WhatsAble Integration with Zapier

Automate your WhatsApp messaging workflows with Zapier and WhatsAble
WhatsAble lets you automate WhatsApp messaging through your favorite workflow automation platforms. This guide walks you through connecting WhatsAble with Zapier to create powerful WhatsApp messaging workflows.
Prerequisites
Before getting started, make sure you have:WhatsAble Account
An active subscription with WhatsAble
Zapier
Access to Zapier workflow automation platform
Get started with WhatsAble
1
Subscribe to WhatsAble
To use the WhatsAble API, you’ll need an active subscription:
- Log in to your WhatsAble dashboard
- Click the Subscribe button
- Start your 7-day free trial
2
Add and verify your phone number
For WhatsAble to send messages through your WhatsApp account: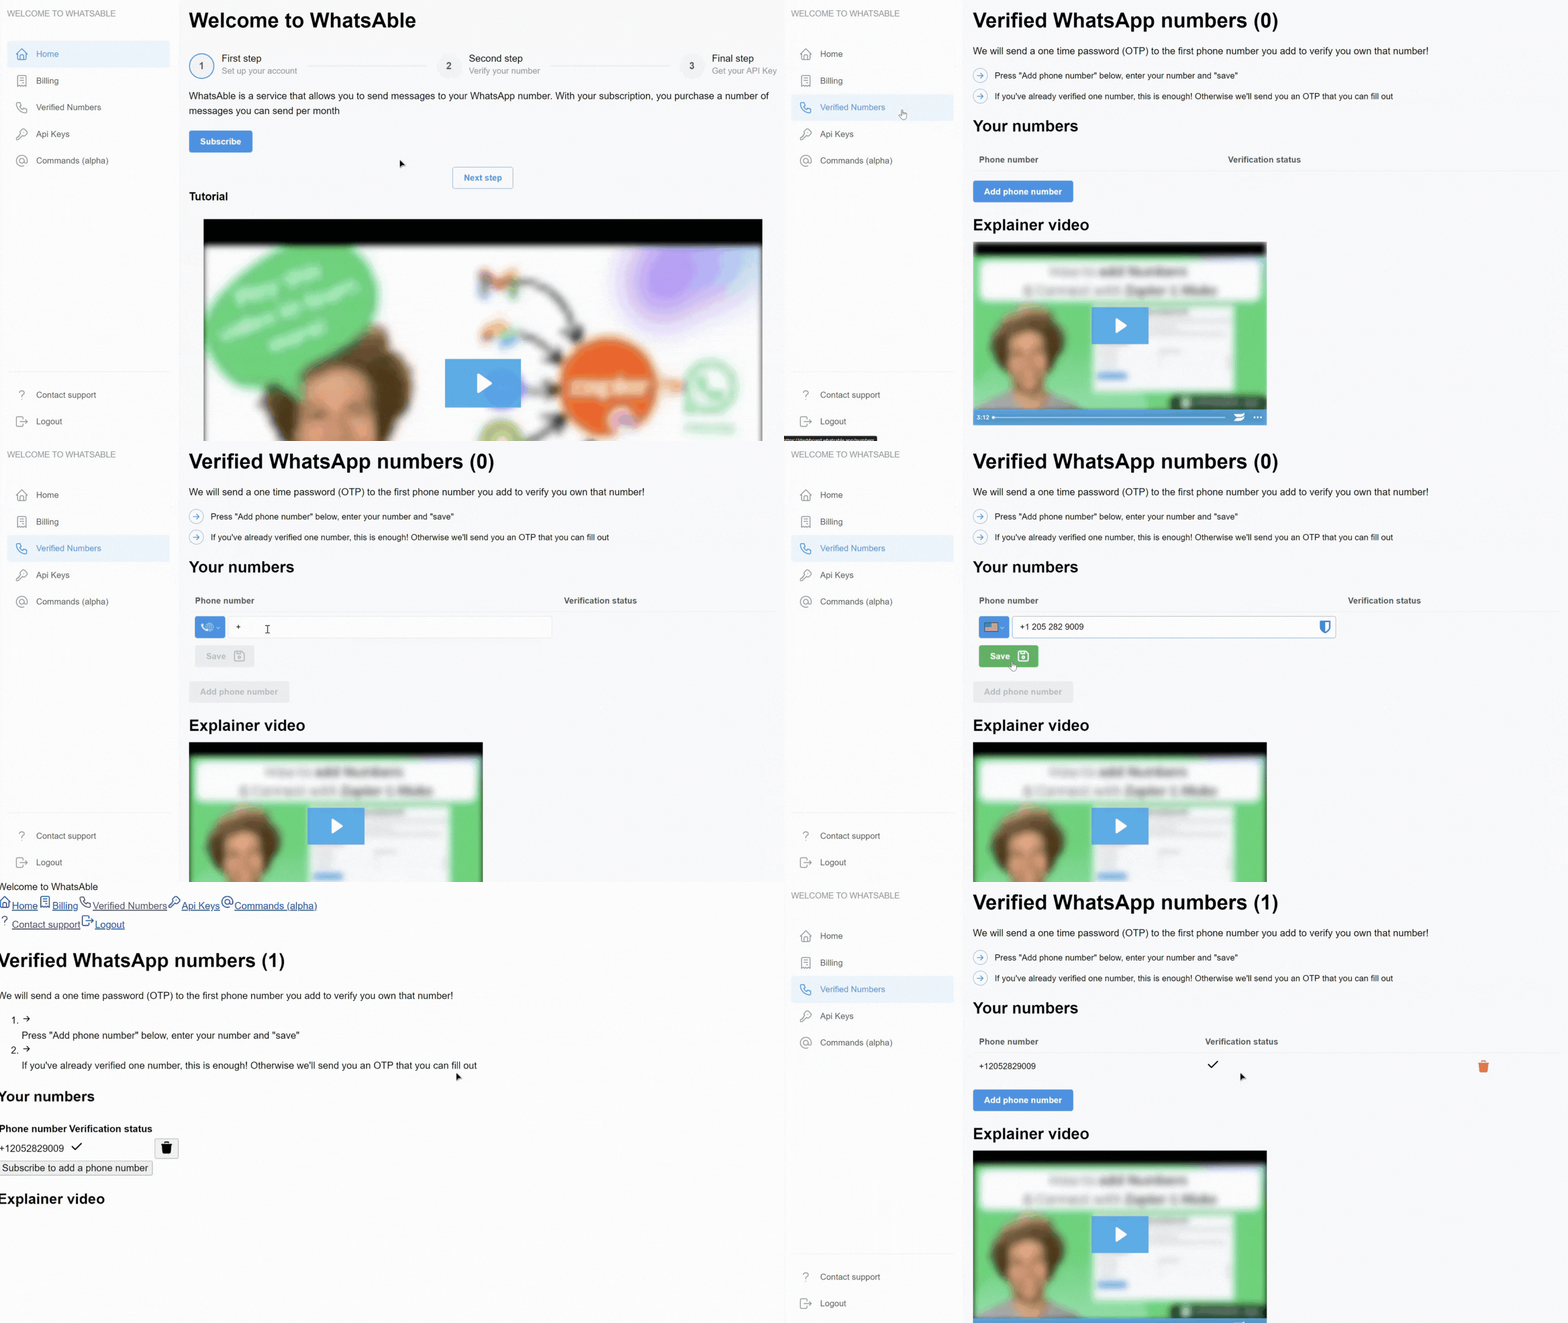
- In your WhatsAble dashboard, navigate to Verified Numbers
- Click Add New Number
- Enter your phone number (with country code)
- You’ll receive a WhatsApp verification code
- Enter the verification code in the WhatsAble dashboard

Adding and verifying a phone number
Multiple numbers? You only need to complete the verification process for your first phone number. For additional numbers, simply add them and save—no verification required.
3
Get your API key
To connect WhatsAble with Zapier, you’ll need your API key: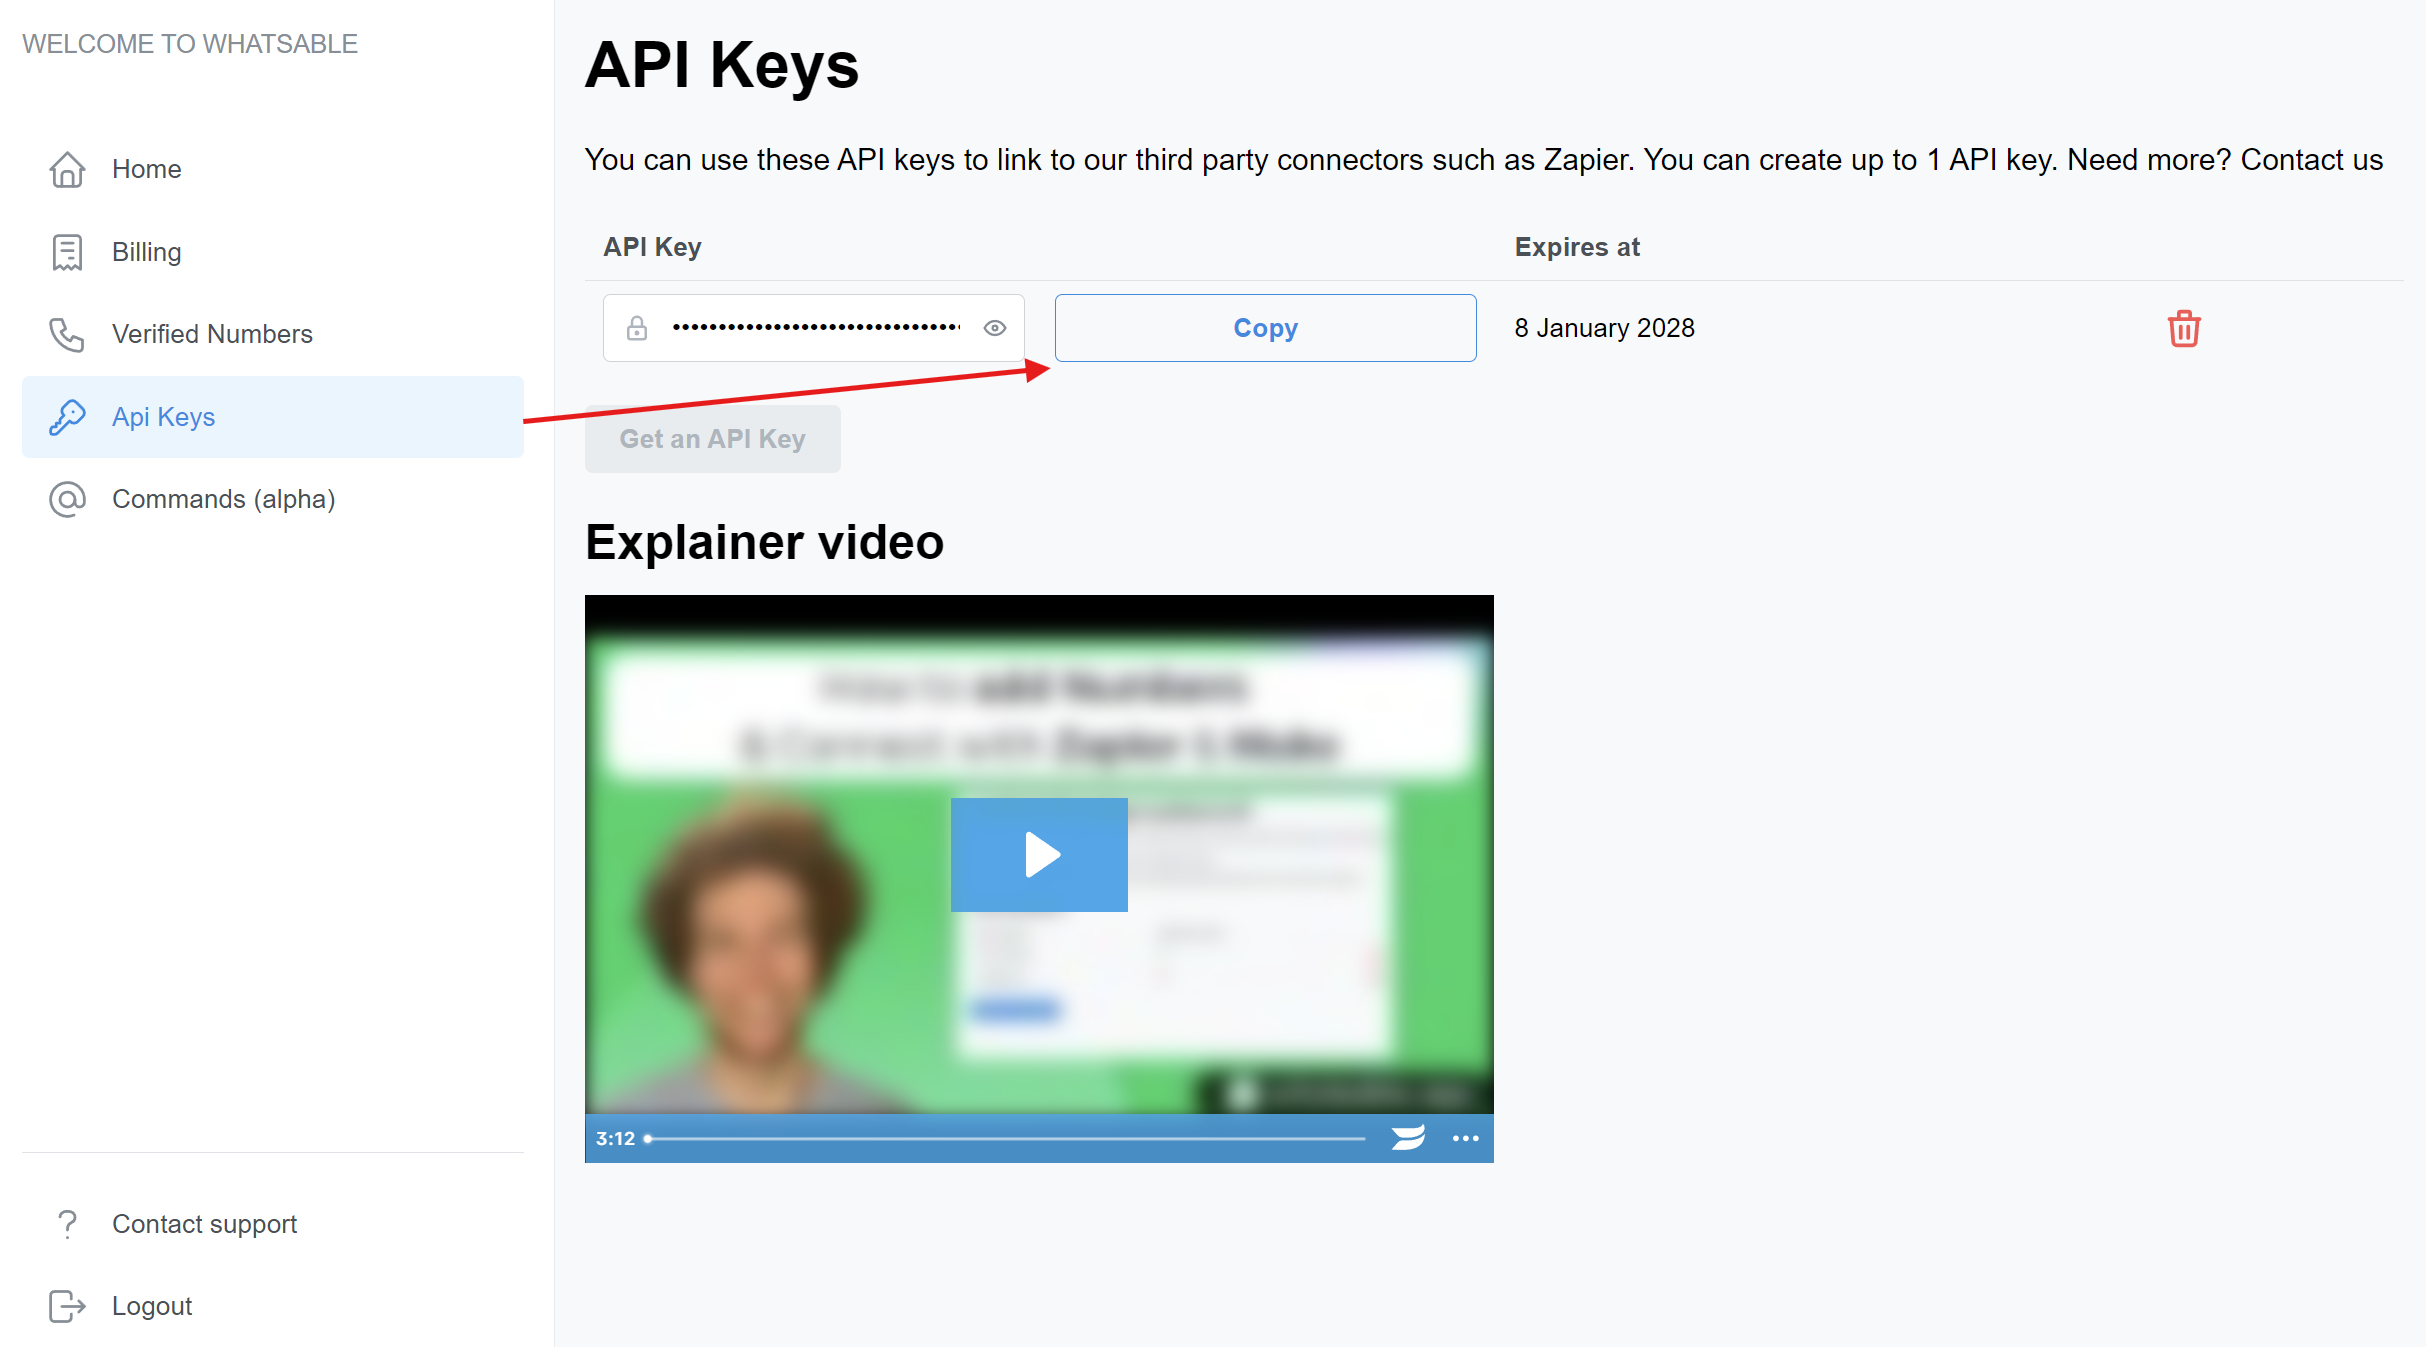
- In your WhatsAble dashboard, go to API Keys
- Copy your unique API key
- Store it securely—you’ll need it for the integration

Connect WhatsAble to Zapier
Now that you have WhatsAble set up, let’s connect it to Zapier to automate your workflows.1
Set up your Zapier Zaps
- Log in to your Zapier account
- Create a new Zap by clicking + Create and select Zaps/New Zap
- Add a trigger step of your choice:
- Popular triggers include Google Forms, Jotform, ClickUp, or a Schedule trigger
- Connect and configure your trigger according to your use case
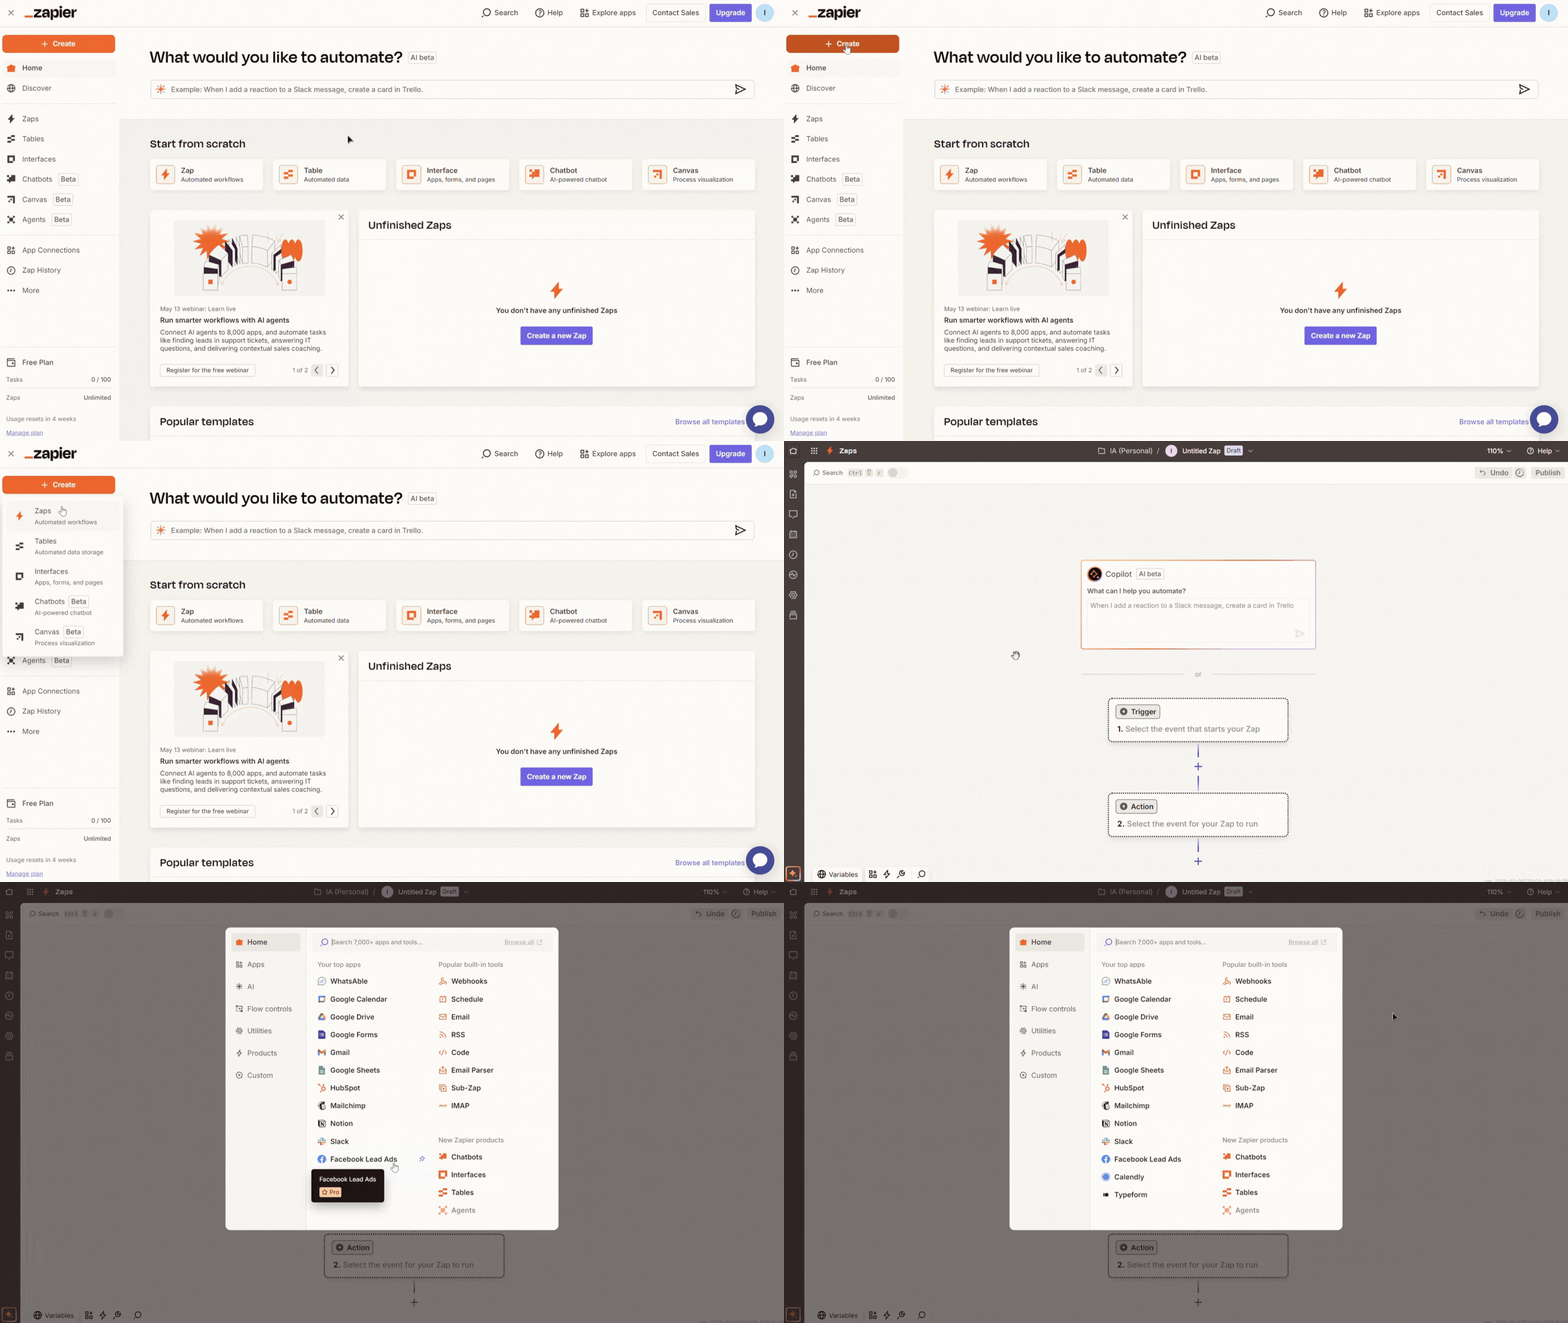
Setting up Zapier Zaps
2
Add the WhatsAble app
- Select the next Action step or click the + button to add a new step
- Search for “WhatsAble” in the apps and tools library
- Select the app with the official WhatsAble logo
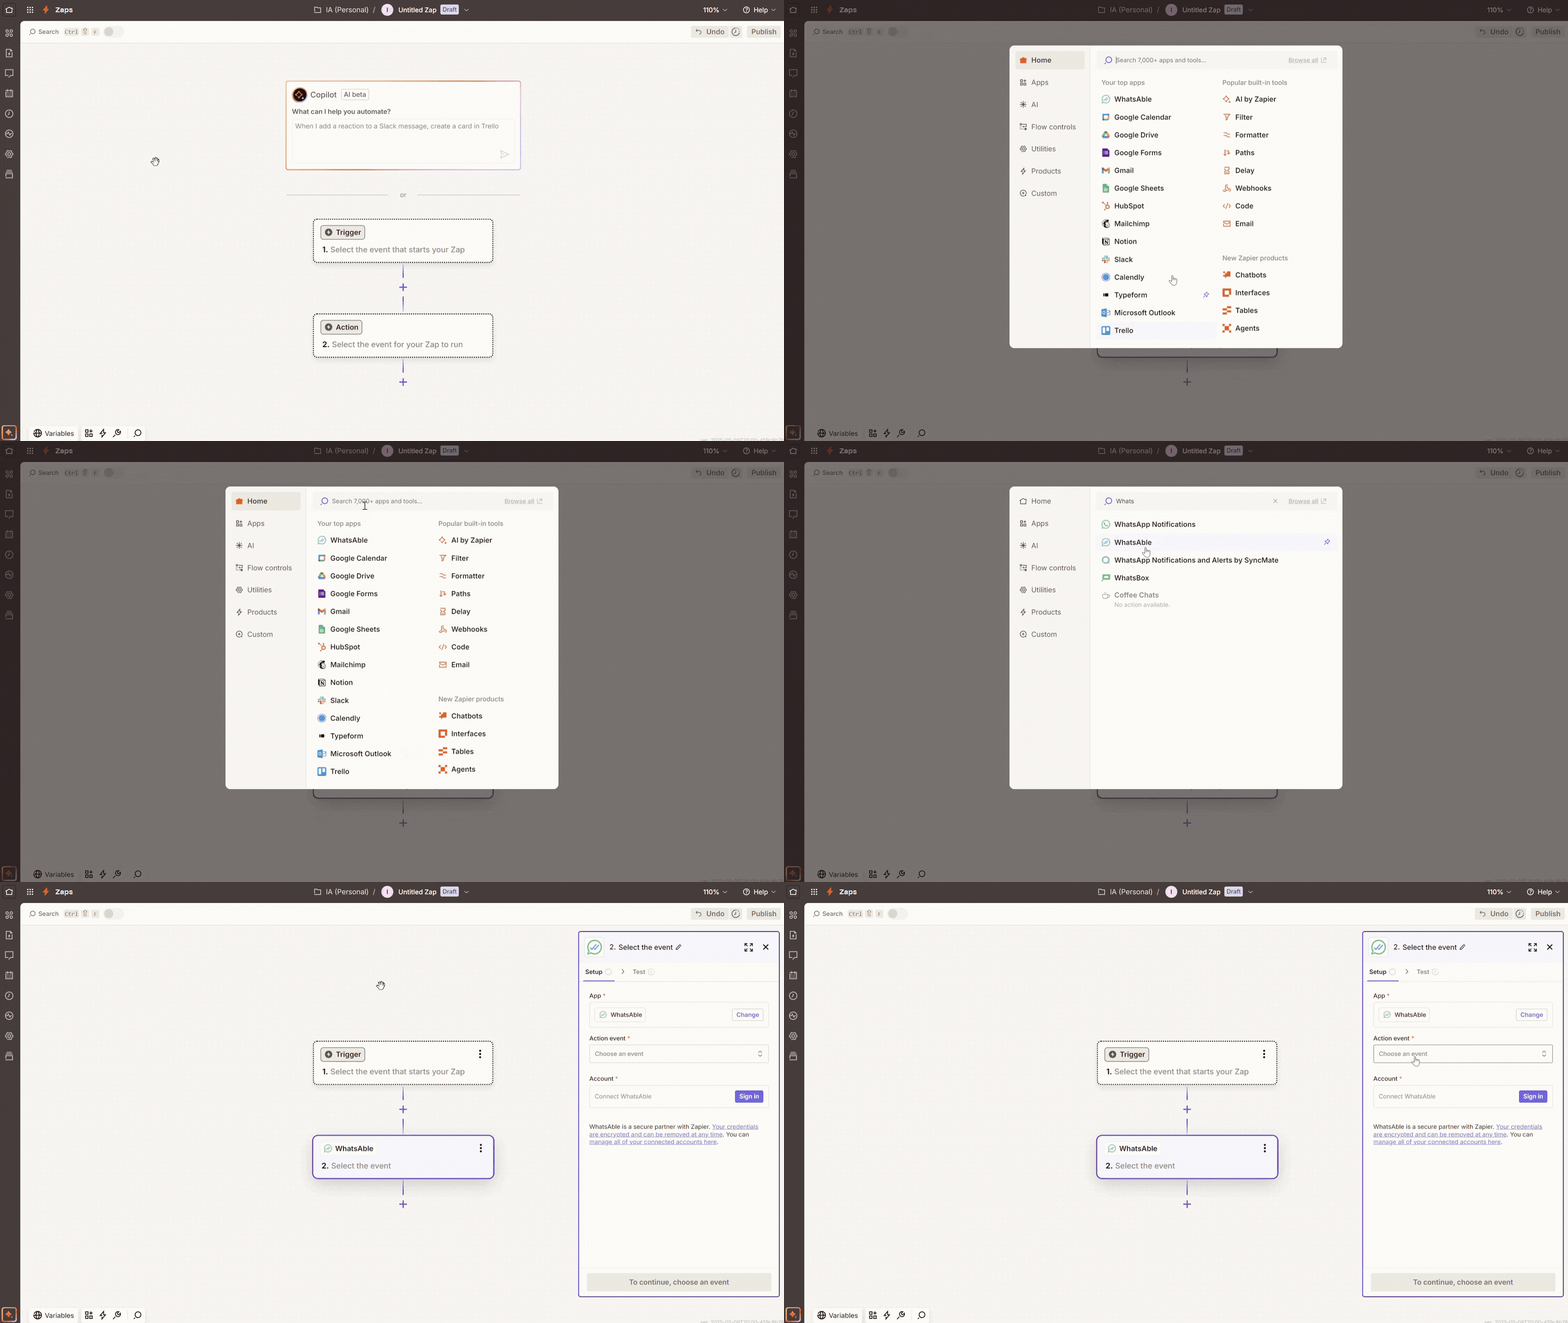
Adding the WhatsAble app
3
Configure WhatsAble credentials
Credential Setup
Credential Setup
- In the WhatsAble app Setup, select Send WhatsApp Message in the Action event dropdown
- Click Sign In in the Account field and you will be prompted to enter your API Key
- Enter your WhatsAble API key that you copied earlier
- Click Yes, Continue to WhatsAble to store your credential
- Next, click the Continue button in the Setup screen to proceed to the Configure section
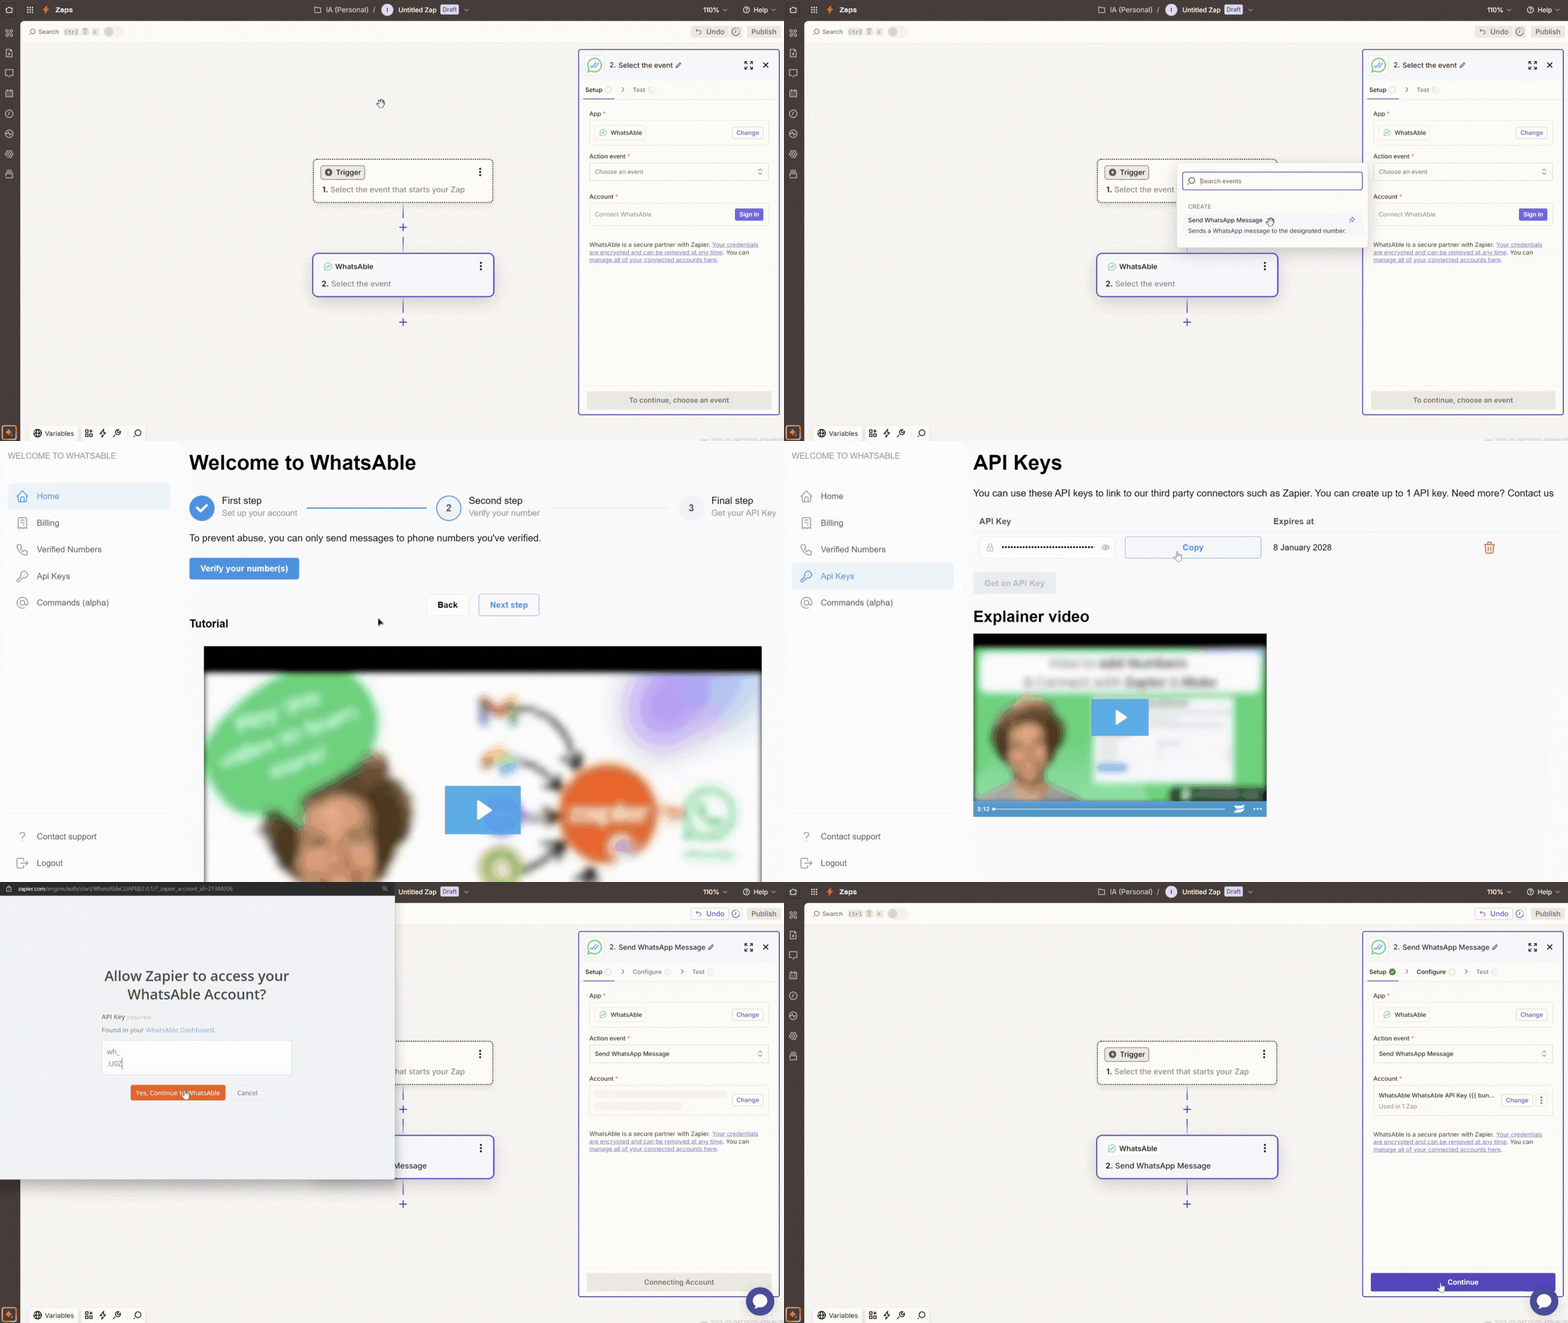
Configuring WhatsAble credentials
4
Configure your message
Complete the required fields: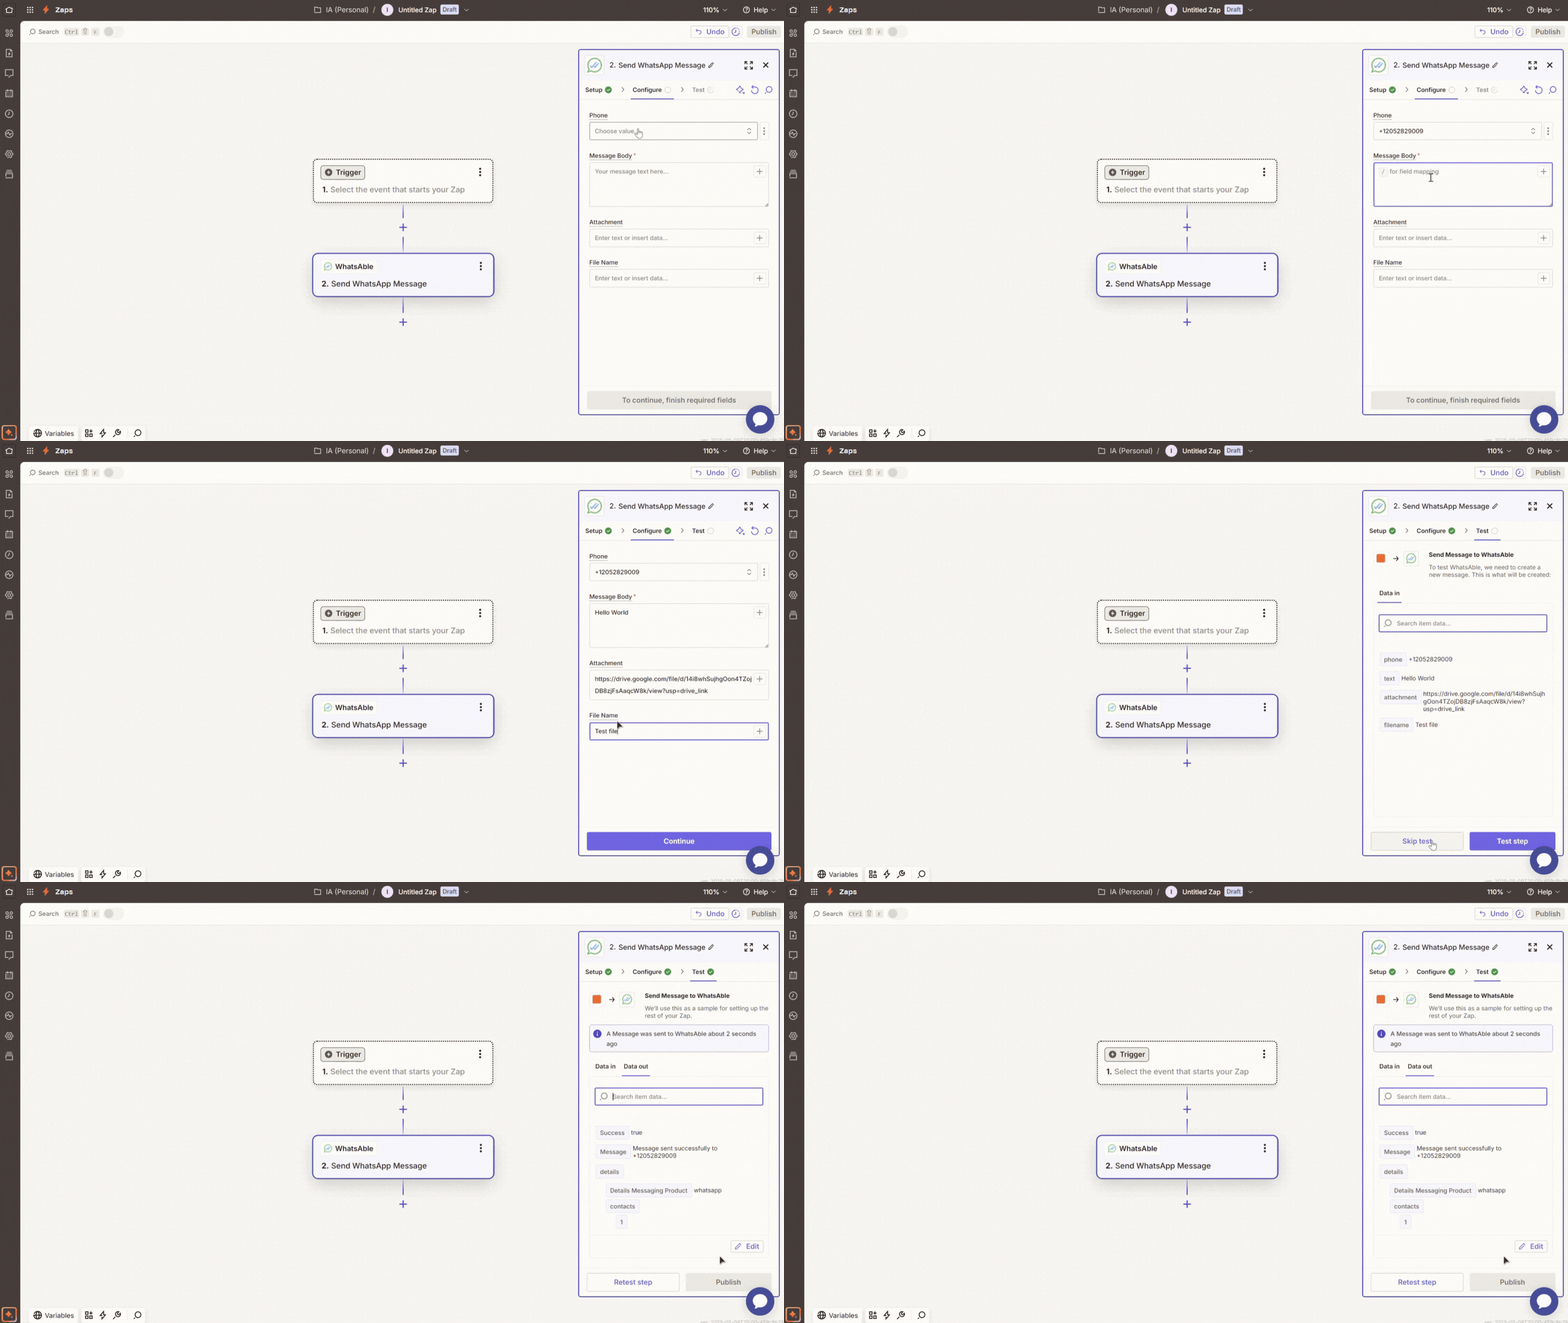
Select the recipient’s phone number (In the Phone dropdown, you’ll see all phone numbers added in your WhatsAble dashboard’s Verified Numbers menu.)
Type your message text or use variables from previous steps
Enter public URL of a file, image, or video to send with your message
Specify a custom filename for your attachment

Configuring message
5
Test and activate your Zap
- Click Continue and then click Test step in the Test to verify it’s working correctly
- If the test is successful, you’ll see a confirmation message
- Click Publish to save your entire Zap
- Toggle the Active switch in the top-left corner to activate your Zap
Example use cases
Customer Onboarding
Send a welcome message when a new customer signs up
Order Notifications
Update customers when their order status changes
Appointment Reminders
Automatically send reminders before scheduled appointments
Lead Follow-up
Send personalized messages to new leads from your form submissions
Support Ticket Updates
Notify customers when their support ticket status changes
Workflow Diagram
Sample WhatsAble Zapier Zap
Troubleshooting
Message not being sent?
Message not being sent?
1
Verify Account Active
Verify that your WhatsAble account is active.
2
Phone Number Verification
Check that your phone number is properly verified.
3
API Key in Zapier
Ensure your API key is entered correctly in Zapier.
4
Recipient Number Format
Confirm that the recipient’s phone number is in the correct format (including country code).
File attachments not working?
File attachments not working?
1
File Size Limit
Check that the file size is under 16 MB.
2
Supported File Type
Verify the file type is supported by WhatsApp.
3
Accessibility
Ensure the file path or URL is accessible.
Need help?
Our support team is ready to assist you:Email support
Contact [email protected]
Schedule a demo
Book a personalized walkthrough
Live chat
Click the chat button in the bottom right corner of the WhatsAble dashboard
For additional automation platform integrations (Make.com, n8n, etc.), please contact our support team or check our integration documentation.