Notifier Integration with Make

Notifier enables you to send automated WhatsApp messages through your favorite scenario automation tools. This guide walks you through integrating Notifier with Make to create powerful messaging scenarios
Prerequisites
Before getting started, make sure you have:Notifier Account
Active Notifier account with a subscription plan (Monthly or Pay-as-you-go)
Make Account
Access to Make scenario automation platform
Set up your Notifier account
Configure your business information
First, let’s set up your business profile in Notifier: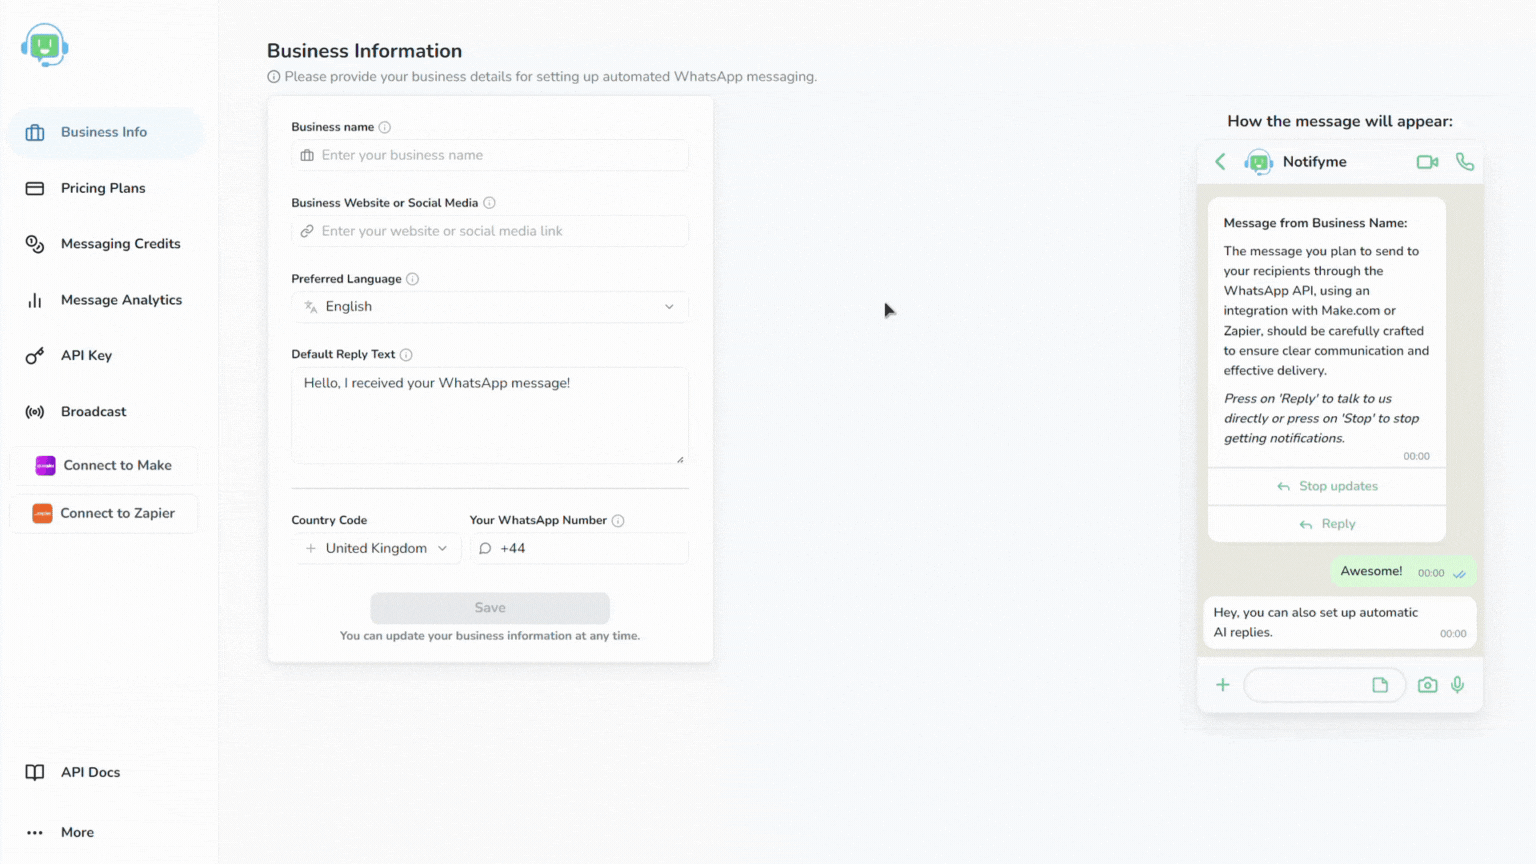
- Log in to your Notifier dashboard
- Navigate to Business Information
- Complete all required fields:
- Business Name: Enter the name that will appear in messages sent to recipients
- Business Website or Social Media: Add your website or social media URL
- Preferred Language: Select the language for standard WhatsApp message elements
- Default Reply Text: Create a template message that appears when recipients click “Reply”
- WhatsApp Number: Add your business WhatsApp number where replies will be directed
After entering your WhatsApp number, Notifier will send a verification code to this number. Enter the code to verify ownership.
Connect Notifier to Make
Now that you have Notifier set up, let’s connect it to Make to automate your scenarios.Connect Notifier to Make
- Log in to your Make account
- Navigate to Notifier dashboard and select Connect to Make in the side menu
- Click Continue in the connection guide popup
- Click Install, select your organization at the bottom of the screen, then click Install again. (Note: You need Admin, Owner, or App Developer role in your organization to install apps.)
You’re now ready to create scenarios with the Notifier app
Set up your Make Scenario
- Log in to your Make account
- Create a new scenario by clicking + Create a new scenario
- (Optional) Add a trigger module of your choice:
- Popular triggers include Google Forms, Jotform, ClickUp, or a Schedule trigger
- Connect and configure your trigger according to your use case
Add the Notifier module
- Click the + button to add a new module
- Search for Notifier WhatsAble in the apps or modules library
- Select the module with the official Notifer logo
Configure Notifier credentials
Credential Setup
Credential Setup
- Once you click on Notifier module, select Send a WhatsApp Message from the ACTIONS
- Click Create a connection in the Connection section of Notifier module and you will be prompted to enter your API Key
- Enter your Notifier API key that you copied earlier
- Rename your connection name if needed
- Click Save to store your credential
Configure your message
Complete the required fields:
Enter the recipient’s phone number (with country code) or use dynamic data from previous module (Make sure that the phone number is valid and that you are only sending to one phone number per step.)
Type your message text or use variables from previous module
Test and activate your scenario
- Click Save to save your message configuration
- Right click on the WhatsAble module and select Run this module only to verify the module is working correctly
- or click Run once in the bottom-left corner of the screen to test the entire scenario
- If the test is successful, you’ll see a confirmation message
- Click Save icon in the bottom-left corner to save your scenario (You can also set timer intarval for the scenario)
- Toggle the Active switch in the bottom-left corner with time to activate your scenario
Example use cases
Customer Onboarding
Send a welcome message when a new customer signs up
Order Notifications
Update customers when their order status changes
Appointment Reminders
Automatically send reminders before scheduled appointments
Lead Follow-up
Send personalized messages to new leads from your form submissions
Support Ticket Updates
Notify customers when their support ticket status changes
Scenario Diagram
Best practices
For optimal results when using Notifier with Make:Personalize your messages
Personalize your messages
Use data from previous modules in your workflow to create personalized, relevant messages for each recipient.
Keep messages concise
Keep messages concise
Focus on a single call-to-action and keep your messages brief to maintain recipient engagement.
Test thoroughly
Test thoroughly
Always run complete tests of your workflow before deploying to production to catch any potential issues.
Monitor performance
Monitor performance
Regularly check your Notifier dashboard to monitor delivery rates and optimize your messaging strategy.
Respect privacy
Respect privacy
Always provide clear opt-out instructions and respect recipient preferences regarding messaging.
Troubleshooting
Message not being sent?
Message not being sent?
Need help?
Our support team is ready to assist you:Email support
Contact team@whatsable.app
Schedule a demo
Book a personalized walkthrough
Live chat
Click the green chat button in the bottom right corner of the Notifier dashboard
For additional automation platform integrations (Zapier, n8n, etc.), please contact our support team or check our integration documentation.