Notifier Integration with n8n

Notifier enables you to send automated WhatsApp messages through your favorite workflow automation tools. This guide walks you through integrating Notifier with n8n to create powerful messaging workflows
Prerequisites
Before getting started, make sure you have:Notifier Account
Active Notifier account with a subscription plan (Monthly or Pay-as-you-go)
n8n Account
Access to n8n workflow automation platform
Set up your Notifier account
Configure your business information
First, let’s set up your business profile in Notifier: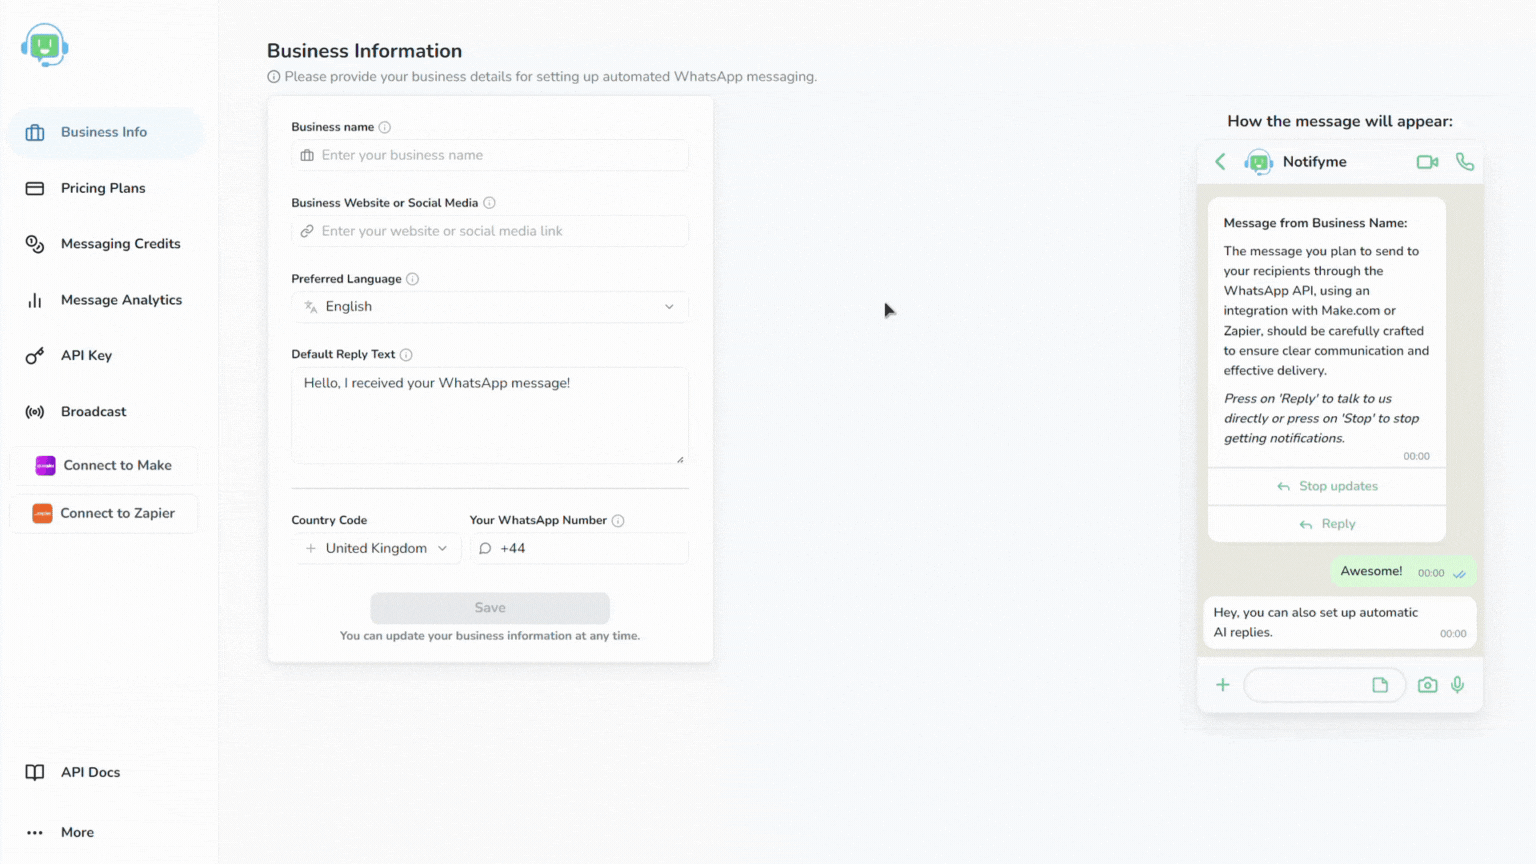
- Log in to your Notifier dashboard
- Navigate to Business Information
- Complete all required fields:
- Business Name: Enter the name that will appear in messages sent to recipients
- Business Website or Social Media: Add your website or social media URL
- Preferred Language: Select the language for standard WhatsApp message elements
- Default Reply Text: Create a template message that appears when recipients click “Reply”
- WhatsApp Number: Add your business WhatsApp number where replies will be directed
After entering your WhatsApp number, Notifier will send a verification code to this number. Enter the code to verify ownership.
Connect Notifier to n8n
Now that you have your Notifier account configured, let’s connect it to n8n to automate your messaging workflows.Set up your n8n workflow
- Log in to your n8n account
- Create a new workflow/Zap by clicking + Create
- Add a trigger node of your choice:
- Popular triggers include Google Forms, Jotform, ClickUp, or a Schedule trigger
- Connect and configure your trigger according to your use case
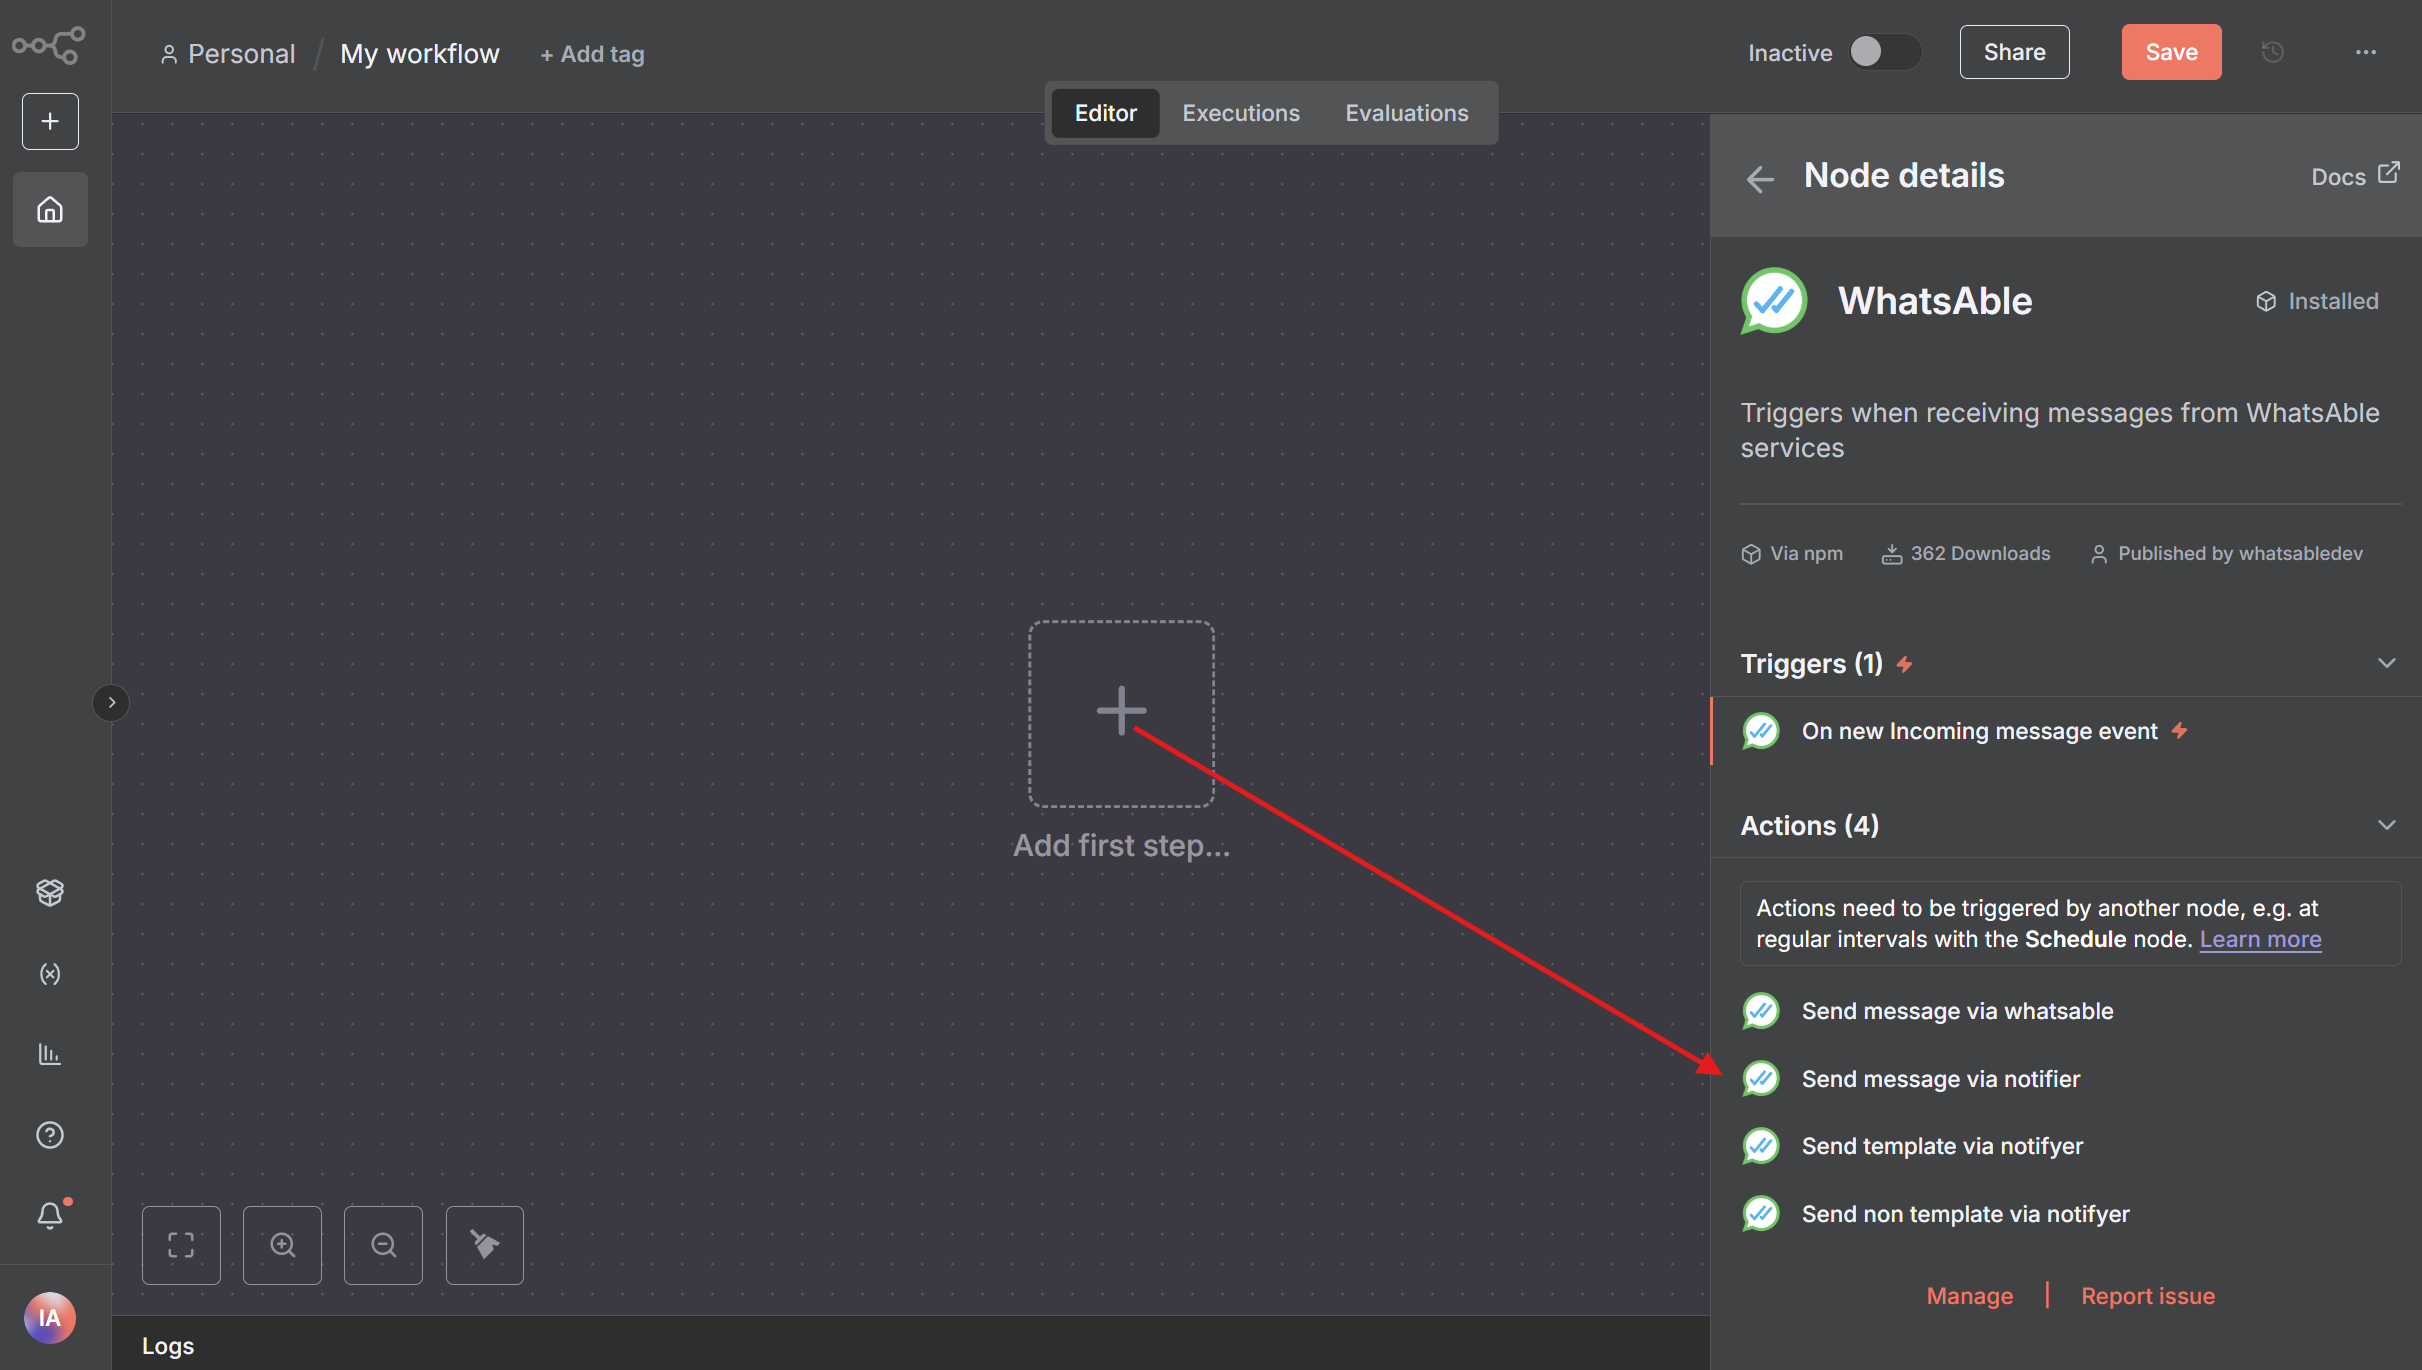
WhatsAble trigger node (optional)
WhatsAble trigger node (optional)
The WhatsAble trigger node enables your workflow to respond automatically to incoming WhatsApp messages. This setup is optional but recommended for building reactive communication flows.
Add WhatsAble trigger node
Follow these steps to add the WhatsAble trigger node to your workflow: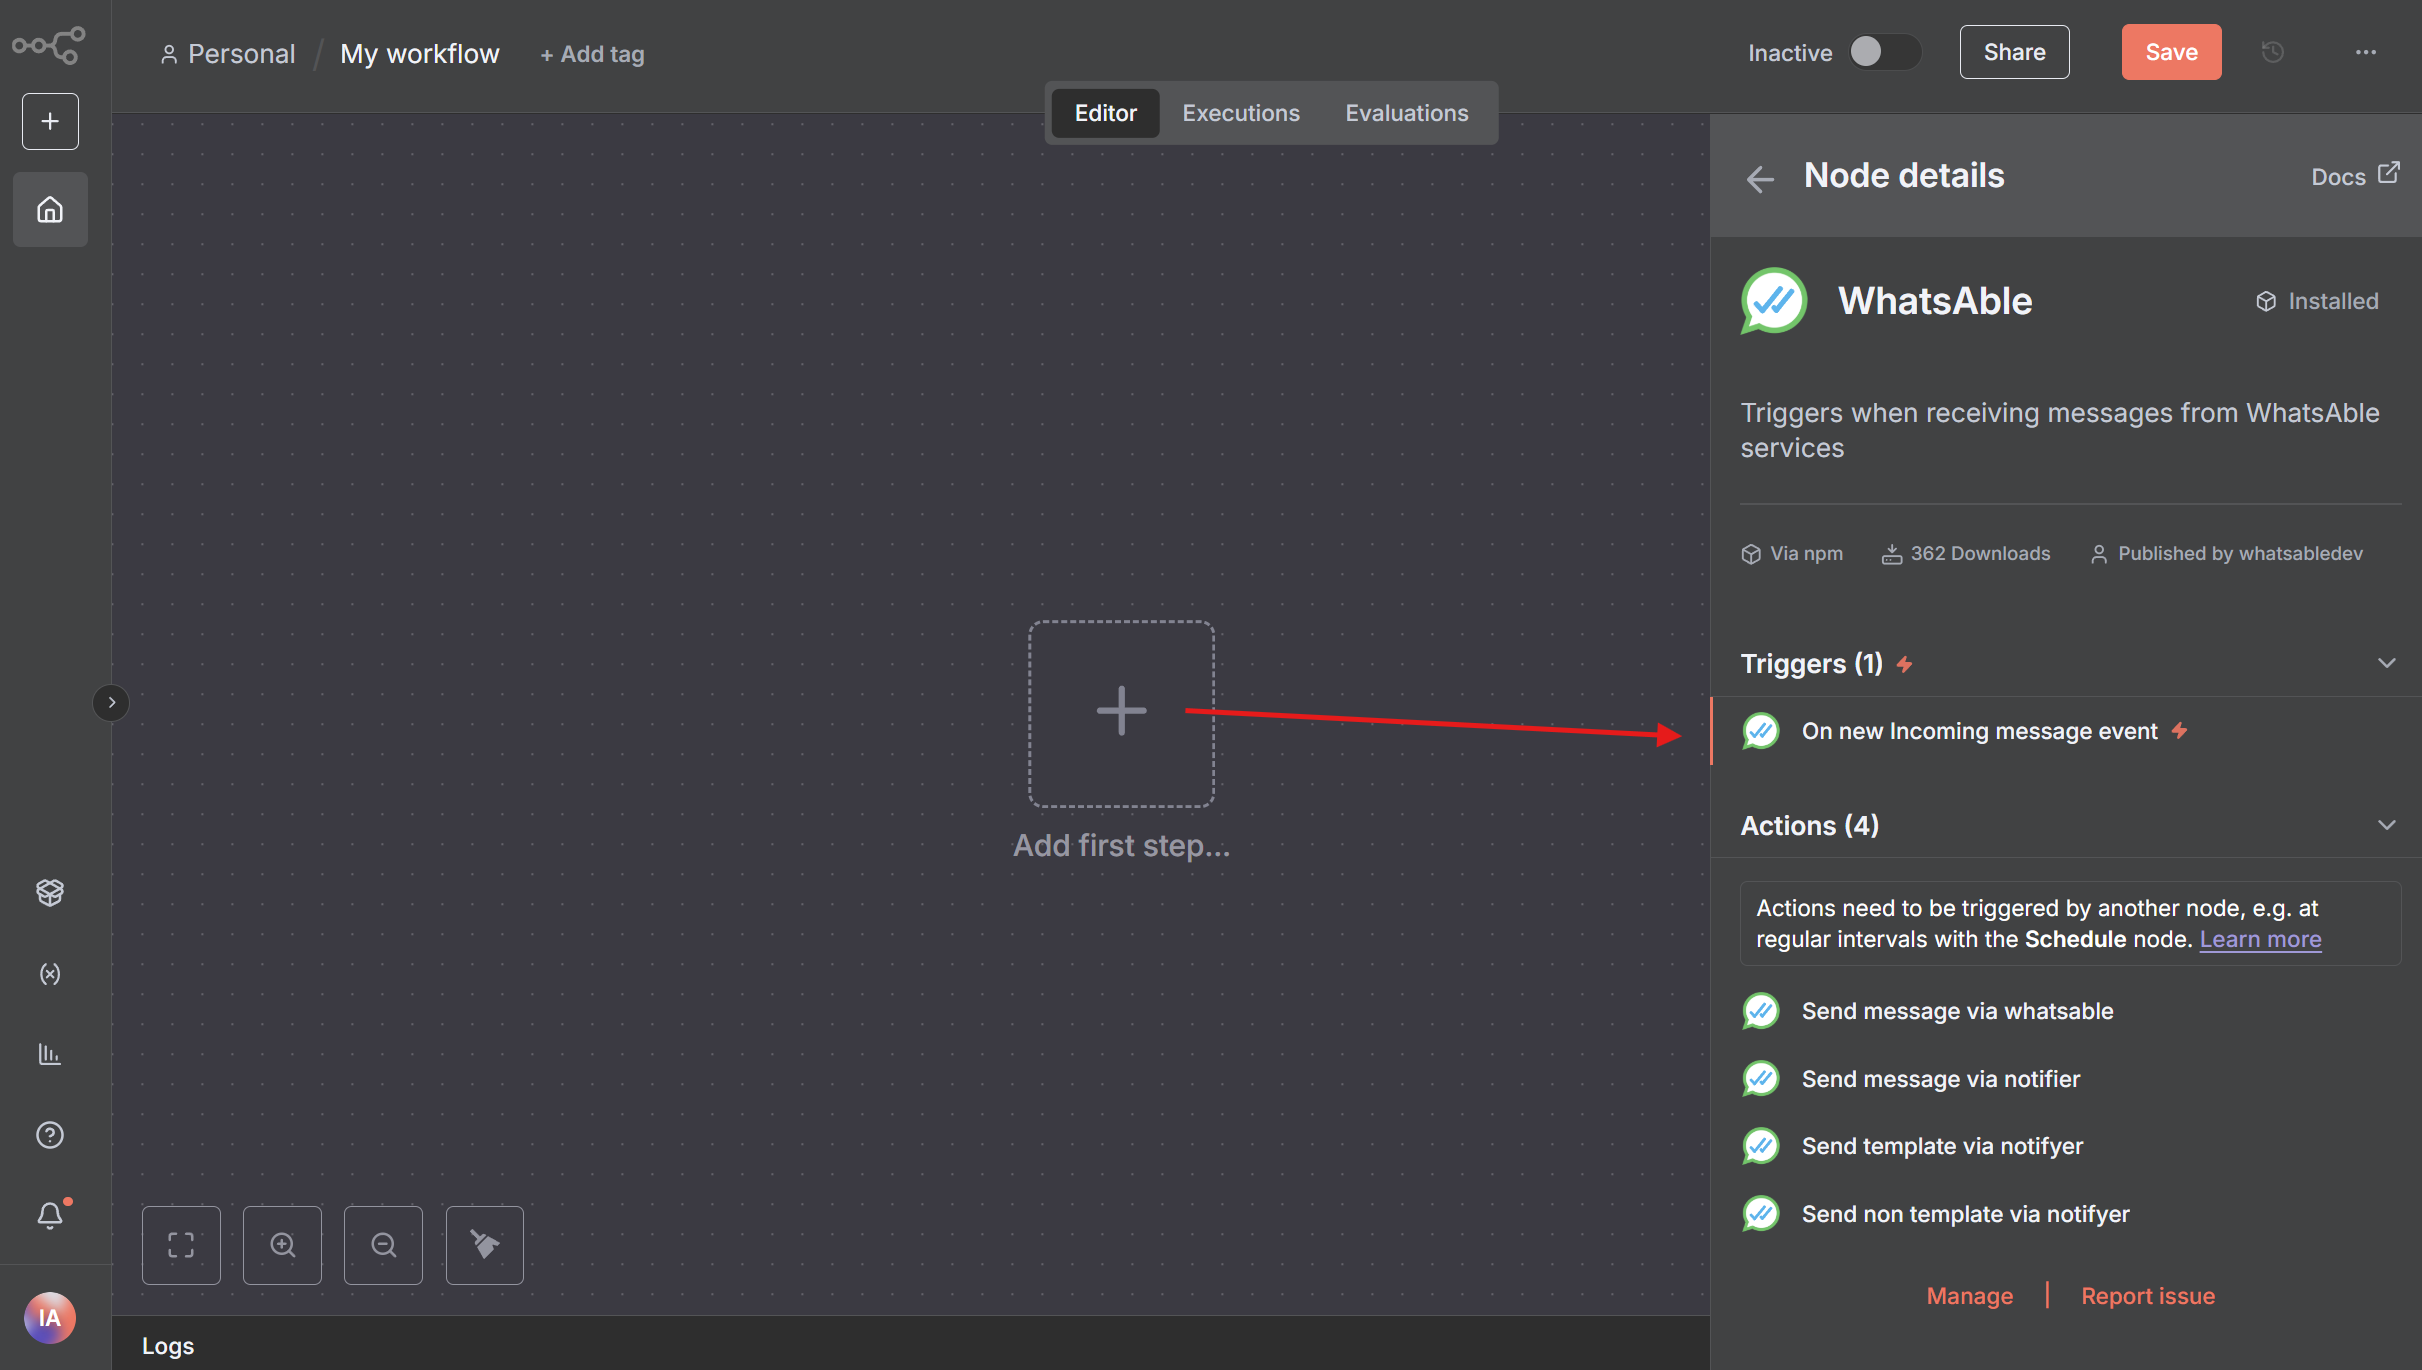
- Click the + button in your workflow canvas to add a new node
- Search for “WhatsAble” in the node library search bar
- Select the node displaying the official WhatsAble logo
- From the available trigger options, choose On new Incoming message event
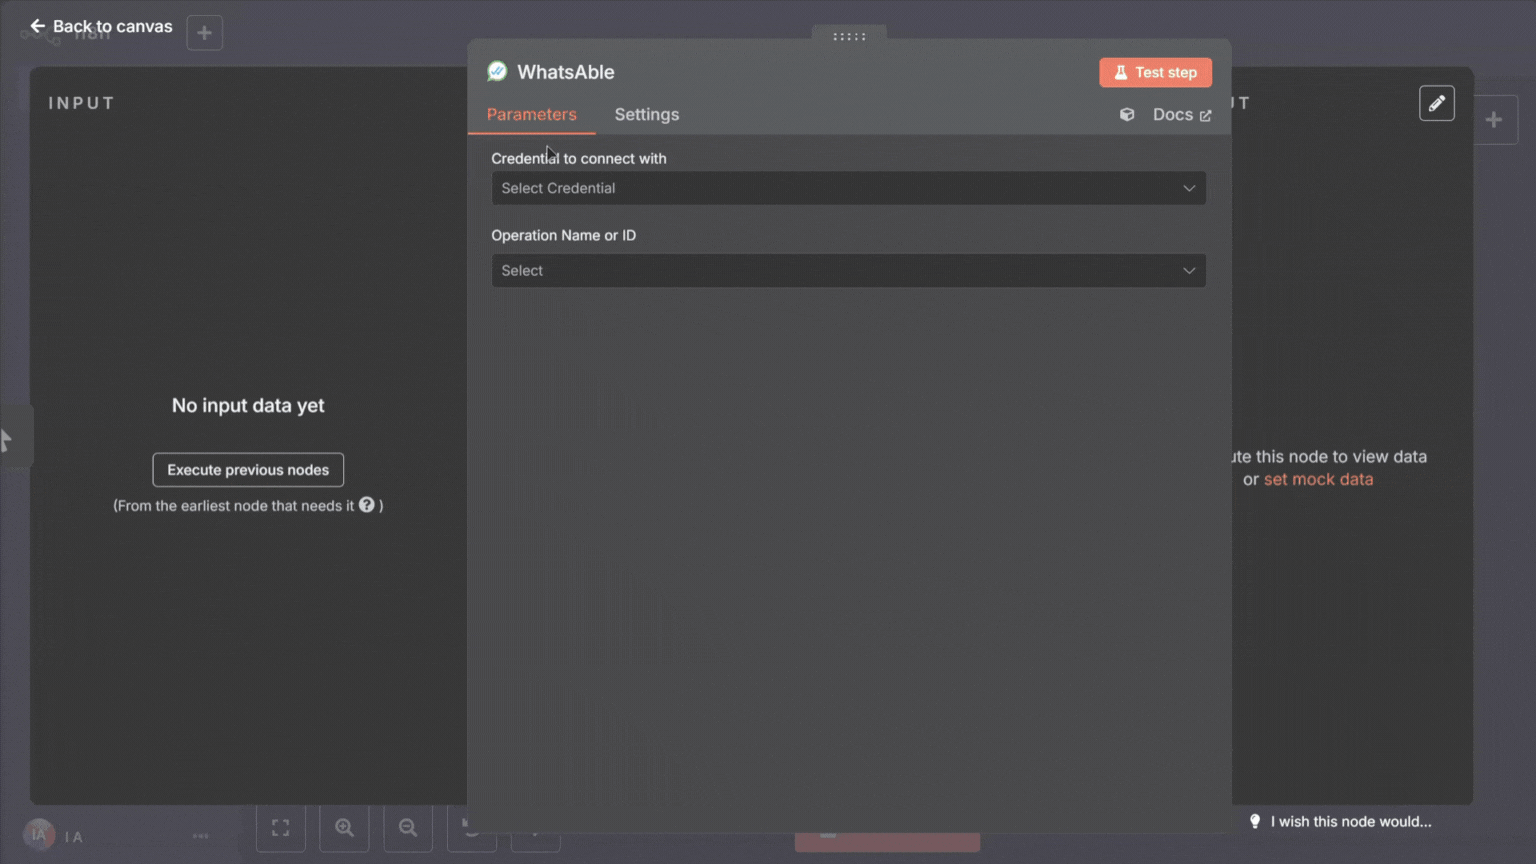
Configure authentication credentials
Set up your WhatsAble API credentials to establish a secure connection:Webhook URL Configuration: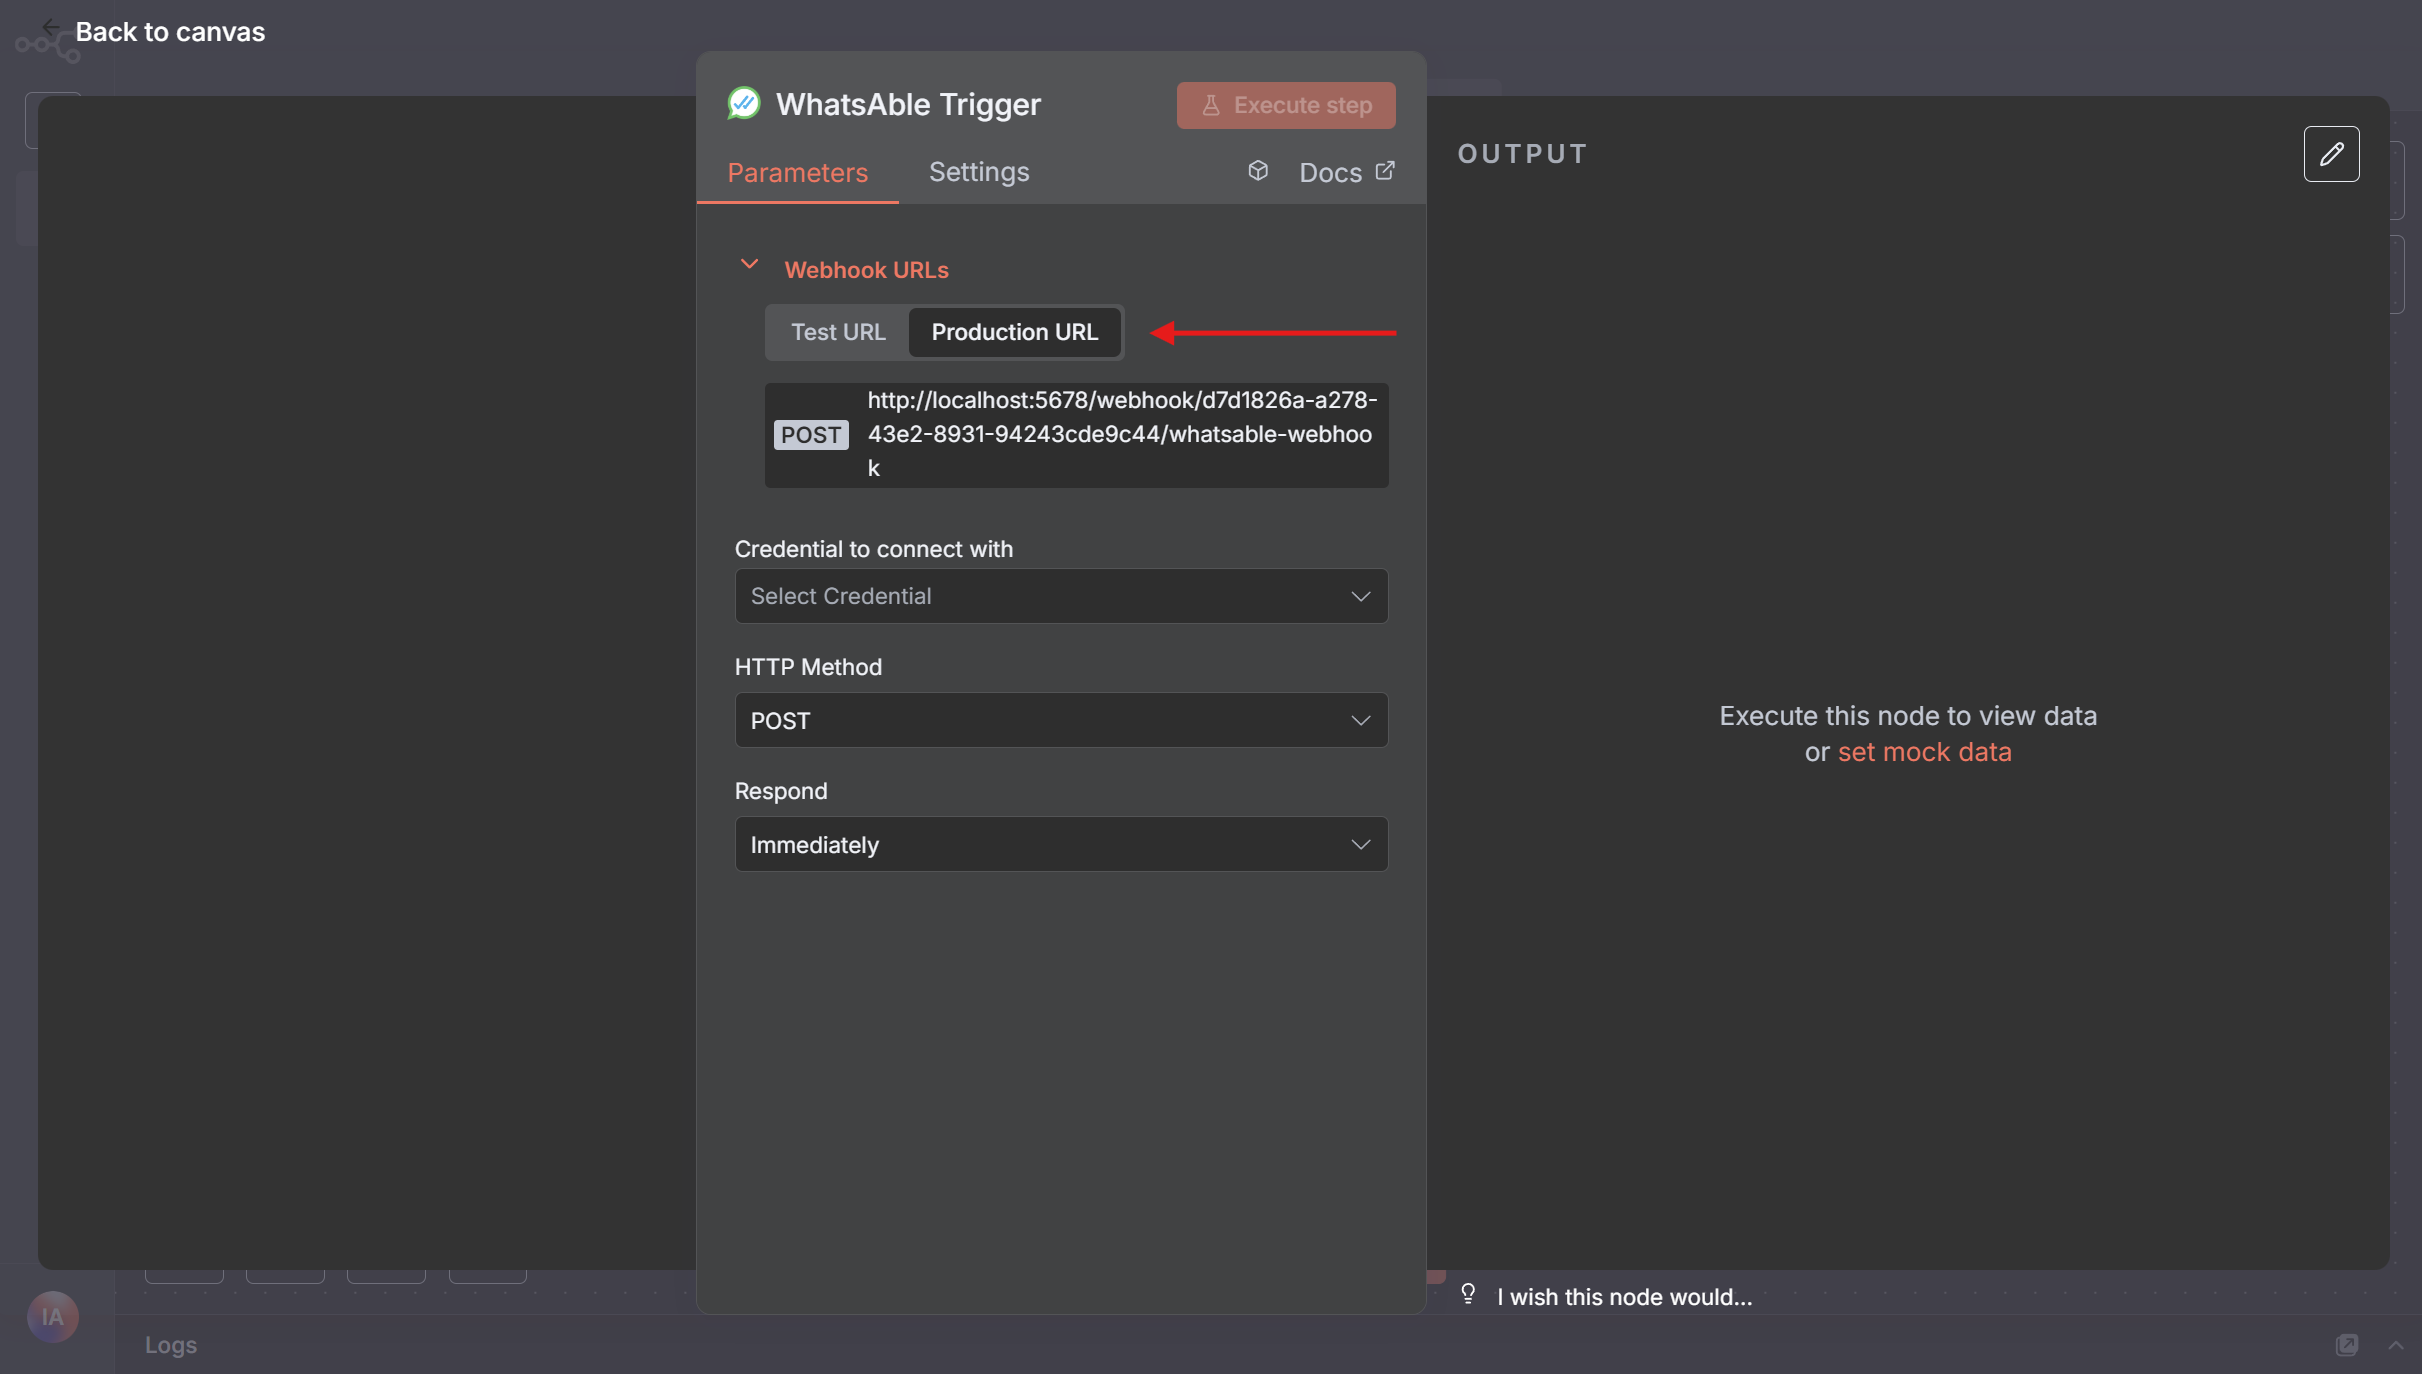
- In the WhatsAble Trigger node parameters, locate the Webhook URLs section at the top
- Select Production URL and copy the generated URL by clicking on it
- Store this URL securely as you’ll need it for the credential setup
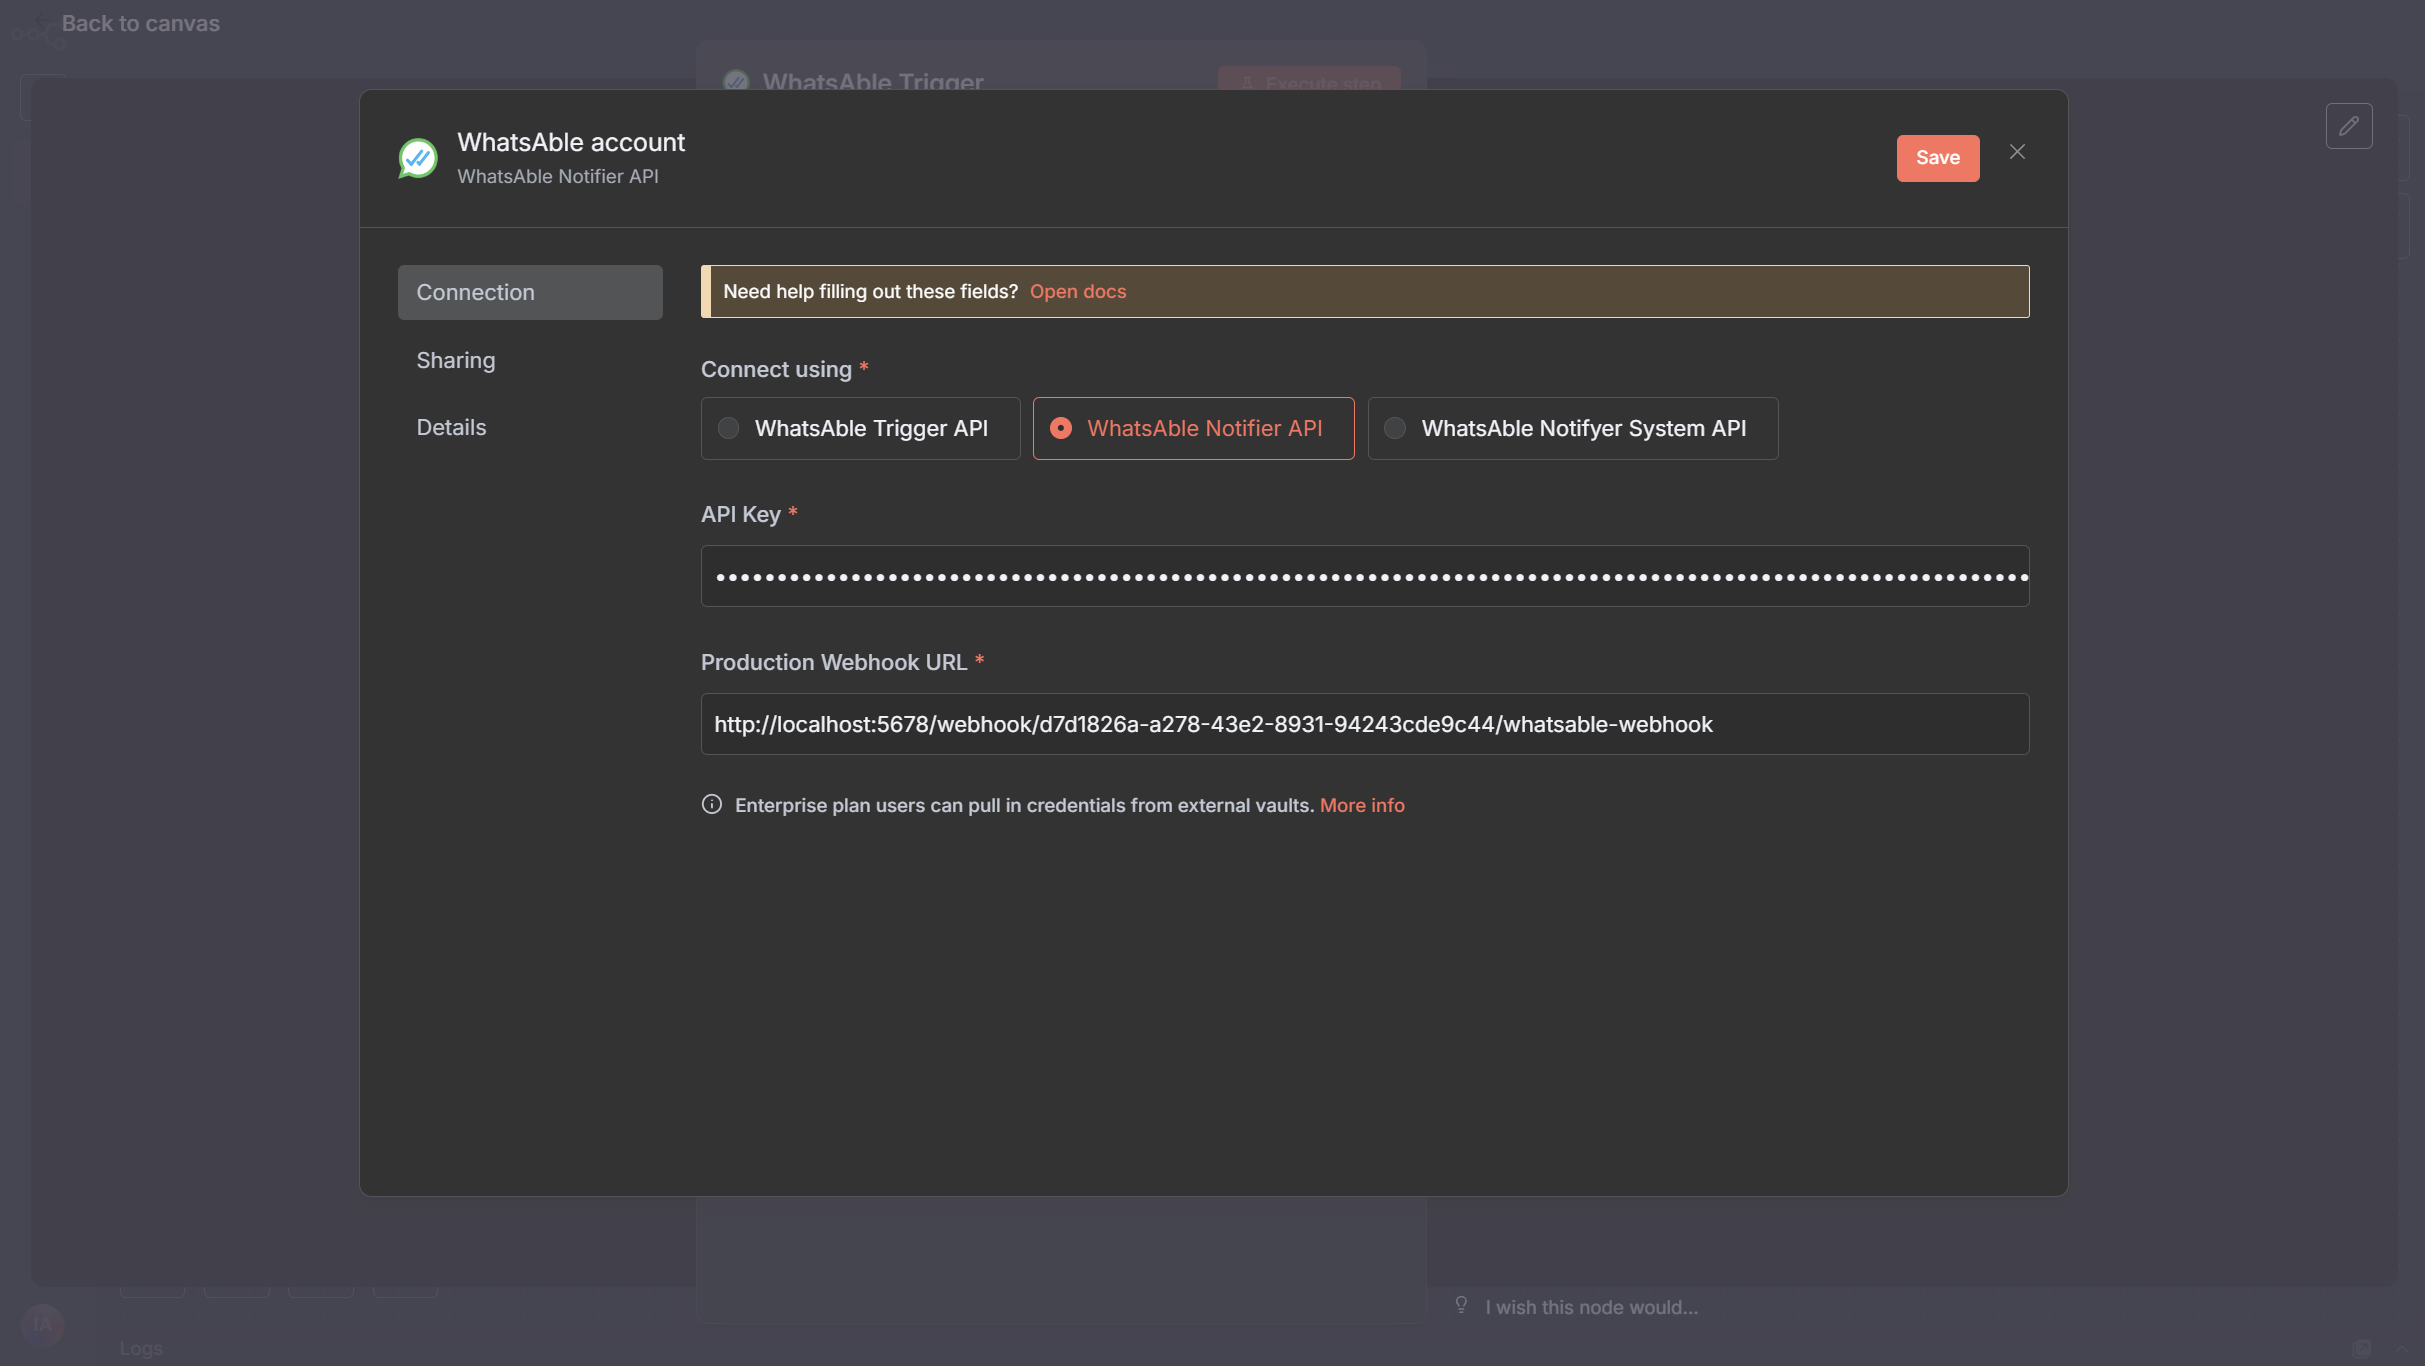
- In the Credential to connect with dropdown, click + Create new credential
- Select WhatsAble Notifier API as your connection method
- Enter your Notifier by WhatsAble API key in the API Key field
- Paste the Production URL you copied earlier into the Production URL field
- Assign a descriptive name to your credential (e.g., “WhatsAble Production”)
- Click Save to securely store your credentials
Your API credentials are encrypted and stored securely. Never share your API key publicly or commit it to version control.
Test and activate workflow
Complete the setup by testing and activating your trigger:Response Configuration:
- In the Respond dropdown, select your preferred response timing:
- Immediately: Responds as soon as the trigger fires
- When Last Node Finishes: Waits for the entire workflow to complete before responding
- Click Execute step on the WhatsAble node to run a test
- Verify the connection is working by checking for a success confirmation
- Review any error messages if the test fails and adjust your configuration accordingly
Once activated, your workflow will automatically process incoming messages according to your configured logic.
Add the WhatsAble node
- Click the + button to add a new node
- Search for “WhatsAble” in the node library
- Select the node with the official WhatsAble logo
- After selecting the WhatsAble node, choose ‘Send message via notifier’ from the available actions menu
Configure Notifier credential
- In the WhatsAble node Parameters, find the Credential to connect with dropdown
- Select + Create new credential
- Enter your Notifier API key that you copied earlier
- Name your credential (e.g., “Notifier Production”)
- Click Save to store your credential
Configure your message
- In Resource dropdown, select Send Message
- In the Operation dropdown, select Send Message Via Notifier
- Complete the required fields:
Enter the recipient’s phone number (with country code) or use dynamic data from previous nodes
Type your message text or use variables from previous nodes
Test and activate your workflow
- Click Test Step on the Notifier node to verify it’s working correctly
- If the test is successful, you’ll see a confirmation message
- Return to your workflow
- Click Save to save your entire workflow
- Toggle the Active switch in the top-right corner to activate your workflow
Congratulations! Your Notifier and n8n integration is now complete! Your automated messaging workflow is now operational! Whenever your trigger conditions are met, n8n will automatically send WhatsApp messages through Notifier.
Example workflows
Here are some powerful automation workflows you can build with Notifier and n8n:Lead Nurturing
Send personalized WhatsApp messages to new leads who fill out your contact form
Order Confirmations
Automatically notify customers when their order is placed, shipped, or delivered
Event Reminders
Send timely WhatsApp reminders before scheduled events or appointments
Customer Feedback
Request feedback via WhatsApp after a customer interaction or purchase
Support Ticket Updates
Keep customers informed about the status of their support requests
Workflow Diagram
Best practices
For optimal results when using Notifier with n8n:Personalize your messages
Personalize your messages
Use data from previous nodes in your workflow to create personalized, relevant messages for each recipient.
Keep messages concise
Keep messages concise
Focus on a single call-to-action and keep your messages brief to maintain recipient engagement.
Test thoroughly
Test thoroughly
Always run complete tests of your workflow before deploying to production to catch any potential issues.
Monitor performance
Monitor performance
Regularly check your Notifier dashboard to monitor delivery rates and optimize your messaging strategy.
Respect privacy
Respect privacy
Always provide clear opt-out instructions and respect recipient preferences regarding messaging.
Troubleshooting
Message not being sent?
Message not being sent?
Need help?
Our support team is ready to assist you:Email support
Contact team@whatsable.app
Schedule a demo
Book a personalized walkthrough
Live chat
Click the green chat button in the bottom right corner of the Notifier dashboard
For additional automation platform integrations (Make.com, Zapier, etc.), please contact our support team or check our integration documentation.