

Meta WhatsApp Coexistence is supported on Notifyer System. You do not need to delete the WhatsApp Business app or stop using the number on your phone. After Embedded Signup, the same number works in the WhatsApp Business app, the Notifyer chat inbox, and automations (Make, Zapier, n8n, API, and webhooks) at the same time.
Overview
Webhooks are HTTP callbacks that Notifyer sends to your server when a message event occurs. They cover:- Incoming messages — a contact writes to your business
- Outgoing messages — your business sends a message, including:
- Hand-typed replies in the WhatsApp Business app on a phone
- Messages sent from the Notifyer chat inbox (with the teammate’s name)
- Messages sent by Make, Zapier, n8n, the API, or a bot
- Click-to-WhatsApp ads — when the inbound message came from a Facebook, Instagram, or WhatsApp Status ad, a
referralobject identifies the creative, platform, and click (ctwa_clid)
Webhook Configuration
Managing Endpoints
1
Access Webhook Settings
Navigate to the Developer section in your dashboard sidebar to manage webhook configurations.
2
Configure Endpoint
Add a new webhook URL. Enable incoming, outgoing, or both depending on which events your endpoint should receive.
Endpoint Requirements
Your webhook endpoint must:- Accept HTTP POST requests
- Process JSON payloads
- Return a 2xx status code within 10 seconds
- Implement idempotency handling (see best practices below)
Incoming and outgoing WhatsApp messages
Notifyer delivers both incoming and outgoing messages to your webhook or automation trigger — including messages typed by hand in the WhatsApp Business app on your phone. This is possible because Notifyer supports Meta WhatsApp Coexistence. You keep using WhatsApp Business on your phone; those hand-typed replies still reach an external webhook and can start an automation. They are not limited to the Notifyer web inbox.Trigger n8n (or any webhook) from WhatsApp messages — including replies typed in the WhatsApp Business app
Direction, sending system, and team member
Use these three fields to tell what happened and who sent it:boolean
true when a contact sent a message to your business. false when your business sent a message to the contact (outgoing). Filter on this field to run logic only for one direction.string
Which system or person sent an outgoing message:
Empty or omitted on incoming messages.
boolean
true when a person sent the message (WhatsApp Business app or Notifyer chat inbox). false when a bot or automation sent it. Combine with send_by to see both whether a human sent it and which teammate or system did.Example payload: message typed on the phone
This is the JSON Notifyer POSTs when someone types a reply in the WhatsApp Business app.incoming_message is false, send_by is "WhatsApp App", and was_message_by_human is true.
last_message_of_bot is the last message your business sent — whether a human typed it in the WhatsApp Business app or the Notifyer inbox, or a bot/automation sent it. last_messages is a JSON string of the last ~20 messages (parse it before iterating). phone_number may arrive as a number rather than a string.Webhook payload
When a message is received or sent on your connected number, Notifyer sends aPOST request to your endpoint with a JSON body.
Sample payloads
Payload Fields
string | array
required
Recent messages in the conversation (about the last 20). On webhook deliveries this is typically a JSON string — parse it before iterating. Each item includes
type (user or bot), content, timestamp, and content_type. Includes messages from the WhatsApp Business app, the Notifyer inbox, automations, and templates.string
required
Human-readable summary of the recent conversation
string | number
required
WhatsApp number of the contact in this conversation (digits, often without
+). On outgoing events this is the person your business messaged. May arrive as a number or a string.string
The name of the recipient if available
string
required
Unique identifier for the user in your system
string
The last message sent by the user
string
The last message your business sent — whether a human typed it in the WhatsApp Business app or Notifyer inbox, or a bot/automation sent it
string
required
The type of the latest message (text, image, audio, video, document, location)
integer
required
Unix timestamp of the user’s last message
integer
required
Unix timestamp of your system’s last message
string
URL to media file if the latest message contains media (null for text messages)
string
Custom note field for additional context
string
Automation-related notes
string
Comma-separated labels for categorizing the conversation
boolean
required
true when the contact sent this message to your business. false when your business sent it (outgoing). Outgoing events include messages typed in the WhatsApp Business app, sent from the Notifyer chat inbox, or sent by Make, Zapier, n8n, the API, or a bot.string
Which system or person sent an outgoing message.
"WhatsApp App" when typed in the WhatsApp Business app; the logged-in teammate’s name when sent from the Notifyer chat inbox; the automation or app name for Make, Zapier, n8n, API, or a bot. Empty on incoming messages.boolean
true when a person sent the message (WhatsApp Business app or Notifyer chat inbox). false when a bot or automation sent it.object
Present on incoming events that originated from a Click-to-WhatsApp ad or post. Omitted on ordinary chats and on most follow-up messages after the first ad-attributed inbound. See Click-to-WhatsApp ads.
Click-to-WhatsApp ads
When someone taps Send message on a Click-to-WhatsApp ad (Facebook, Instagram, or WhatsApp Status) and writes to your number, Meta attaches areferral object to that inbound message. Notifyer passes it through to your custom webhook and to n8n, Make, and Zapier triggers.
Use it to optimize campaigns: see which creative, which platform, and which ad produced the lead, then label the conversation, route it to the right team, or send ctwa_clid to Meta’s Conversions API.
referral is typically present only on the first inbound message after the ad click. Later messages in the same chat usually omit it. Persist ctwa_clid and source_id (keyed on the contact’s phone) as soon as they arrive.WhatsApp Status ad placements may omit
ctwa_clid. Organic posts use source_type: "post" instead of "ad".What each field is for
Referral object
Look forreferral as a top-level field on the Notifyer payload, or at entry[].changes[].value.messages[].referral if the delivery includes the Cloud API envelope.
string
"ad" when the lead tapped an ad. "post" when they came from an organic post.string
Meta ID of the ad or post. Use this to group and compare creatives.
string
URL of the ad or post the contact tapped. The host tells you the platform (for example Instagram permalink vs Facebook/ad link).
string
Headline shown on the ad or post.
string
Body copy of the ad or post. May include emoji shortcodes such as
:fire:.string
Creative type:
"image" or "video".string
URL of the image creative when
media_type is "image". These URLs can expire — copy any asset you need to keep.string
URL of the video creative when
media_type is "video".string
Thumbnail URL for video creatives.
string
Click-to-WhatsApp click ID. Pass this to Meta Conversions API for Business Messaging (
action_source: "business_messaging", messaging_channel: "whatsapp") so purchases and qualified leads attribute back to the ad.object
Optional. Welcome message configured on the ad, when Meta includes it.
Cloud API envelope example
This is the Meta WhatsApp Business Account shape. The attribution lives onmessages[].referral. Contact identifiers in this example are anonymized; the referral fields match a real Instagram Click-to-WhatsApp ad.
Webhook Management API
You can programmatically manage your webhook endpoints using our API.Create Webhook Endpoint
POST https://api.insightssystem.com/api:qh9OQ3OW/webhook/dev/create
Register a new webhook endpoint to receive incoming message notifications. Send a valid Bearer token (same credential used for the dashboard).
Request Body
string
required
Full HTTPS URL of your endpoint.
boolean
required
Whether the webhook is enabled.
boolean
required
Incoming message trigger on/off. When
true, your endpoint receives messages contacts send to your business.boolean
Outgoing message trigger on/off. When
true, your endpoint also receives messages your business sends — including hand-typed replies in the WhatsApp Business app, Notifyer chat inbox messages, and messages sent by Make, Zapier, n8n, the API, or a bot. Set this to true if an automation must react to messages typed on the phone.boolean
required
Schedule activity trigger on/off. When enabled, your bot can send multiple sequential messages with natural delays between them — useful for simulating human-like conversation flow.
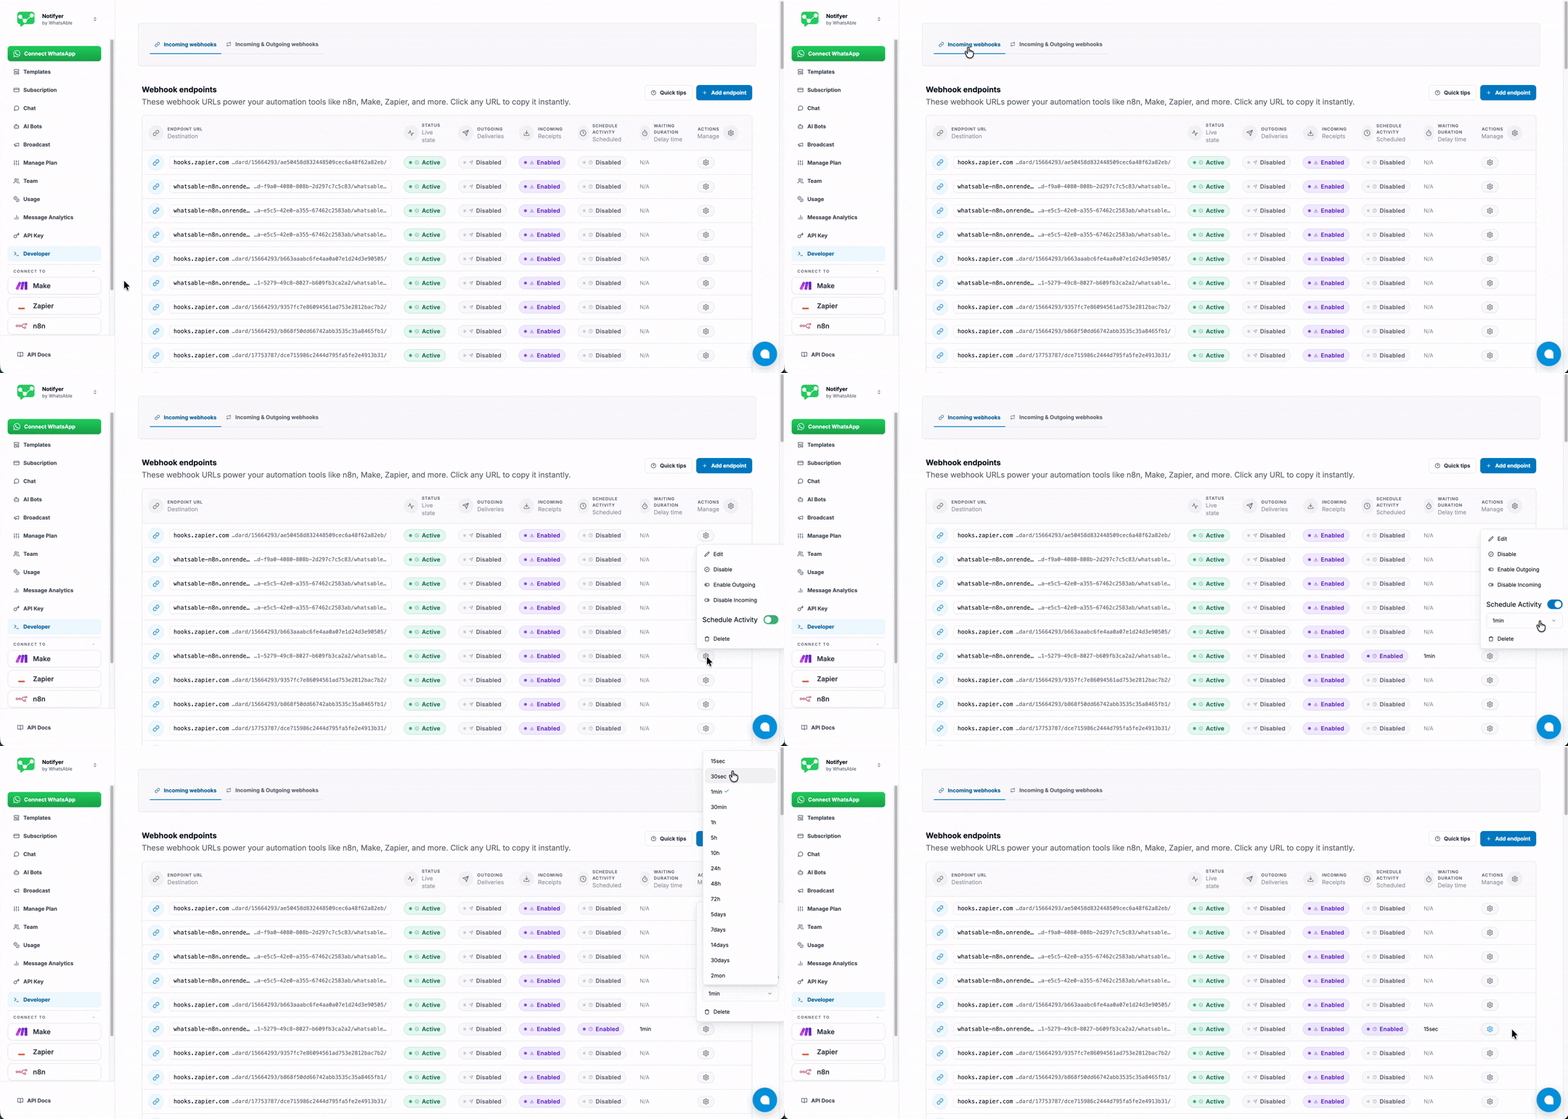
waiting_duration to the maximum delay window you need. When schedule_activity is false, set waiting_duration to 0.
number
required
How long (in seconds) to wait for schedule activity when
schedule_activity is true. Set to 0 when schedule activity is off.Dashboard presets: 15, 30, 60, 1800, 3600, 18000, 36000, 86400, 172800, 259200, 432000, 604800, 1209600, 2592000, 5184000 (15 seconds → 2 months). Prefer these values if mirroring the app UI.boolean
required
If
true, enables request signing. The server returns a signature_secret once in the response — copy and store it immediately, as it will not be shown again.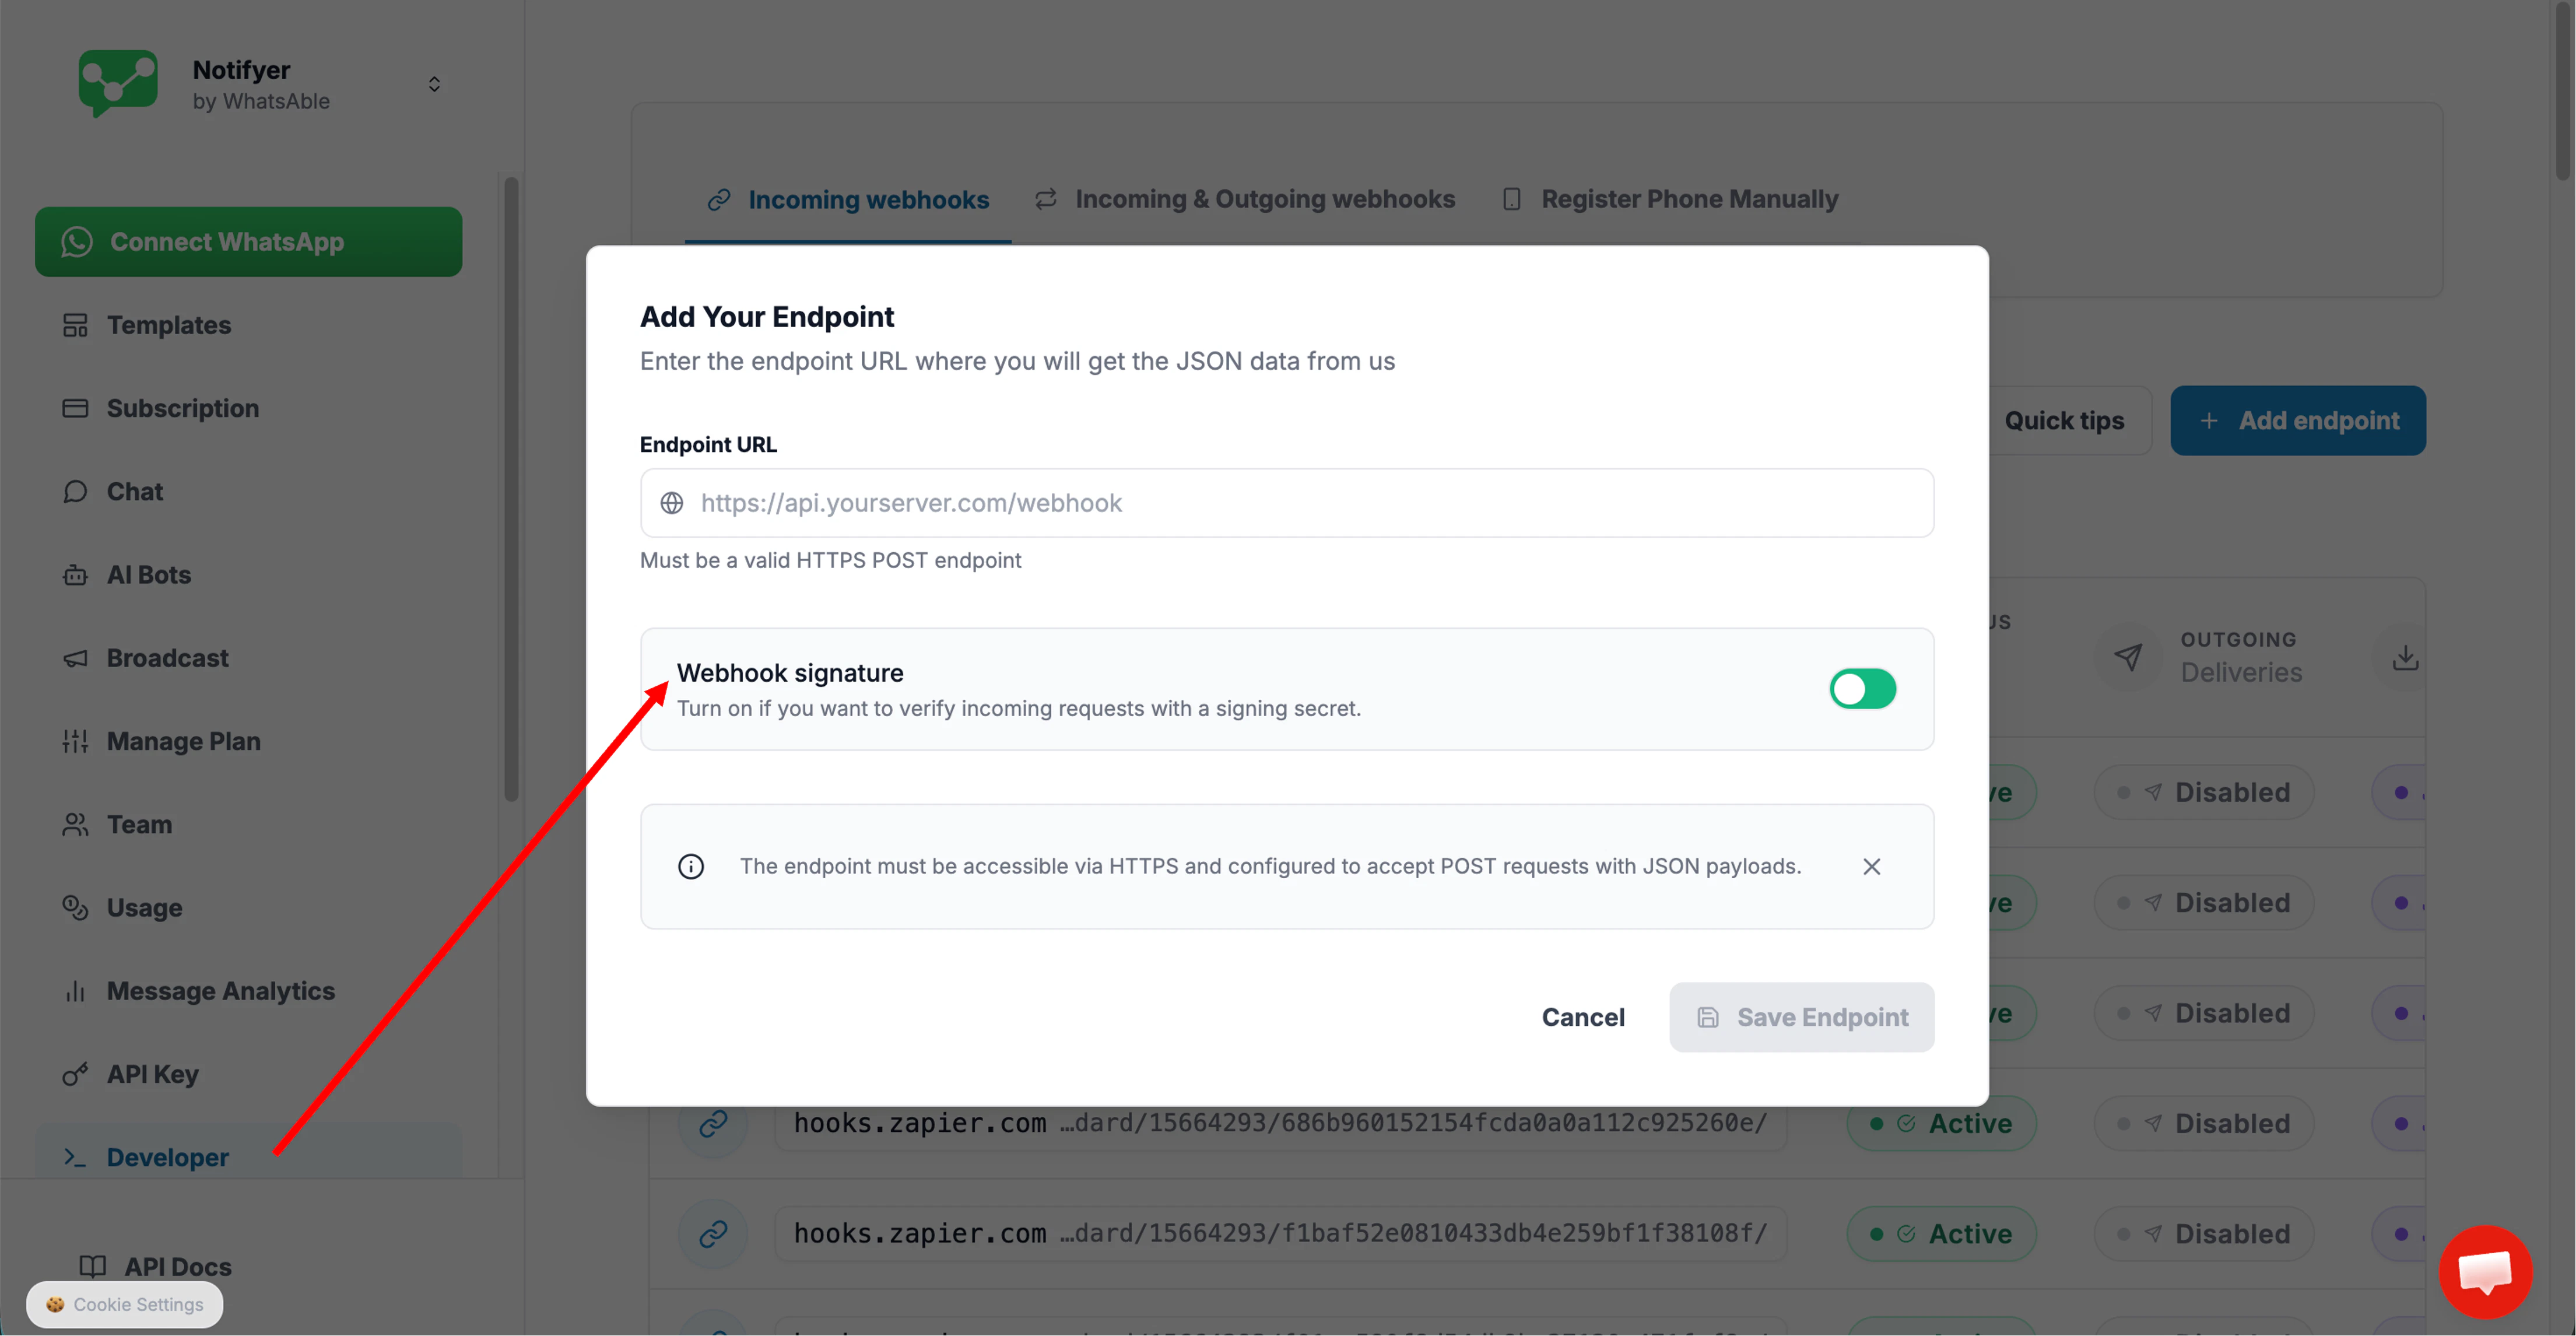
Response
Returns a JSON object for the created webhook row.number
Webhook ID.
boolean
Whether the webhook is enabled.
boolean
Incoming message trigger.
boolean
Outgoing message trigger. When
true, the endpoint receives messages your business sends, including WhatsApp Business app replies.string
Stored endpoint URL.
number
Unix timestamp in milliseconds.
number
Schedule activity wait time in seconds.
boolean
Schedule activity flag.
string | null
When
active_signature was true: a one-time secret string — copy and store it immediately, it will not be retrievable again. When active_signature was false: null.Webhook Signature Verification
When a webhook is created withactive_signature: true, every request our system sends to your endpoint will include an X-Webhook-Signature header. Use it to confirm the request genuinely came from us and was not tampered with.
The value is derived from the
signature_secret returned at creation time. Compare it in your endpoint handler to validate each incoming request.
If
active_signature was false when the webhook was created, this header will not be present in requests sent to your endpoint.Troubleshooting
Webhook Not Receiving Events
Webhook Not Receiving Events
- Verify your endpoint is publicly accessible
- Check for HTTP 4xx or 5xx responses
- Ensure proper SSL certificate configuration
- Verify your webhook is enabled in the dashboard
- Confirm outgoing is enabled if you expect events for messages you send (including the WhatsApp Business app)
No referral / Click-to-WhatsApp fields on the payload
No referral / Click-to-WhatsApp fields on the payload
referralis usually only on the first inbound message after the ad click. Storectwa_clidandsource_idimmediately.- Organic messages (not from an ad or post) have no
referralobject. - WhatsApp Status ad placements may omit
ctwa_clideven when other referral fields are present. - Confirm you are looking at
referral(Notifyer payload) ormessages[].referral(Cloud API envelope), not a Facebook Lead Ad form submission — that is a different Meta product.
"Same webhook exist" error when creating a webhook
"Same webhook exist" error when creating a webhook
Each endpoint URL must be unique. If you submit a
webhooks URL that is already registered, the API will return a “Same webhook exist” error.To resolve this:- Check your existing webhooks in the Developer → Incoming Webhooks tab of the dashboard to confirm whether the URL is already registered.
- If you want to update settings on an existing webhook (e.g. toggle
incoming, changewaiting_duration), use the update/edit endpoint instead of re-creating it. - If you genuinely need a fresh webhook at the same URL, delete the existing one first, then create a new one.
FAQs
Do webhooks include Click-to-WhatsApp ad details?
Do webhooks include Click-to-WhatsApp ad details?
Yes. When the contact’s message comes from a Click-to-WhatsApp ad, the payload includes a
referral object (source_id, source_url, source_type, headline, body, media_type, creative URLs, and ctwa_clid). Use it to see which creative and platform produced the lead. Full reference: Click-to-WhatsApp ads.Do webhooks include messages typed in the WhatsApp Business app?
Do webhooks include messages typed in the WhatsApp Business app?
Yes. With Meta WhatsApp Coexistence you keep the WhatsApp Business app on your phone. Enable the outgoing trigger. Those messages arrive with
incoming_message: false, send_by: "WhatsApp App", and was_message_by_human: true. They are POSTed to your webhook — they are not limited to the Notifyer web UI.How do I tell which teammate sent an outgoing message?
How do I tell which teammate sent an outgoing message?
Read
send_by. When the message was sent from the Notifyer chat inbox, send_by is that user’s name (for example "Axel Meta"). When it was typed in the WhatsApp Business app, send_by is "WhatsApp App". was_message_by_human is true in both human cases.How do I handle different message types?
How do I handle different message types?
Check
message_type (text, image, audio, video, document, location). For audio, the transcription appears in the text fields when available.Do I need to respond to every webhook request?
Do I need to respond to every webhook request?
Yes. Return a 2xx HTTP status code for every request so Notifyer does not retry unnecessarily.
How can I test webhook delivery?
How can I test webhook delivery?
Use the Test Webhook feature in the Developer section of your dashboard, or send a message from the WhatsApp Business app after enabling outgoing events.
Need assistance?
Our technical support team is available to assist with webhook configuration, payload handling, and integration questions.