# Start a Zap from a WhatsApp message
> Use the WhatsAble trigger in Zapier to start a Zap when a contact writes to your WhatsApp number.
The WhatsAble trigger starts a Zap when a contact sends a message to your WhatsApp number. In Zapier it is the instant trigger **New Incoming or Outgoing WhatsApp Message** of the WhatsAble app.
This page is the how-to guide. For every field the trigger sends, see [Zapier triggers and actions](/integration/zapier/fields). For the account connection, see the [Zapier overview](/integration/zapier).
## When to use it
- **Reply fast**:
Answer a first message with a template, an AI reply, or a routing step.
- **Save every lead**:
Write each new contact and message into a sheet, a CRM, or a database.
- **Alert your team**:
Post to Slack or send an email when a message contains a word such as "refund".
- **Read ad leads**:
Read the Click-to-WhatsApp data (`referral`) of a new lead and label it by ad.
## Set up the trigger
**Add the trigger**
In the Zap editor, click the **Trigger** step, search for **WhatsAble**, and choose **New Incoming or Outgoing WhatsApp Message** as the **Trigger event**. Under **Account**, choose your WhatsAble connection, or connect one with your WhatsAble API key.
**Keep the default Credential Type**
In the **Configure** tab, leave **Credential Type** on its default value, the first option in the list. The other options exist for older WhatsAble API keys. If you are not sure which one fits your key, write to team@whatsable.app.
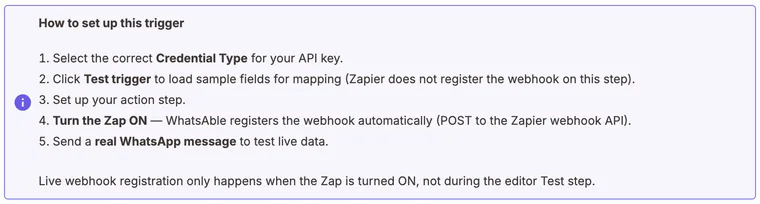 *The setup notes at the top of the Configure tab*
**Load sample data**
Click **Test trigger**. Zapier loads a sample message with every field, so you can map the fields in your next steps. The sample is example data built into the app, not a message from your number.
**Add your actions, then publish**
Add the steps that should run for each message, then click **Publish** to turn the Zap on.
When the Zap turns on, Zapier registers the Zap's webhook URL with WhatsAble. The webhook then appears under **Settings** → [**Webhooks**](https://console.whatsable.app/settings/outgoing-webhooks) in WhatsAble.
**Check it with a real message**
Send a WhatsApp message from your own phone to your WhatsApp number. Open the Zap's history in Zapier and check that a run started with your message.
> [!NOTE]
>
> An API key belongs to one WhatsApp number, and the trigger receives the messages of that number only. To work with two numbers, create one API key and one Zapier connection for each number.
> [!NOTE]
>
> After a teammate replies by hand in a chat, this trigger skips that chat for 24 hours, so your Zap and your team do not both answer. Messages sent by the API, a bot or a broadcast do not start the pause. To change or remove it, edit the webhook in **Settings** → [**Webhooks**](https://console.whatsable.app/settings/outgoing-webhooks) and change **Pause when your team replies**.
## What the trigger gives you
Each run receives one message. These are the fields you map most often. The others are in [Zapier triggers and actions](/integration/zapier/fields).
| Field | Meaning |
| --- | --- |
| `phone_number` | The contact's number, digits only, for example `14155550132` |
| `recipient_name` | The contact's name in WhatsAble |
| `last_message_of_user` | The text of the message that started the run |
| `message_type` | The kind of message, for example `text`, `audio`, `image`, or `document` |
| `attachment_url` | A public URL of the attached file, or empty |
| `labels` | The labels on the conversation, separated by commas |
| `note` | The note saved on the contact |
| `conversation_paragraph` | The recent conversation as one block of text, ready for an AI prompt |
| `referral` | Click-to-WhatsApp ad data. Present only on a lead that came from an ad. |
## Example: save a lead and reply
**Trigger**
Add the WhatsAble trigger.
**Save the lead**
Add a Google Sheets, Airtable or CRM action. Map `phone_number`, `recipient_name` and `last_message_of_user` to its columns.
**Reply**
Add **WhatsAble: [Send WhatsApp Message](/integration/zapier/send-message)**. Map **Phone Number** from `phone_number`. The contact just wrote to you, so a non-template message works for the next 24 hours.
## Turning the Zap off
Turning the Zap off does not remove the webhook from WhatsAble: it stays under **Settings** → [**Webhooks**](https://console.whatsable.app/settings/outgoing-webhooks). WhatsAble turns a webhook off by itself after its URL answers "not found" (HTTP 404 or 410) 20 times in a row.
## Troubleshooting
Test trigger shows a sample, not my message
That is expected. **Test trigger** shows example data so that you can map fields. Real messages reach the Zap only after you publish it.
Nothing arrives after I publish the Zap
Check that the Zap is on, and that the webhook appears under **Settings** → **Webhooks**. Then send a message to the number of the API key that the Zapier connection uses, not to another number.
A chat stopped starting the Zap
A teammate probably replied by hand in that chat in the last 24 hours. See the note about **Pause when your team replies** above.
The connection fails
Zapier checks the API key when you connect. Create a new key on the [**API keys**](https://console.whatsable.app/settings/api-keys) page and connect again. Use the WhatsAble API key, not a Meta or WhatsApp key.