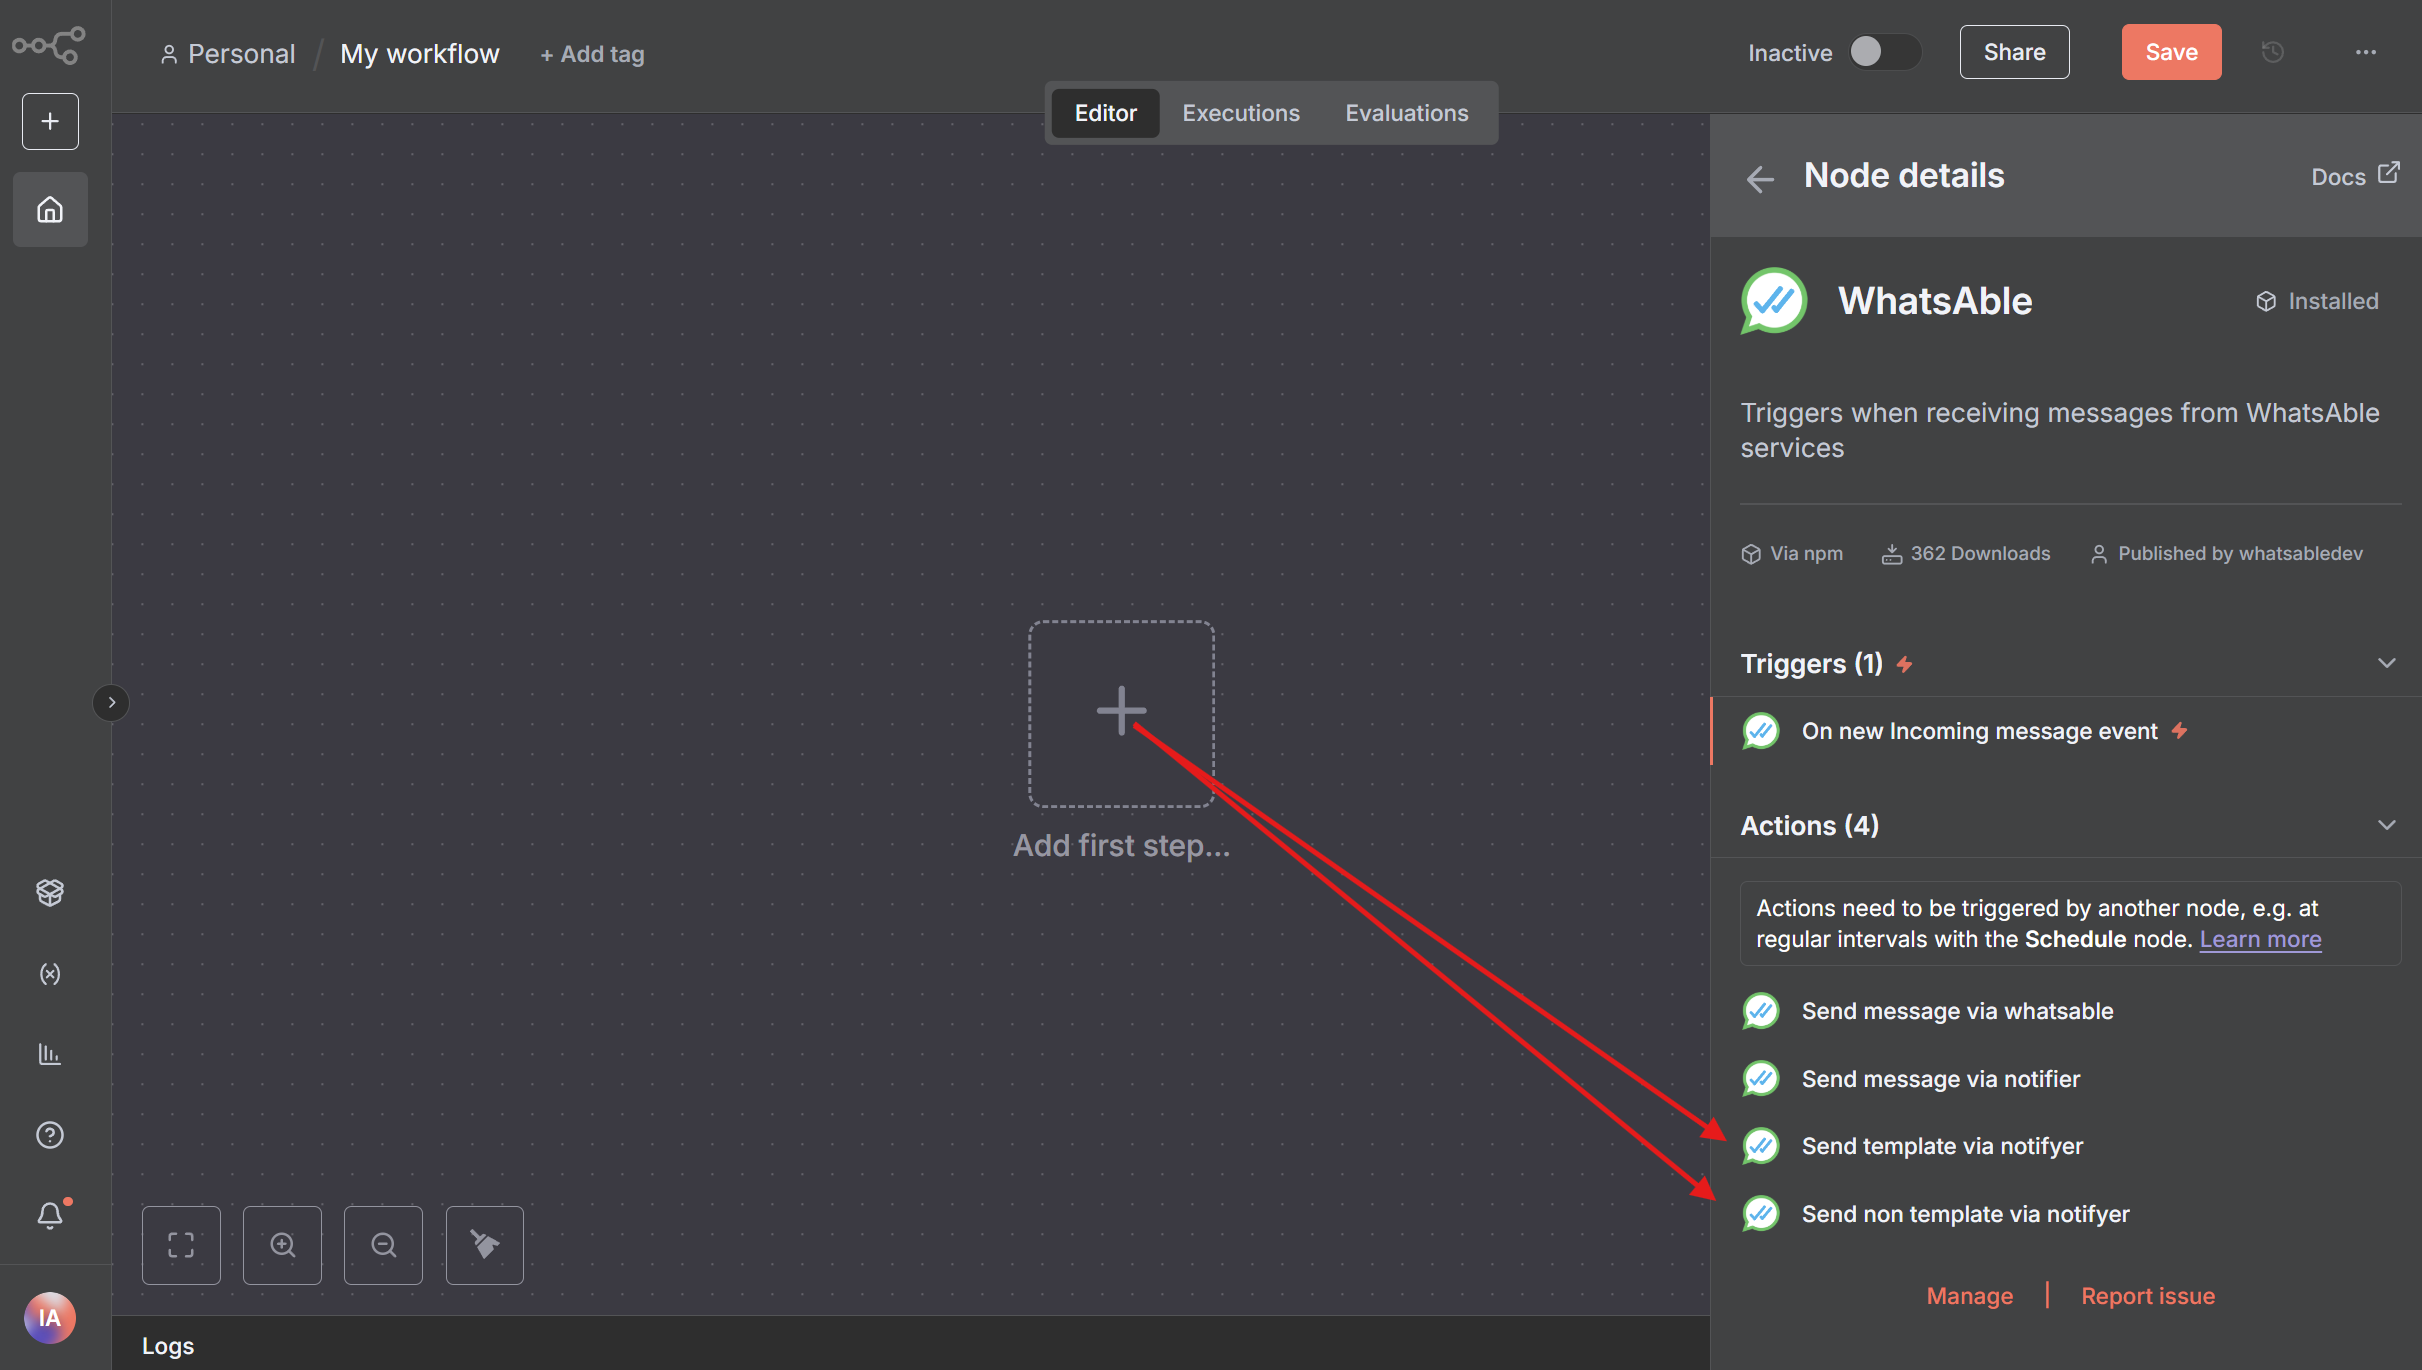
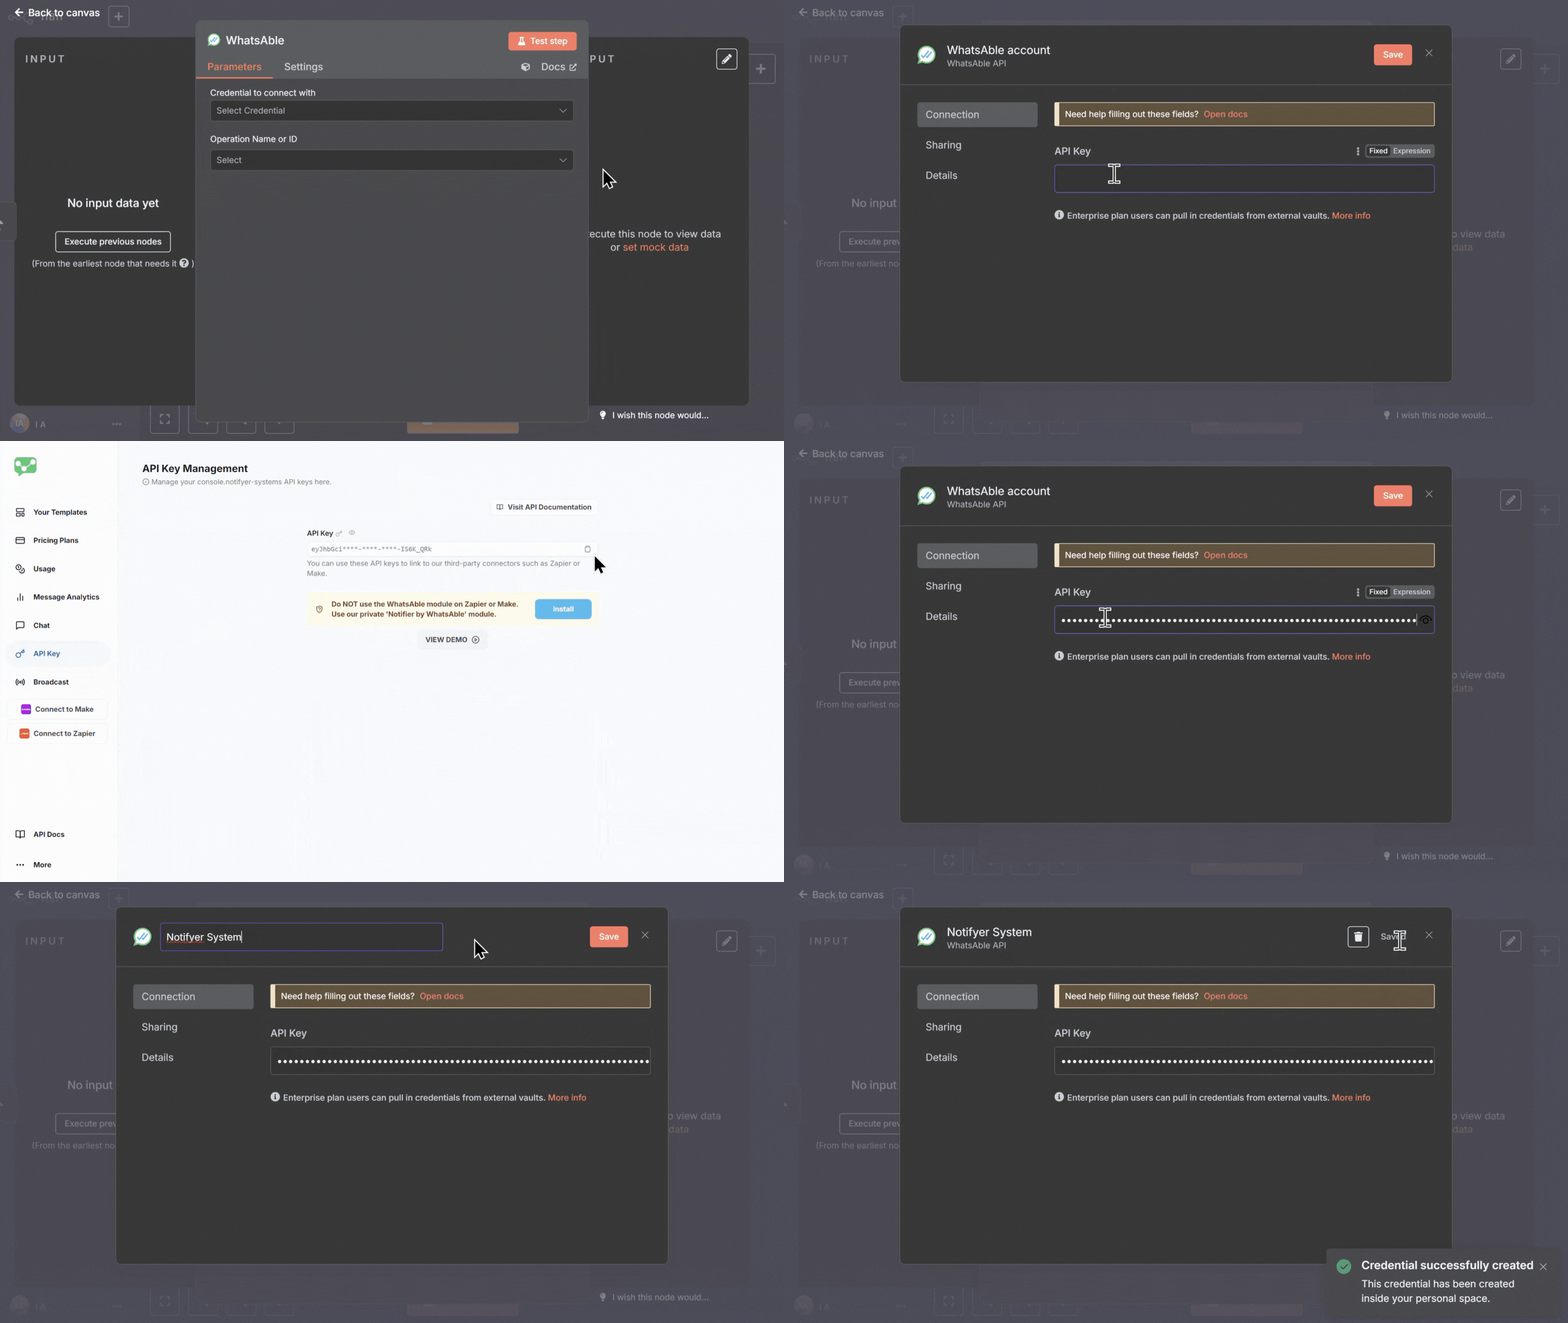
> ## Documentation Index
> Fetch the complete documentation index at: https://docs.whatsable.app/llms.txt
> Use this file to discover all available pages before exploring further.

# n8n

> Learn how to seamlessly integrate n8n with the Notifyer System for enterprise-level WhatsApp automation

# Notifyer System Integration with n8n

<Frame caption="Automate your WhatsApp messaging workflows with n8n and Notifyer System">
  <img src="https://mintcdn.com/whatsable/ybRDW0df7Pd2uENs/images/notifyer_n8n_svg.svg?fit=max&auto=format&n=ybRDW0df7Pd2uENs&q=85&s=511a5995630fba049028eabfa2498ce2" className="rounded-xl" width="1920" height="1080" data-path="images/notifyer_n8n_svg.svg" />
</Frame>

<Tip>
  This guide walks you through connecting Notifyer System with n8n to create powerful automated WhatsApp messaging workflows for your business
</Tip>

## Prerequisites

Before getting started, make sure you have:

<CardGroup cols={2}>
  <Card title="Notifyer System Account" icon="user">
    Active Notifyer System account with a subscription plan (Monthly or Pay-as-you-go)
  </Card>

  <Card title="n8n Account" icon="user">
    Access to [n8n](https://app.n8n.cloud/login) workflow automation platform
  </Card>
</CardGroup>

<Tip>
  New to Notifyer System? [Sign up here](https://console.notifyer-systems.com/)
</Tip>

## Setting up your Notifyer System account

<Steps>
  <Step title="Complete the Embedding Process">
    Before sending WhatsApp messages, you must complete the platform embedding process, which connects your WhatsApp Business account to Notifyer System.

    <Info>
      The embedding process is required by Meta to ensure proper business verification and compliance with WhatsApp Business Platform policies.
    </Info>
  </Step>

  <Step title="Set up message templates">
    Notifyer System provides two methods for sending WhatsApp messages:

    <Accordion title="Option A: Template messages" defaultOpen={true}>
      <p>WhatsApp templates are pre-approved message formats that allow for personalization while maintaining compliance with WhatsApp policies.</p>

      <Steps>
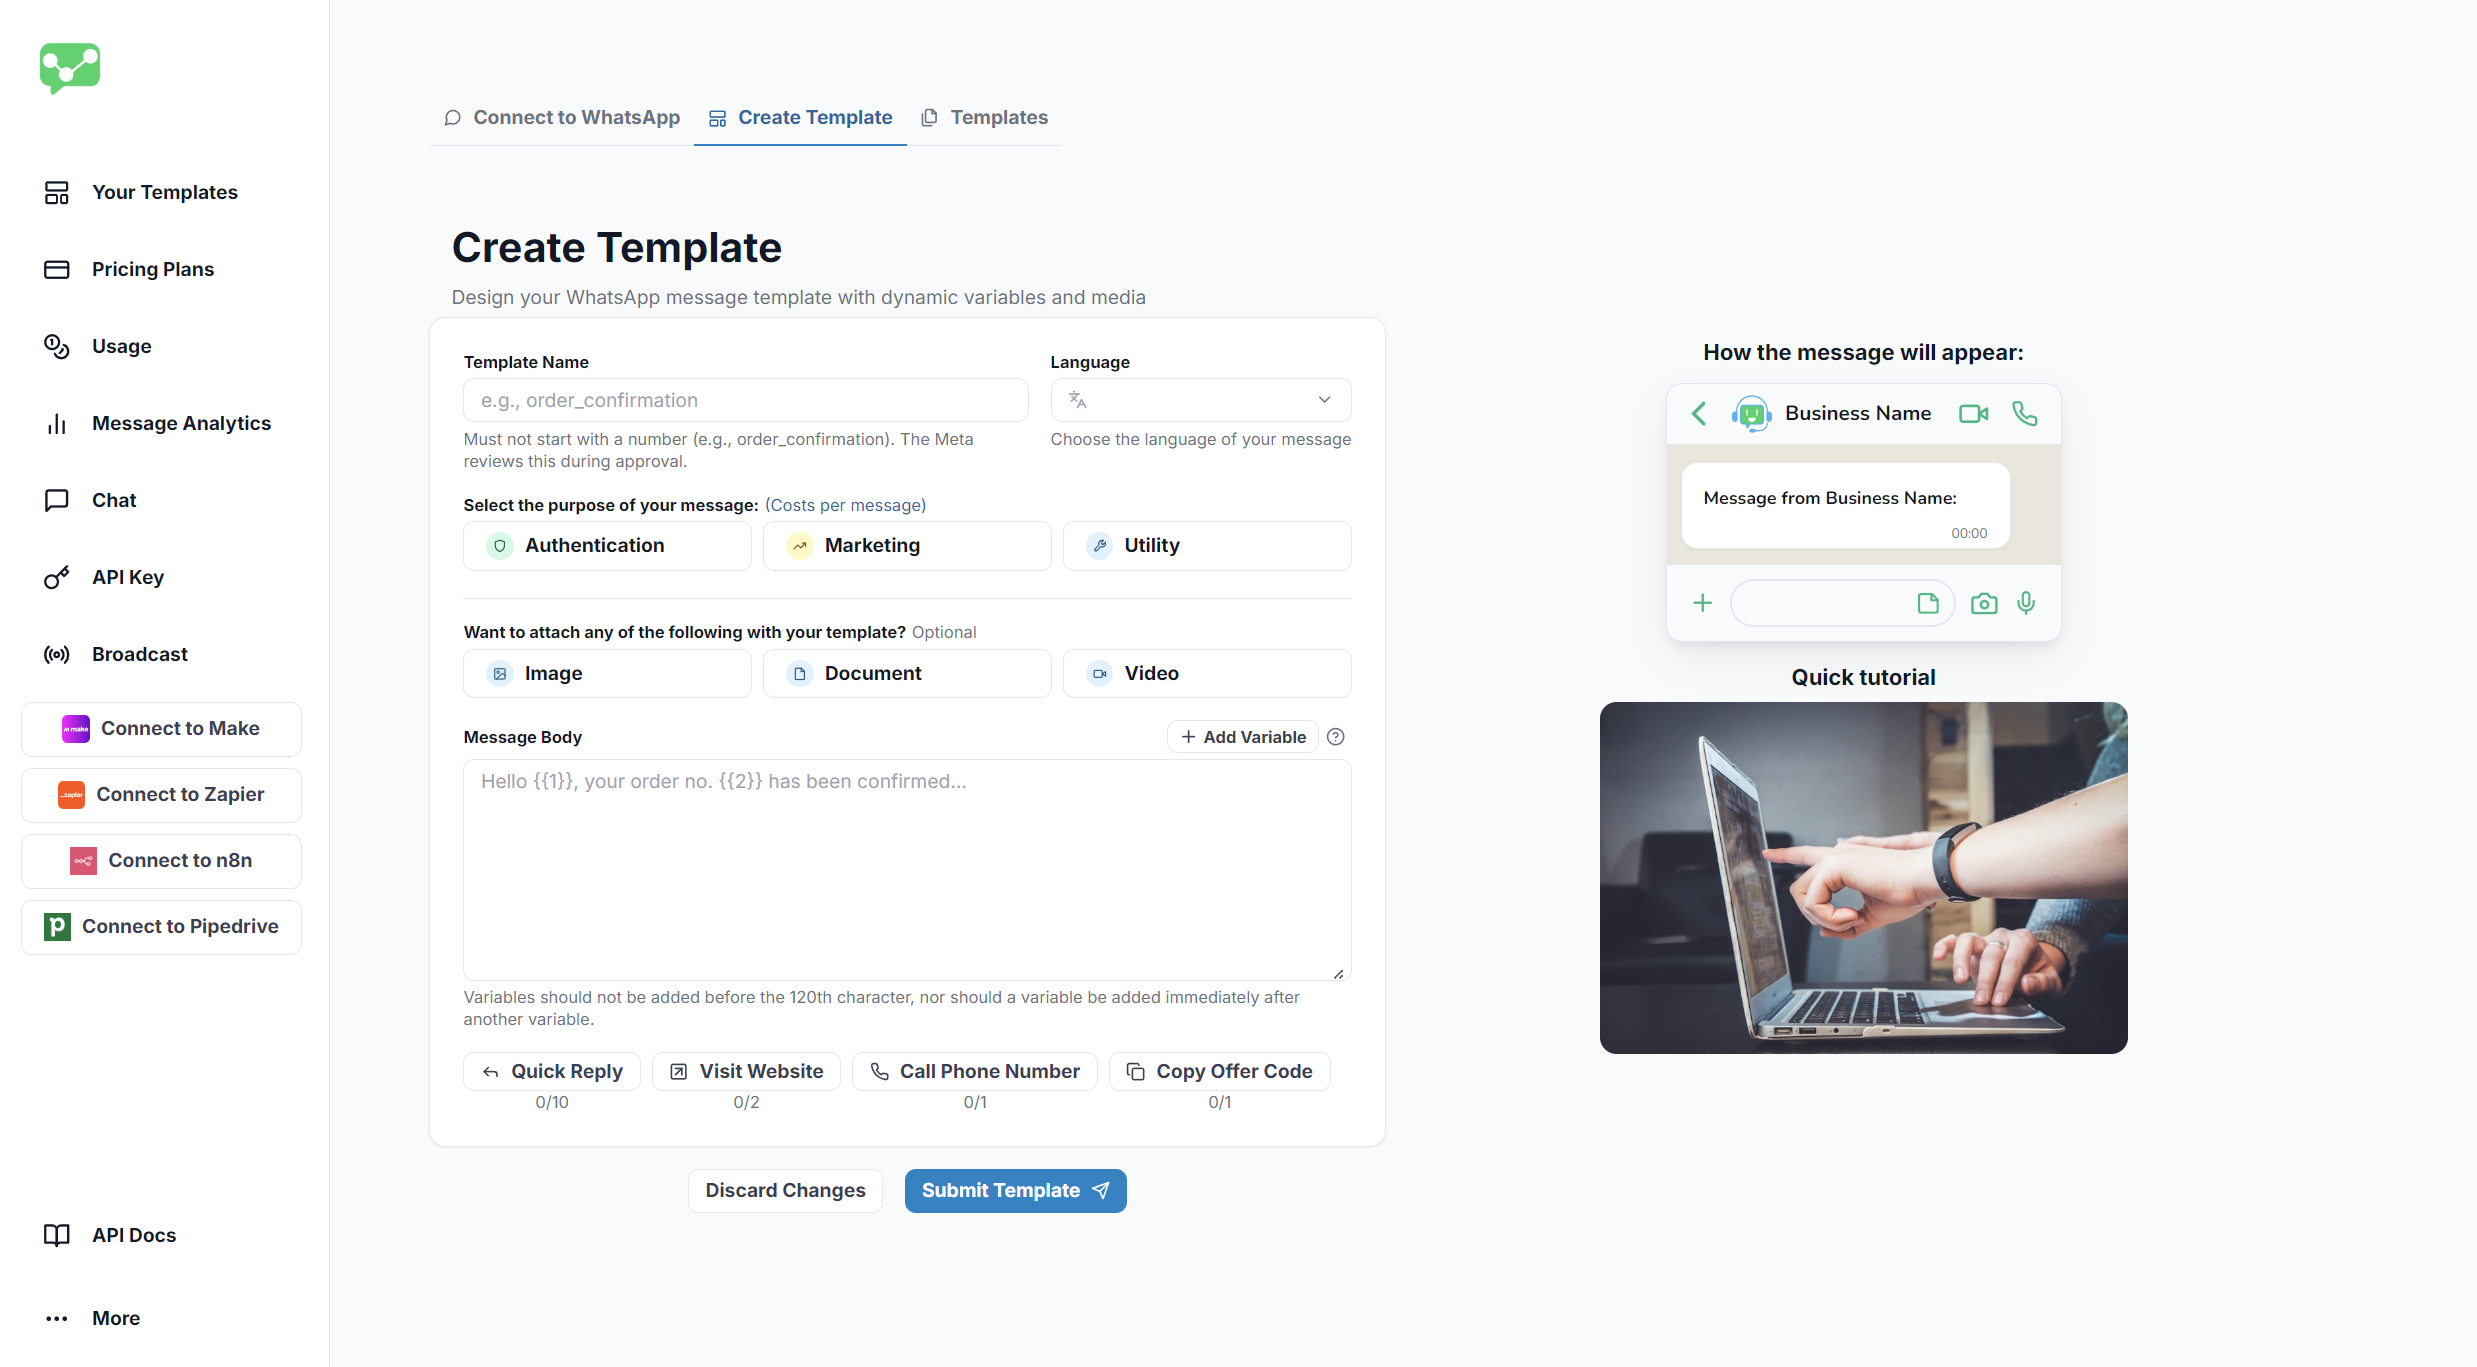
        <Step title="Navigate to Templates">
          Go to **Your Templates** in your Notifyer dashboard
        </Step>

        <Step title="Create Template">
          Click the **Create Template** tab at the top of the page
        </Step>

        <Step title="Fill out the form">
          Complete the template creation form with the following details:

          <ResponseField name="Template Name" type="string" required>
            Choose a descriptive name for internal reference
          </ResponseField>

          <ResponseField name="Language" type="string" required>
            Choose your template's primary language
          </ResponseField>

          <ResponseField name="Category" type="string" required>
            Select the appropriate message category
          </ResponseField>

          <ResponseField name="Header" type="image | document | video">
            Optional: Add an image, document, or video header
          </ResponseField>

          <ResponseField name="Message Body" type="string" required>
            Craft your message content
          </ResponseField>

          <ResponseField name="Variables" type="string">
            Add placeholders using `{{1}}`, `{{2}}` format for personalization
          </ResponseField>

          <ResponseField name="Buttons" type="button">
            Optional: Configure call-to-action buttons
          </ResponseField>
        </Step>

        <Step title="Submit for review">
          Click **Preview and Submit**
        </Step>
      </Steps>

      <Frame caption="Template Creation Interface">
        <img src="https://mintcdn.com/whatsable/denF9KomrZc8Vz_c/images/notifyer_template_create.png?fit=max&auto=format&n=denF9KomrZc8Vz_c&q=85&s=e3abdd6f740b211c2d8ae61753fef0e3" alt="Template Creation Interface" width="2477" height="1367" data-path="images/notifyer_template_create.png" />
      </Frame>

      <Warning>
        Templates typically get reviewed within 24 hours. Creating compliant templates that avoid promotional language increases approval chances.
      </Warning>
    </Accordion>

    <Accordion title="Option B: Non-template messages">
      <p>For simpler communications, you can send non-template messages that include:</p>

      <CardGroup cols={2}>
        <Card title="Text" icon="message-text">
          Plain text messages within the 24-hour window
        </Card>

        <Card title="Images" icon="image">
          Photos and graphics in supported formats
        </Card>

        <Card title="Documents" icon="file-pdf">
          PDFs, Word docs, and other file types
        </Card>

        <Card title="Videos" icon="video">
          MP4 and other supported video formats
        </Card>
      </CardGroup>

      <Note>
        Non-template messages can only be sent within the 24-hour customer service window after a customer initiates contact with your business.
      </Note>
    </Accordion>
  </Step>

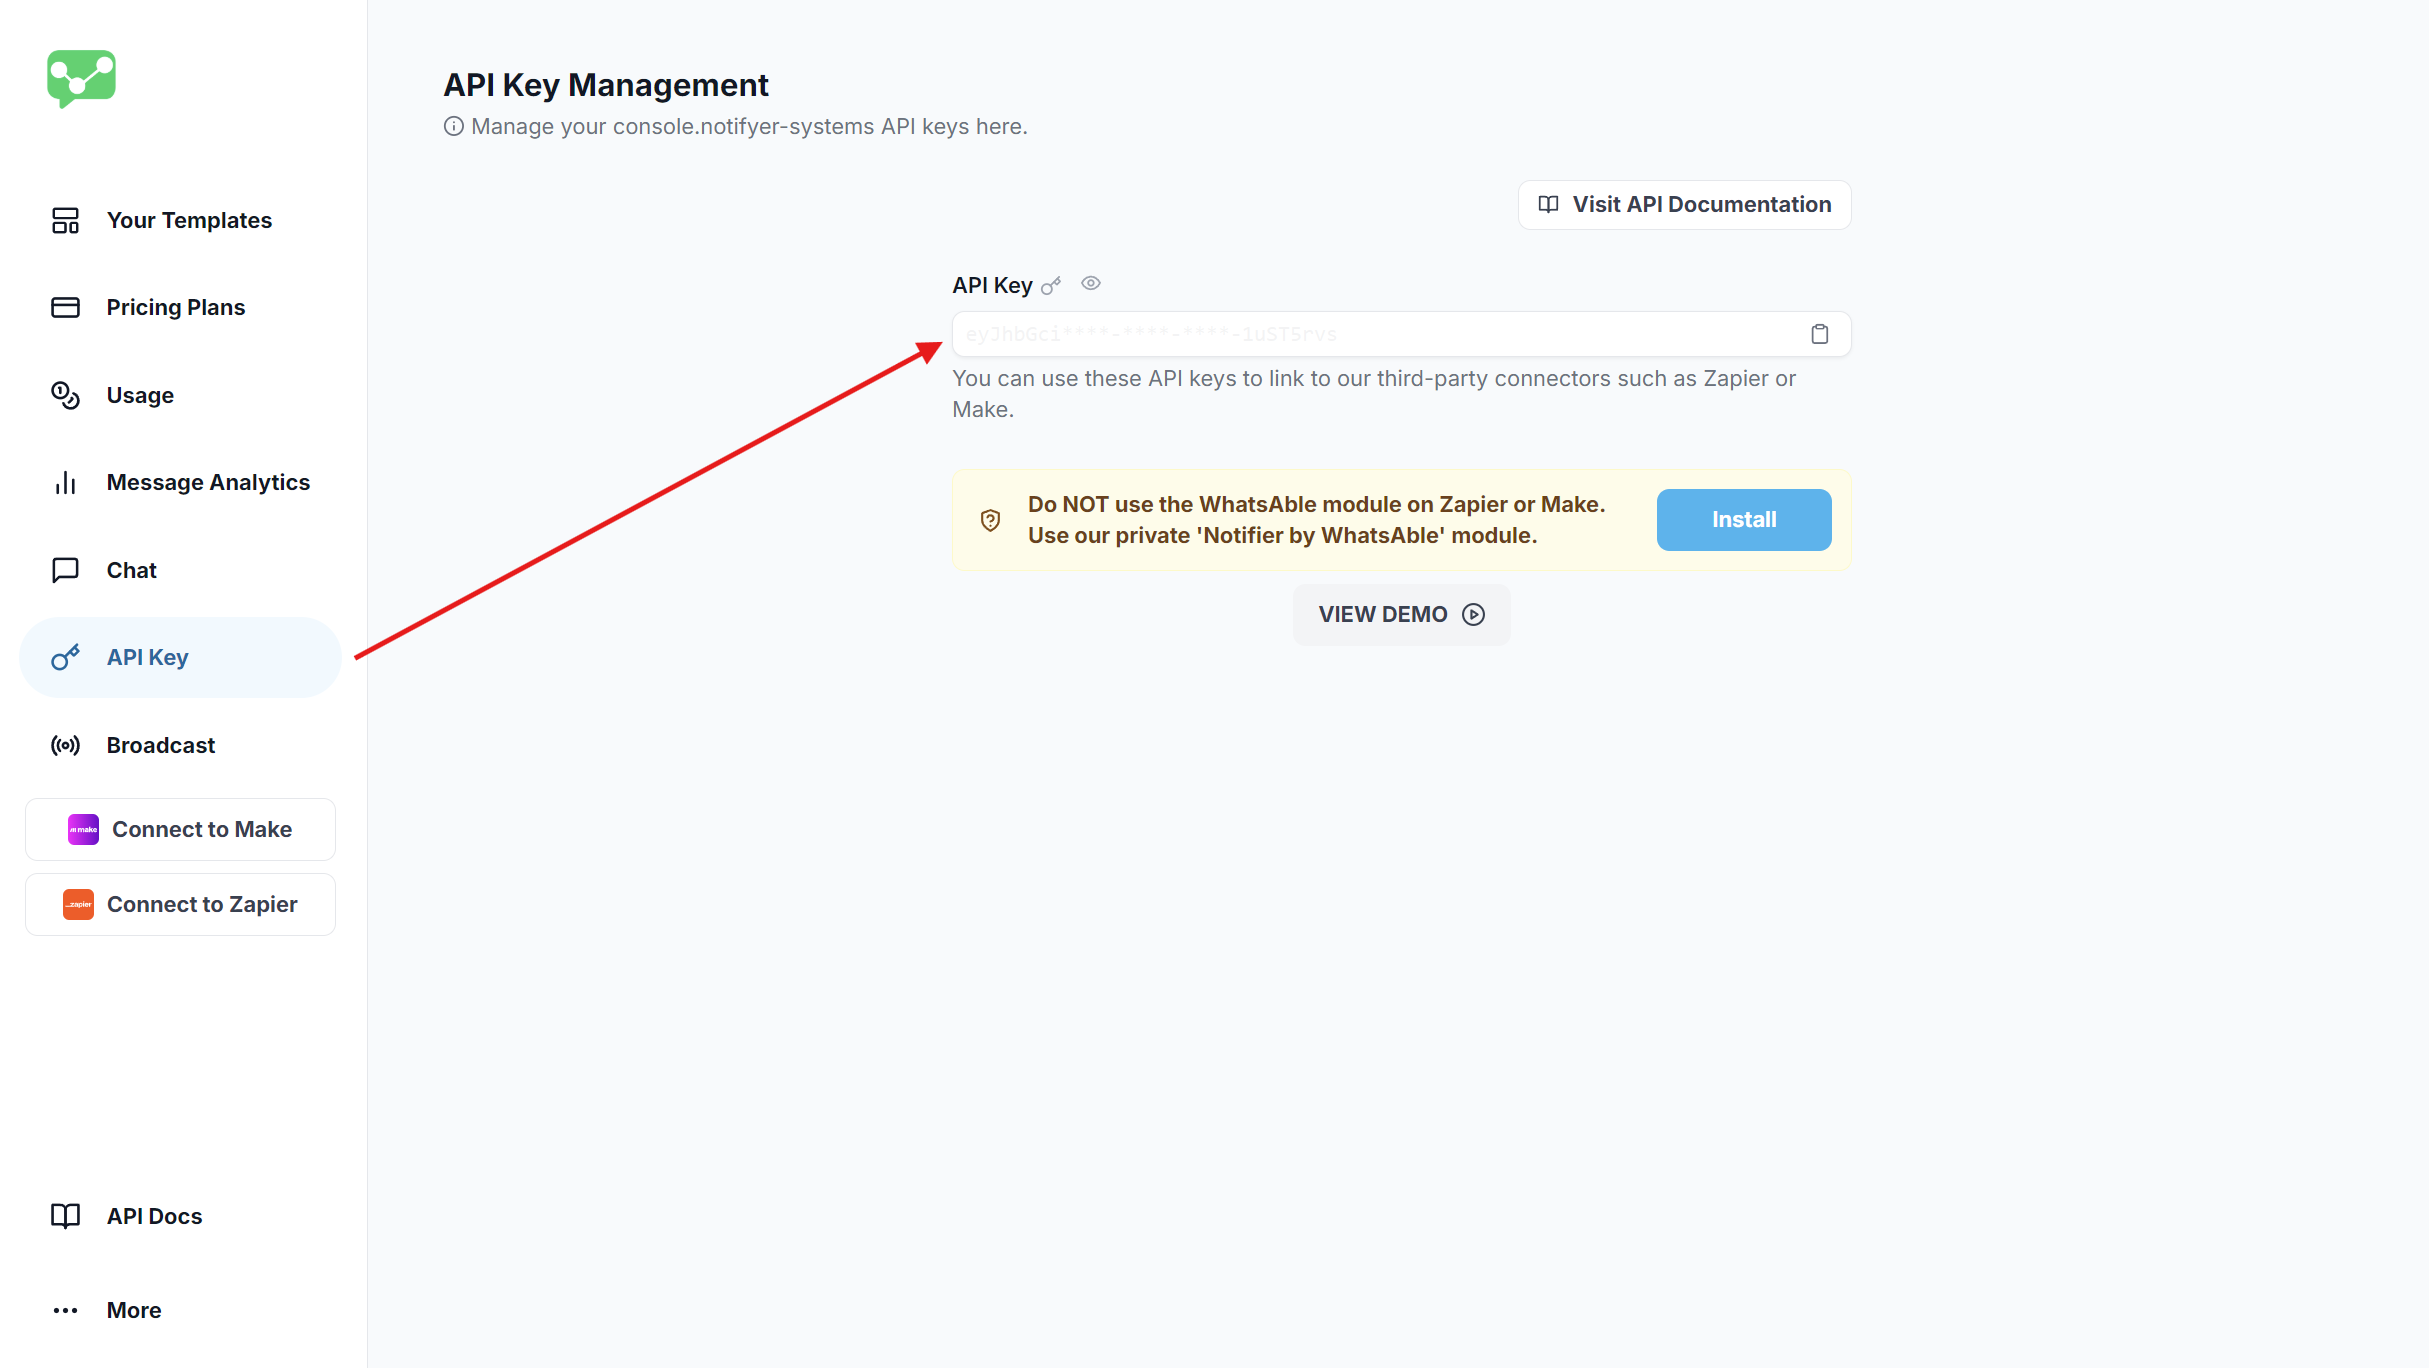
  <Step title="Get your API key">
    To connect Notifyer System with n8n, you'll need an API key:

    1. In your Notifyer dashboard, navigate to [**API Keys**](https://console.notifyer-systems.com/api-key)
    2. Copy your unique API key
    3. Store it securely—you'll need it for the integration

    <Warning>
      Never share your API key publicly or commit it to version control systems.
    </Warning>

    <Frame caption="API Key Location">
      <img src="https://mintcdn.com/whatsable/denF9KomrZc8Vz_c/images/notifyer_apikey.png?fit=max&auto=format&n=denF9KomrZc8Vz_c&q=85&s=307e75f280fafa5cda469e1a2827d5bc" alt="API Key Location" width="2429" height="1368" data-path="images/notifyer_apikey.png" />
    </Frame>
  </Step>
</Steps>

## Integrating with n8n

<Frame caption="Introducing the New Features of N8N Nodes Version 2.3.3">
  <iframe className="w-full aspect-video" src="https://www.loom.com/embed/a7a1ec43721a4971ae912bcfc040d5cc" title="Introducing the New Features of N8N Nodes Version 2.3.3" frameBorder="0" allow="accelerometer; autoplay; clipboard-write; encrypted-media; gyroscope; picture-in-picture" allowFullScreen />
</Frame>

<Steps>
  <Step title="Set up your n8n workflow">
    1. Log in to your n8n account
    2. Create a new workflow by clicking **Create Workflow**
    3. Add a trigger node of your choice:
       * Popular triggers include Google Forms, Jotform, ClickUp, or a Schedule trigger
       * Connect and configure your trigger according to your use case

    <Accordion title="WhatsAble trigger node (optional)">
      <Info>
        The WhatsAble trigger node enables your workflow to respond automatically to incoming WhatsApp messages. This setup is optional but recommended for building reactive communication flows.
      </Info>

      <Steps>
        <Step title="Add WhatsAble trigger node">
          Follow these steps to add the WhatsAble trigger node to your workflow:

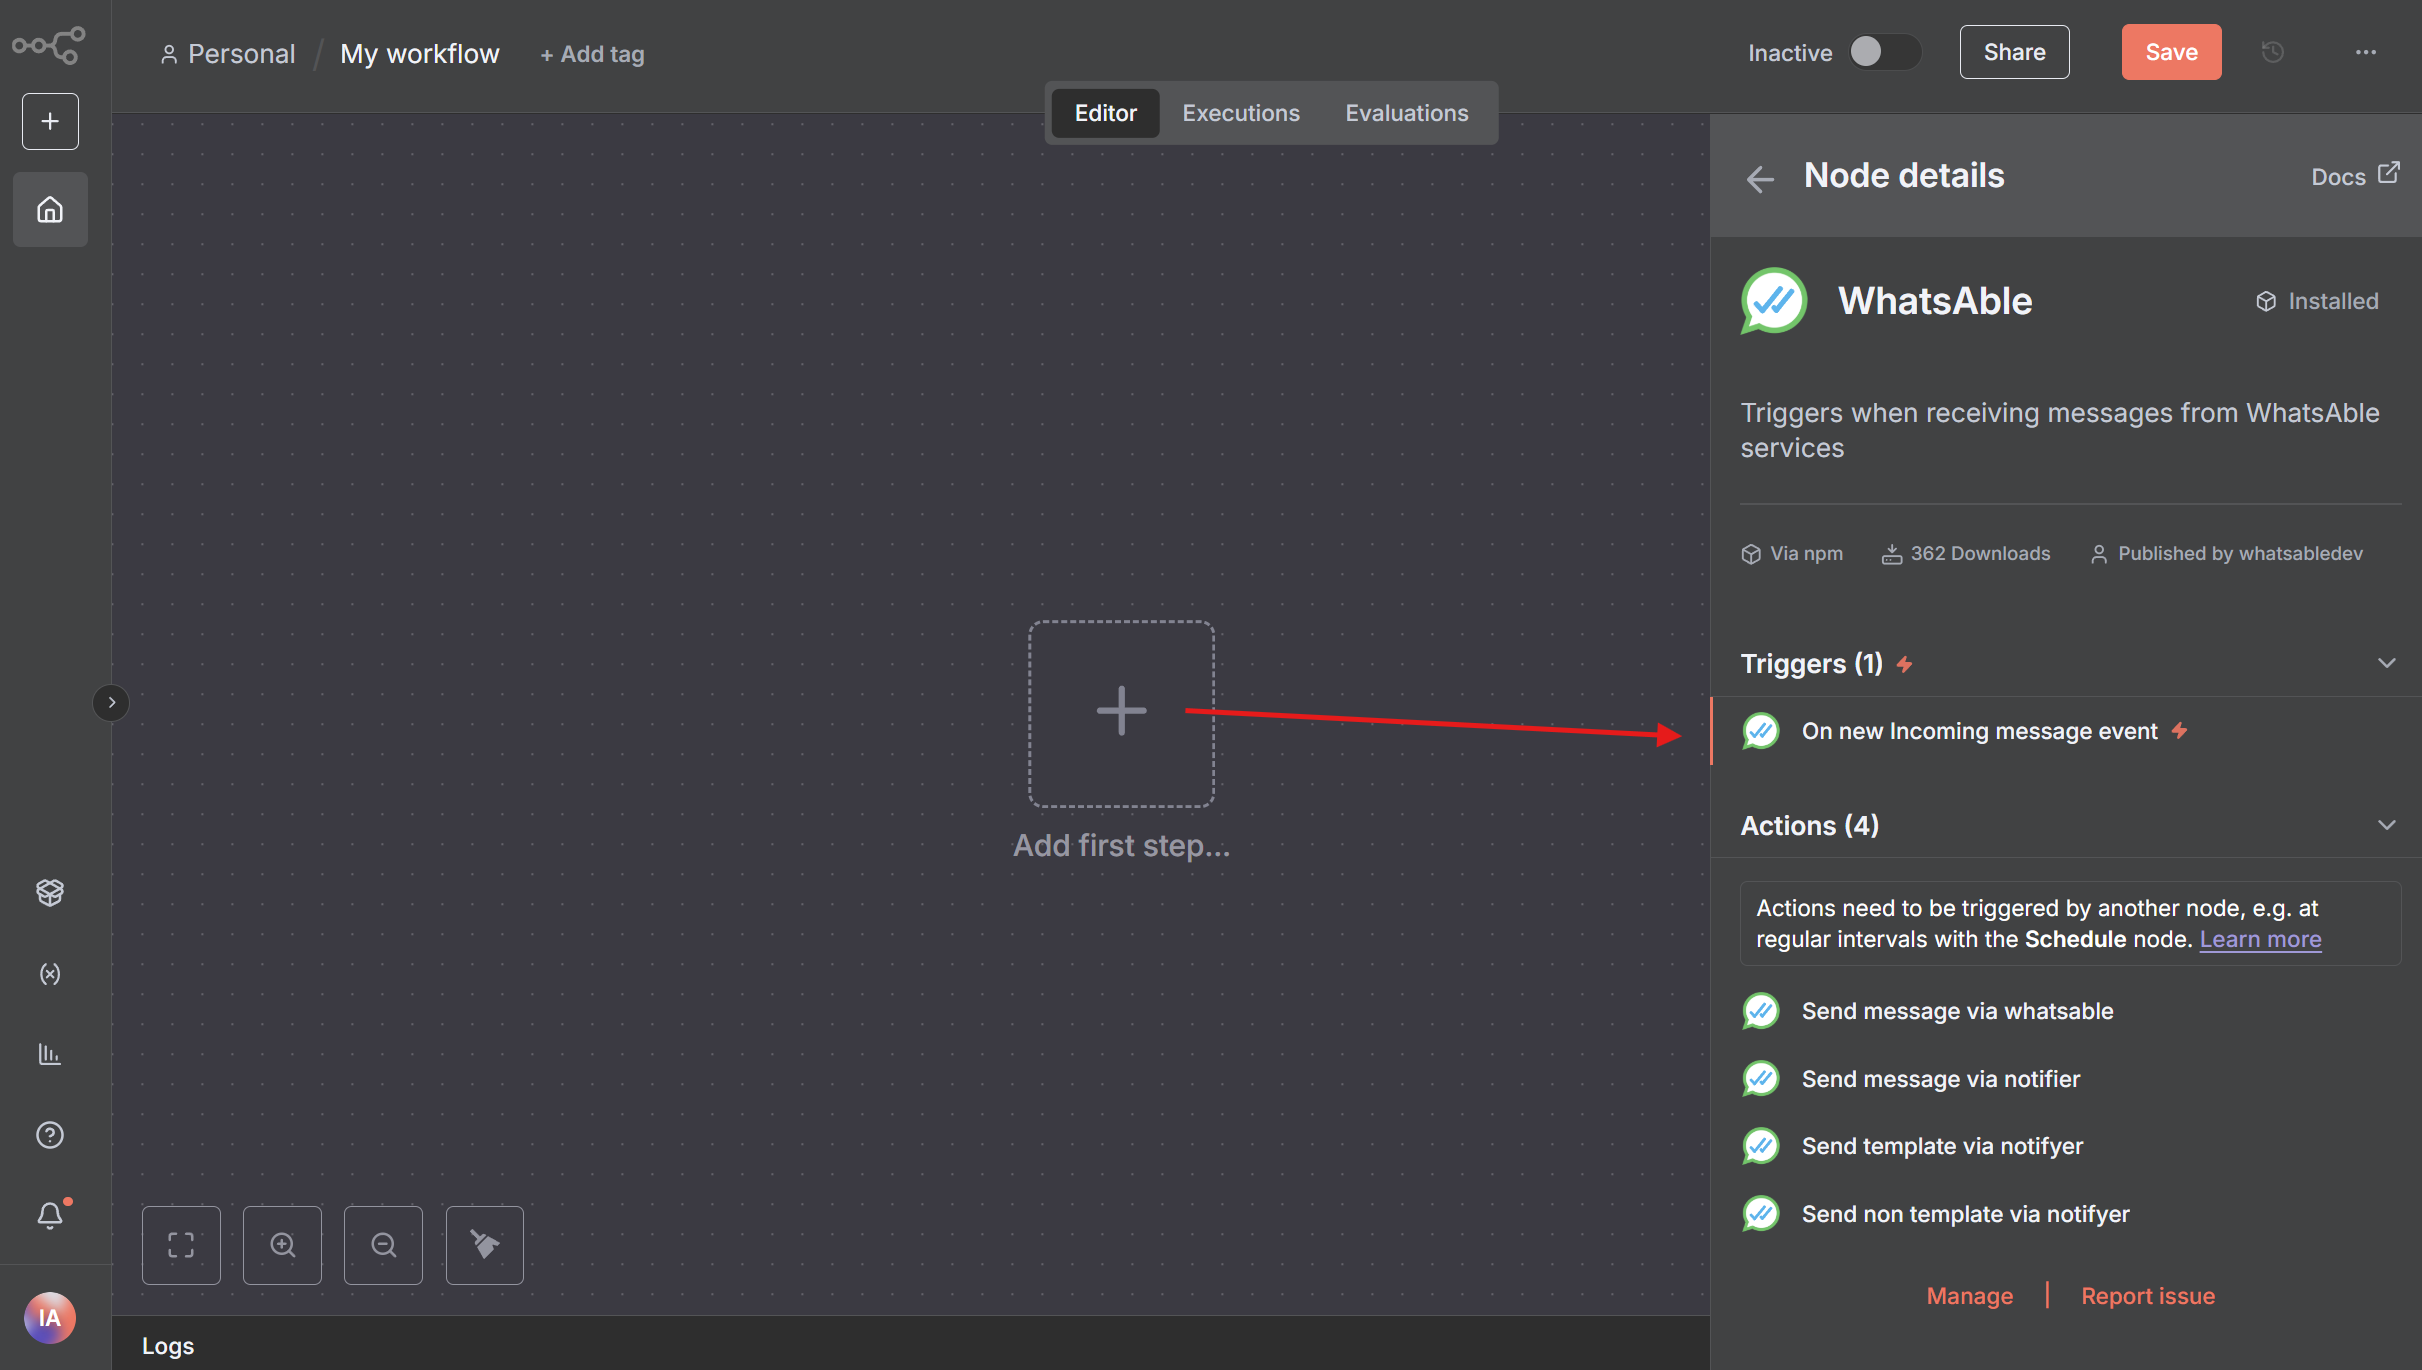
          1. Click the **+** button in your workflow canvas to add a new node
          2. Search for "WhatsAble" in the node library search bar
          3. Select the node displaying the official WhatsAble logo
          4. From the available trigger options, choose **On new Incoming message event**

          <Frame caption="Adding WhatsAble trigger node with 'On new Incoming message event' selection">
            <img src="https://mintcdn.com/whatsable/denF9KomrZc8Vz_c/images/trigger-node.png?fit=max&auto=format&n=denF9KomrZc8Vz_c&q=85&s=cd83cb5d371b8dd24f2dbdb03357db90" alt="WhatsAble node selection showing trigger options" width="2422" height="1370" data-path="images/trigger-node.png" />
          </Frame>

          <Tip>
            The trigger node will automatically listen for incoming messages and initiate your workflow when a new message is received.
          </Tip>
        </Step>

        <Step title="Configure authentication credentials">
          Set up your WhatsAble API credentials to establish a secure connection:

          **Webhook URL Configuration:**

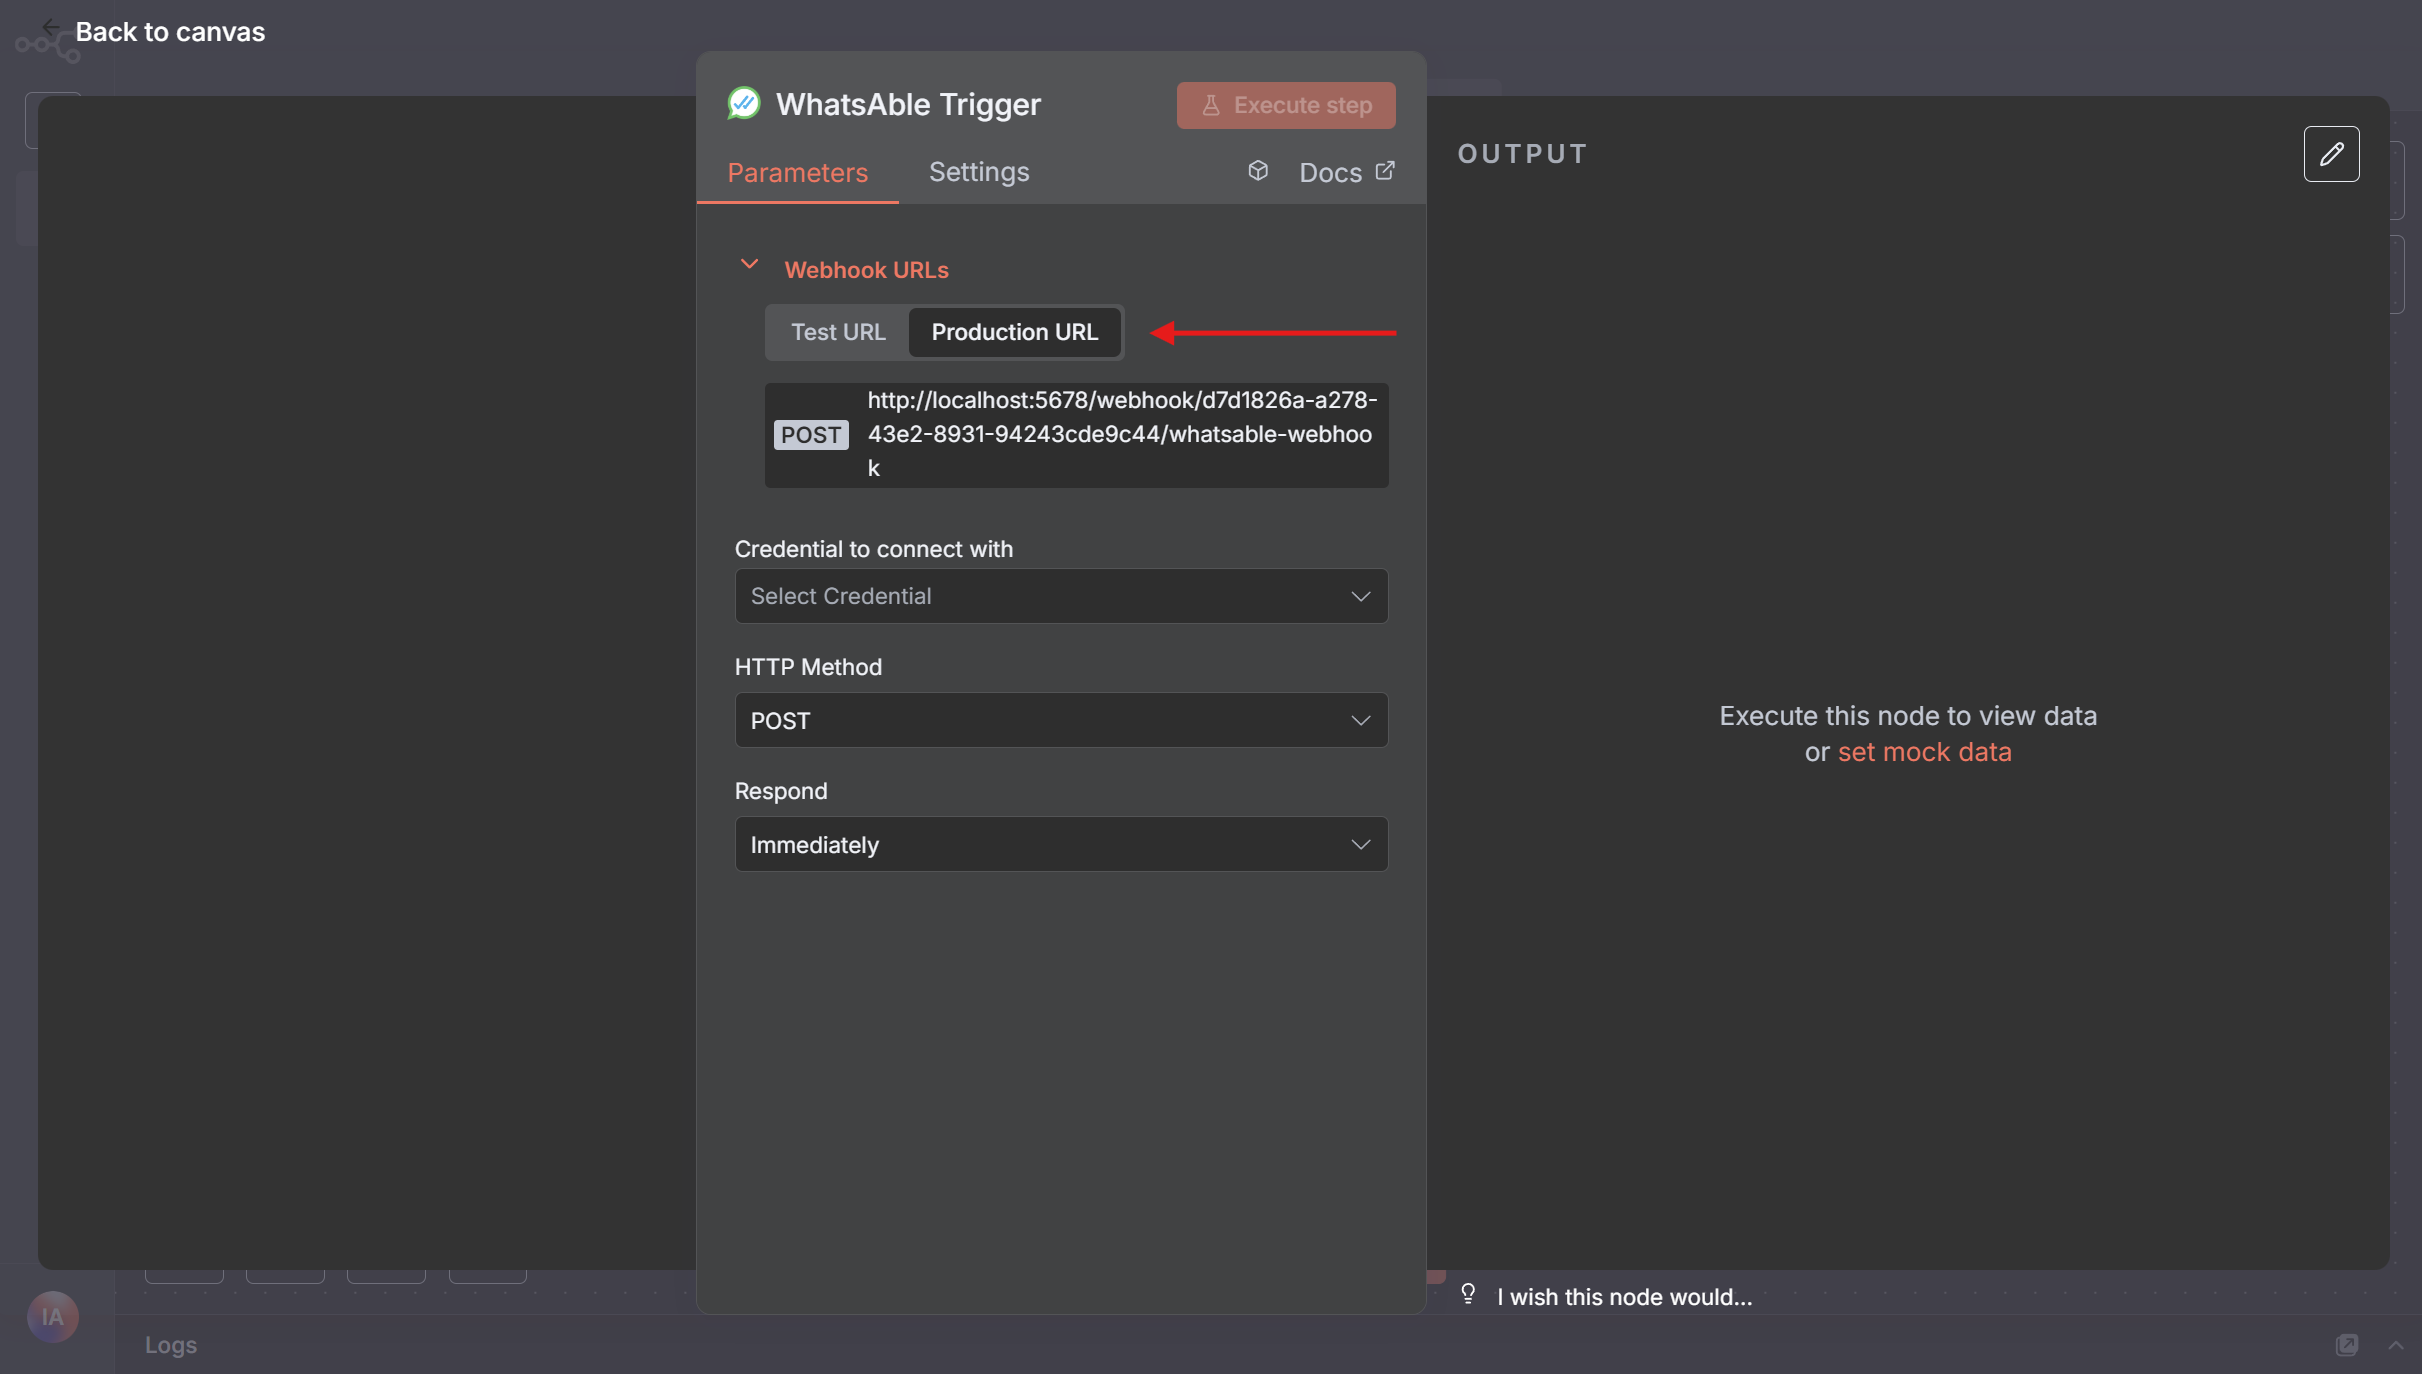
          1. In the WhatsAble Trigger node parameters, locate the **Webhook URLs** section at the top
          2. Select **Production URL** and copy the generated URL by clicking on it
          3. Store this URL securely as you'll need it for the credential setup

          <Frame caption="Copying the Production URL for webhook configuration">
            <img src="https://mintcdn.com/whatsable/denF9KomrZc8Vz_c/images/trigger-node-purl.png?fit=max&auto=format&n=denF9KomrZc8Vz_c&q=85&s=9557dc5278f7e136f69792a68595ab49" alt="Production URL selection and copy interface" width="2422" height="1374" data-path="images/trigger-node-purl.png" />
          </Frame>

          **Credential Creation:**

          1. In the **Credential to connect with** dropdown, click **+ Create new credential**
          2. Select **WhatsAble Notifyer System API** as your connection method
          3. Enter your Notifyer System API key in the **API Key** field
          4. Paste the Production URL you copied earlier into the **Production URL** field
          5. Assign a descriptive name to your credential (e.g., "WhatsAble Production")
          6. Click **Save** to securely store your credentials
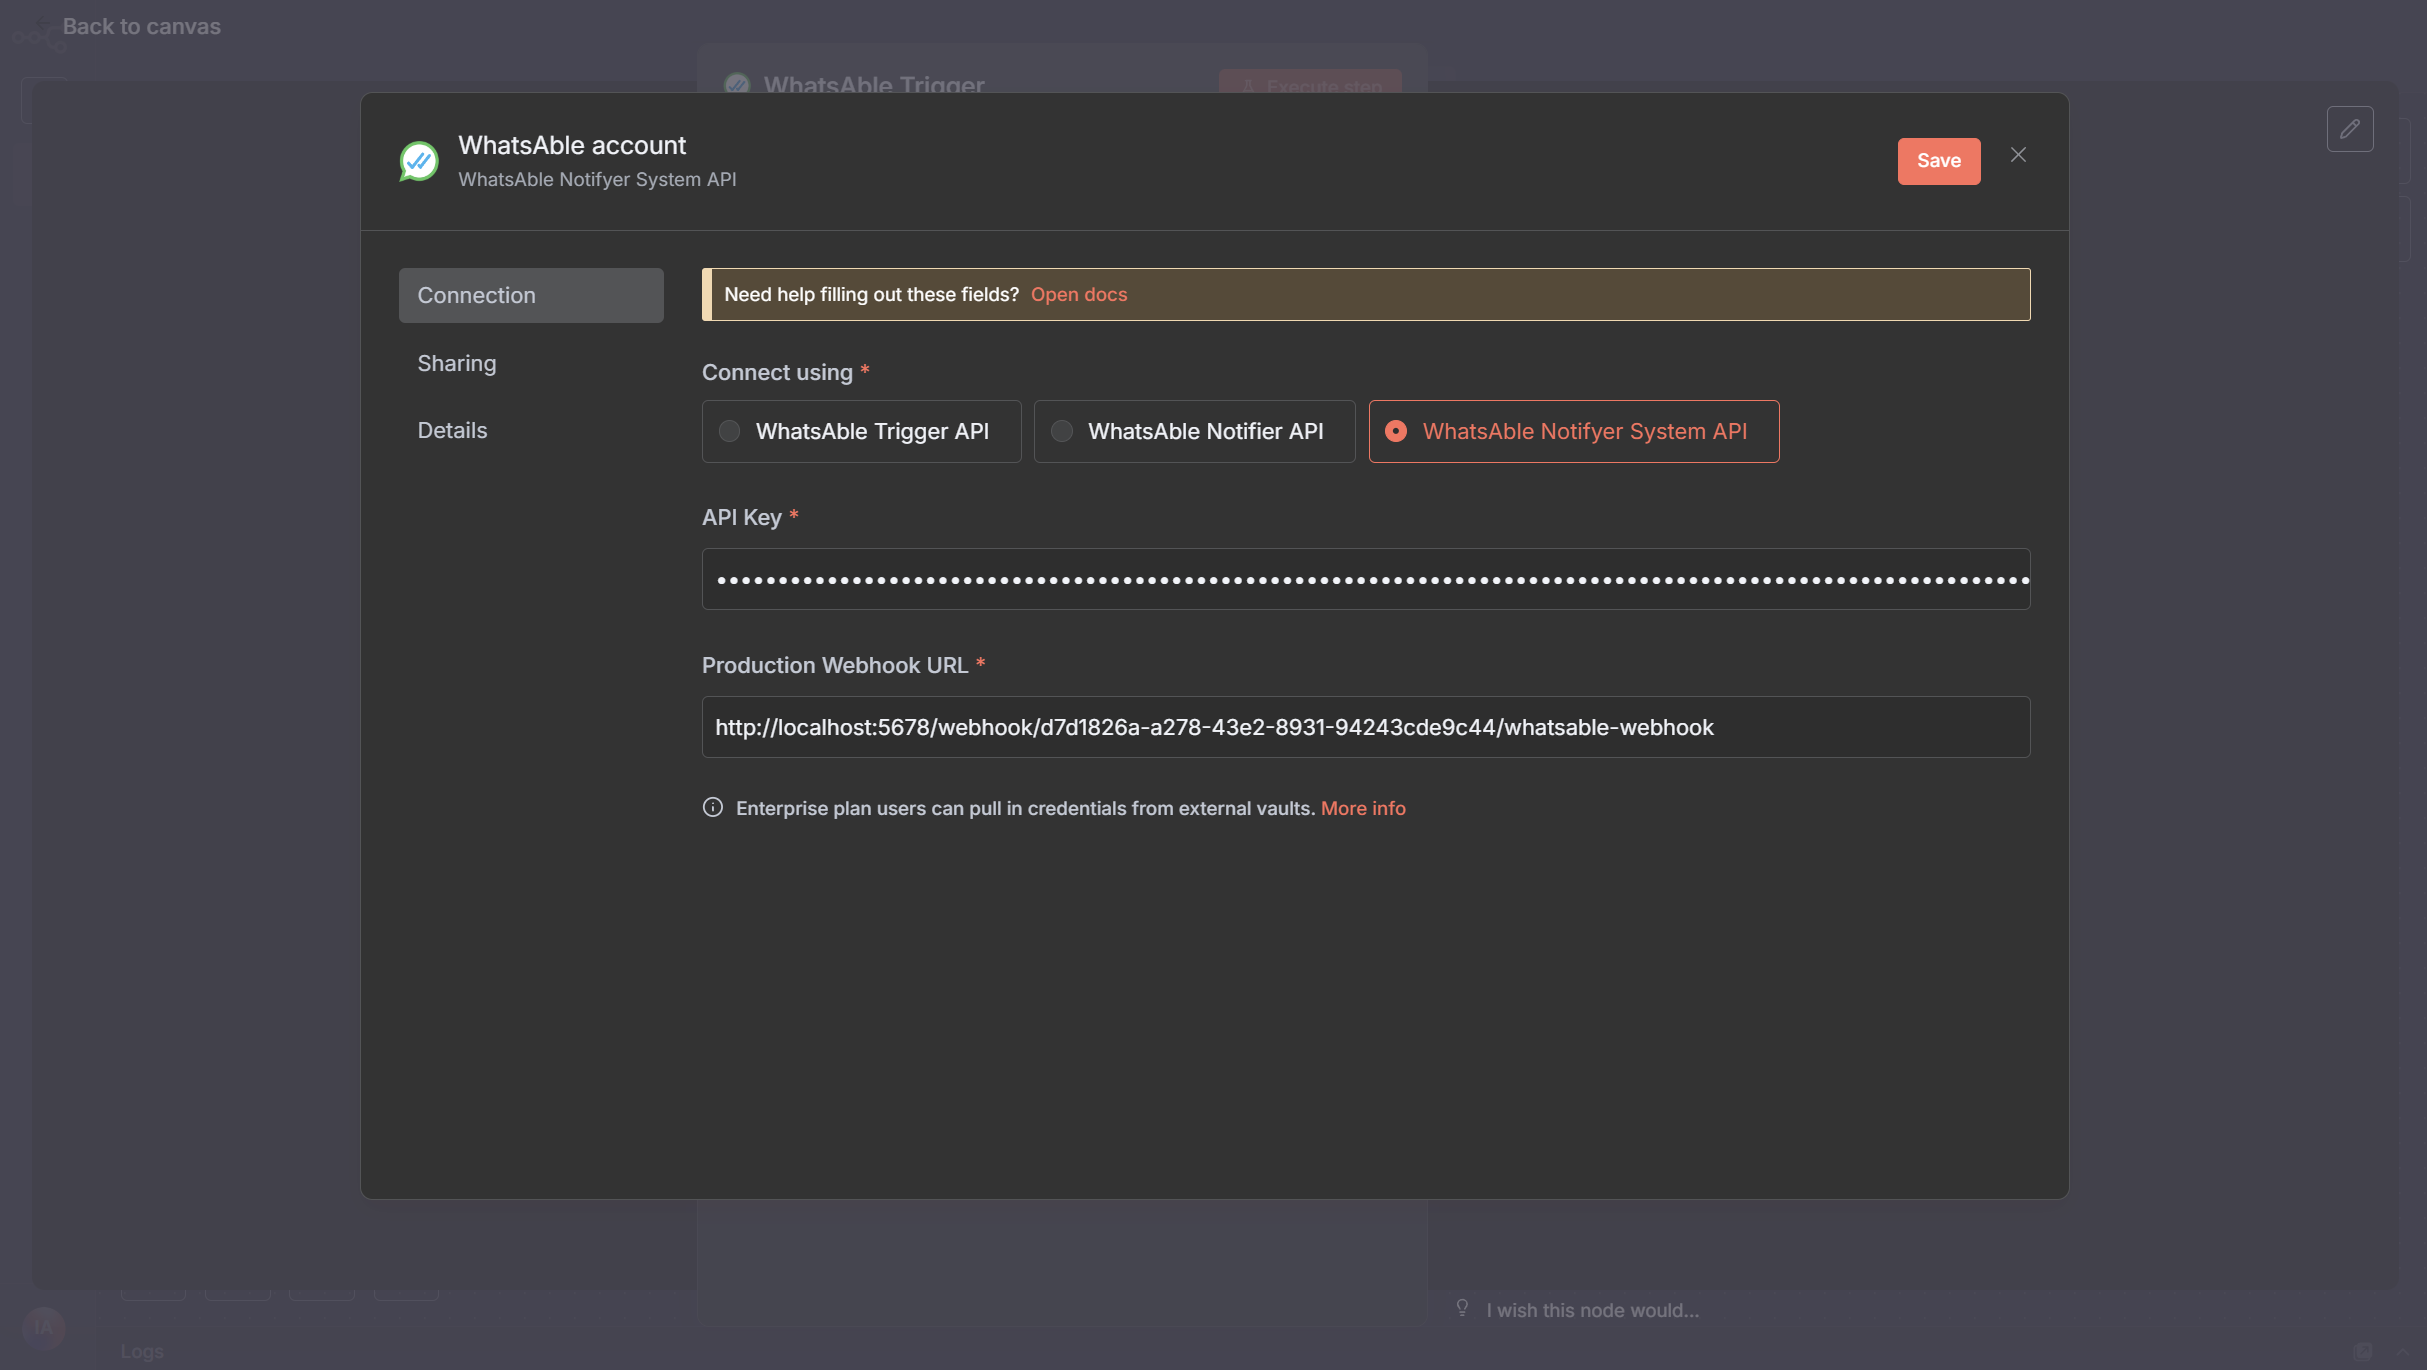
          <Frame caption="Credential configuration for WhatsAble Trigger node">
            <img src="https://mintcdn.com/whatsable/denF9KomrZc8Vz_c/images/notifyer-trigger-node.png?fit=max&auto=format&n=denF9KomrZc8Vz_c&q=85&s=66c3483c2ee88798e60df17d12a403b1" alt="WhatsAble credential configuration interface" width="2427" height="1370" data-path="images/notifyer-trigger-node.png" />
          </Frame>

          <Note>
            Your API credentials are encrypted and stored securely. Never share your API key publicly or commit it to version control.
          </Note>
        </Step>

        <Step title="Test and activate workflow">
          Complete the setup by testing and activating your trigger:

          **Response Configuration:**

          1. In the **Respond** dropdown, select your preferred response timing:
             * **Immediately**: Responds as soon as the trigger fires
             * **When Last Node Finishes**: Waits for the entire workflow to complete before responding

          **Testing:**

          1. Click **Execute step** on the WhatsAble node to run a test
          2. Verify the connection is working by checking for a success confirmation
          3. Review any error messages if the test fails and adjust your configuration accordingly

          <Check>
            Once activated, your workflow will automatically process incoming messages according to your configured logic.
          </Check>

          <Warning>
            Remember to test your workflow thoroughly before activating it in production to ensure it behaves as expected.
          </Warning>
        </Step>
      </Steps>
    </Accordion>
  </Step>

  <Step title="Add the Notifyer System node">
    1. Click the **+** button after your trigger node
    2. Search for "WhatsAble" in the nodes panel
    3. Select the node with the official WhatsAble logo
    4. After selecting the WhatsAble node, choose 'Send template via Notifyer' or 'Send non-template via Notifyer' as needed.

    <Frame caption="WhatsAble Node: Send Message via Send template via Notifyer / Send non-template via Notifyer">
      <img src="https://mintcdn.com/whatsable/denF9KomrZc8Vz_c/images/notifyer-node-action.png?fit=max&auto=format&n=denF9KomrZc8Vz_c&q=85&s=8992fd24276272c1422dae596e158a18" alt="WhatsAble node selection" width="2422" height="1370" data-path="images/notifyer-node-action.png" />
    </Frame>
  </Step>

  <Step title="Configure Notifyer System credential">
    1. In the WhatsAble node **Parameters**, find the **Credential to connect with** dropdown
    2. Select **+ Create new credential**
    3. Enter your Notifyer System API key that you copied earlier
    4. Name your credential (e.g., "Notifyer Production")
    5. Click **Save** to store your credential

    <Frame caption="Configuring Notifyer System credential">
      <img src="https://mintcdn.com/whatsable/denF9KomrZc8Vz_c/images/notifyer_n8n1.gif?s=84e7c0f200516777cb295cb05f5b90ba" alt="Configuring Notifyer System credential" width="1536" height="864" data-path="images/notifyer_n8n1.gif" />
    </Frame>
  </Step>

  <Step title="Configure your message">
    1. In **Resource** dropdown, select **Send Message**
    2. In the **Operation** dropdown, choose **Send template via Notifyer** for template messages or **Send non‑template via Notifyer** for regular messages (only works within the 24‑hour window).
    3. Complete the required fields:

    <Tabs>
      <Tab title="Operation: Send template via Notifyer">
        <Steps>
          <Step title="Configure message">
            Complete the required fields:

            <ResponseField name="Recipient" type="string" required>
              Enter the recipient's phone number with country code (e.g., +14155552671) or use dynamic data from previous nodes
            </ResponseField>

            <ResponseField name="Template Name or ID" type="dropdown" required>
              Select from your pre-approved templates in the dropdown
            </ResponseField>

            <ResponseField name="Template message details" type="string" required>
              Based on your selected Template message type, fill in the required fields:

              * For text messages: Enter your message content
              * For media messages: Provide a publicly accessible URL to your file
              * Optional caption (for media files)

              <Warning>
                For all media types, ensure your file URLs are publicly accessible and match the supported file formats.
              </Warning>
            </ResponseField>

            <ResponseField name="Note" type="string" optional>
              (Optional) Include a note in the template message for internal tracking
            </ResponseField>

            <ResponseField name="Label Names or IDs" type="dropdown" optional>
              (Optional) Select the label(s) you created in Chat Notifyer for internal tracking
            </ResponseField>

            <ResponseField name="Schedule Message" type="selection" optional>
              (Optional) Select the date and time to schedule when your message will be sent
            </ResponseField>
          </Step>
        </Steps>
      </Tab>

      <Tab title="Operation: Send non-template via Notifyer">
        <Steps>
          <Step title="Recipient Phone Number">
            Enter the **Phone Number** with country code
          </Step>

          <Step title="Select message type">
            Choose from the following message types:

            <CardGroup cols={2}>
              <Card title="Text Message" icon="message">
                For plain text messages
              </Card>

              <Card title="Document Message" icon="file">
                For sending documents (PDF, Word, etc.)
              </Card>

              <Card title="Image Message" icon="image">
                For sending images (JPEG, PNG, etc.)
              </Card>

              <Card title="Video Message" icon="video">
                For sending videos (MP4, 3GP, etc.)
              </Card>
            </CardGroup>
          </Step>

          <Step title="Complete message details">
            Based on your selected message type, fill in the required fields:

            * For text messages: Enter your message content
            * For media messages: Provide a publicly accessible URL to your file
            * Optional caption (for media files)

            <Warning>
              For all media types, ensure your file URLs are publicly accessible and match the supported file formats.
            </Warning>
          </Step>

          <Step title="Label Names or IDs">
            (Optional) Select the label(s) you created in Chat Notifyer for internal tracking
          </Step>

          <Step title="Schedule Message">
            (Optional) Select the date and time to schedule when your message will be sent
          </Step>
        </Steps>
      </Tab>
    </Tabs>
  </Step>

  <Step title="Test and activate your workflow">
    1. Click **Test Step** on the Notifyer node to verify it's working correctly
    2. If the test is successful, you'll see a confirmation message
    3. Return to your workflow
    4. Click **Save** to save your entire workflow
    5. Toggle the **Active** switch in the top-right corner to activate your workflow

    <Check>
      Your automated messaging workflow is now operational! Whenever your trigger conditions are met, n8n will automatically send WhatsApp messages through Notifyer System.
    </Check>
  </Step>
</Steps>

## Example use cases

<CardGroup cols={3}>
  <Card title="Order confirmations" icon="box-check">
    Send automatic order confirmations when new orders are placed
  </Card>

  <Card title="Appointment reminders" icon="calendar">
    Schedule reminders before upcoming appointments
  </Card>

  <Card title="Lead notifications" icon="user-plus">
    Alert your sales team when new leads come in
  </Card>

  <Card title="Customer support" icon="headset">
    Route support inquiries to the appropriate team member
  </Card>

  <Card title="Delivery updates" icon="truck">
    Keep customers informed about their delivery status
  </Card>

  <Card title="Payment reminders" icon="credit-card">
    Send automatic payment reminders for overdue accounts
  </Card>
</CardGroup>

## Best practices

<AccordionGroup>
  <Accordion title="Test thoroughly" icon="vial">
    Always test your workflows with test phone numbers before activating them for production use.
  </Accordion>

  <Accordion title="Use templates" icon="file-lines">
    Whenever possible, use pre-approved templates for better deliverability and compliance.
  </Accordion>

  <Accordion title="Add personalization" icon="user">
    Include customer names and specific details to increase engagement and response rates.
  </Accordion>

  <Accordion title="Follow WhatsApp policies" icon="shield-check">
    Ensure all message content complies with WhatsApp Business policies to avoid account restrictions.
  </Accordion>

  <Accordion title="Monitor performance" icon="chart-line">
    Regularly check your message delivery rates in your Notifyer dashboard.
  </Accordion>
</AccordionGroup>

## Troubleshooting

<AccordionGroup>
  <Accordion title="Messages not sending?" icon="circle-exclamation">
    <Steps>
      <Step title="Verify API key">
        Ensure your API key is entered correctly in the n8n credentials
      </Step>

      <Step title="Check phone numbers">
        Confirm phone numbers are in the correct international format (e.g., +14155552671)
      </Step>

      <Step title="Check subscription">
        Verify your Notifyer subscription is active and has available credits
      </Step>

      <Step title="Template verification">
        For template messages, ensure you're using an approved template
      </Step>
    </Steps>
  </Accordion>

  <Accordion title="Template errors?" icon="file-exclamation">
    <Steps>
      <Step title="Variable check">
        Verify all required variables are included in your template message
      </Step>

      <Step title="Format verification">
        Check that variable formats match the expected values (text, number, date, etc.)
      </Step>

      <Step title="Template name">
        Ensure you're using the correct template name exactly as it appears in your dashboard
      </Step>
    </Steps>
  </Accordion>

  <Accordion title="Media not displaying?" icon="image">
    <Steps>
      <Step title="URL access">
        Confirm your media URLs are publicly accessible (test in an incognito browser)
      </Step>

      <Step title="File format">
        Verify the file format is supported by WhatsApp
      </Step>

      <Step title="File size">
        Check that file sizes are within WhatsApp limits:

        * Images: up to 5MB
        * Videos: up to 16MB
        * Documents: up to 100MB
      </Step>
    </Steps>
  </Accordion>
</AccordionGroup>

## Need help?

Our support team is ready to assist you:

<CardGroup cols={3}>
  <Card title="Email support" icon="envelope" href="mailto:team@whatsable.app">
    Contact [team@whatsable.app](mailto:team@whatsable.app)
  </Card>

  <Card title="Schedule a demo" icon="calendar" href="https://tidycal.com/axelmeta/notifyer-systems-demo">
    Book a personalized walkthrough
  </Card>

  <Card title="Live chat" icon="message-dots" href="">
    Click the green chat button in the bottom right corner of the Notifyer dashboard
  </Card>
</CardGroup>

<Info>
  For additional automation platform integrations (Make.com, Zapier, etc.), please contact our support team or check our integration documentation.
</Info>