> ## Documentation Index
> Fetch the complete documentation index at: https://docs.whatsable.app/llms.txt
> Use this file to discover all available pages before exploring further.

# Embedding Process

> Connect your WhatsApp Business Account to the Notifyer System to enable automated messaging capabilities

# WhatsApp Business Account Integration

<Frame caption="Connect your WhatsApp Business account to unlock powerful automated messaging">
  <iframe className="w-full aspect-video" src="https://www.youtube.com/embed/-QiBtKxki1w" title="WhatsApp Business Integration" frameBorder="0" allow="accelerometer; autoplay; clipboard-write; encrypted-media; gyroscope; picture-in-picture" allowFullScreen />
</Frame>

## Overview

Notifyer System enables businesses to send automated WhatsApp messages to customers through a direct integration with the WhatsApp Business Platform. This guide walks you through the embedding process to connect your WhatsApp Business Account with Notifyer System.

<Note>
  This process uses Meta's Embedded Signup flow, which allows you to create or connect your WhatsApp Business Account directly within Notifyer System.
</Note>

## Prerequisites

<Check>
  Active Notifyer System account with a subscription plan or pay-as-you-go credit
</Check>

<Check>
  Meta Business Portfolio (or willingness to create one during the process)
</Check>

<Check>
  A phone number that isn't currently associated with any WhatsApp account
</Check>

<Warning>
  The phone number you use for your WhatsApp Business Account cannot have an existing WhatsApp account associated with it. If you're using a number that already has WhatsApp, you'll need to delete that account or use a different number.
</Warning>

## Integration Process

<Steps>
  <Step title="Access the Connection Flow">
    <Accordion title="Navigating to the Connection Page" defaultOpen={true}>
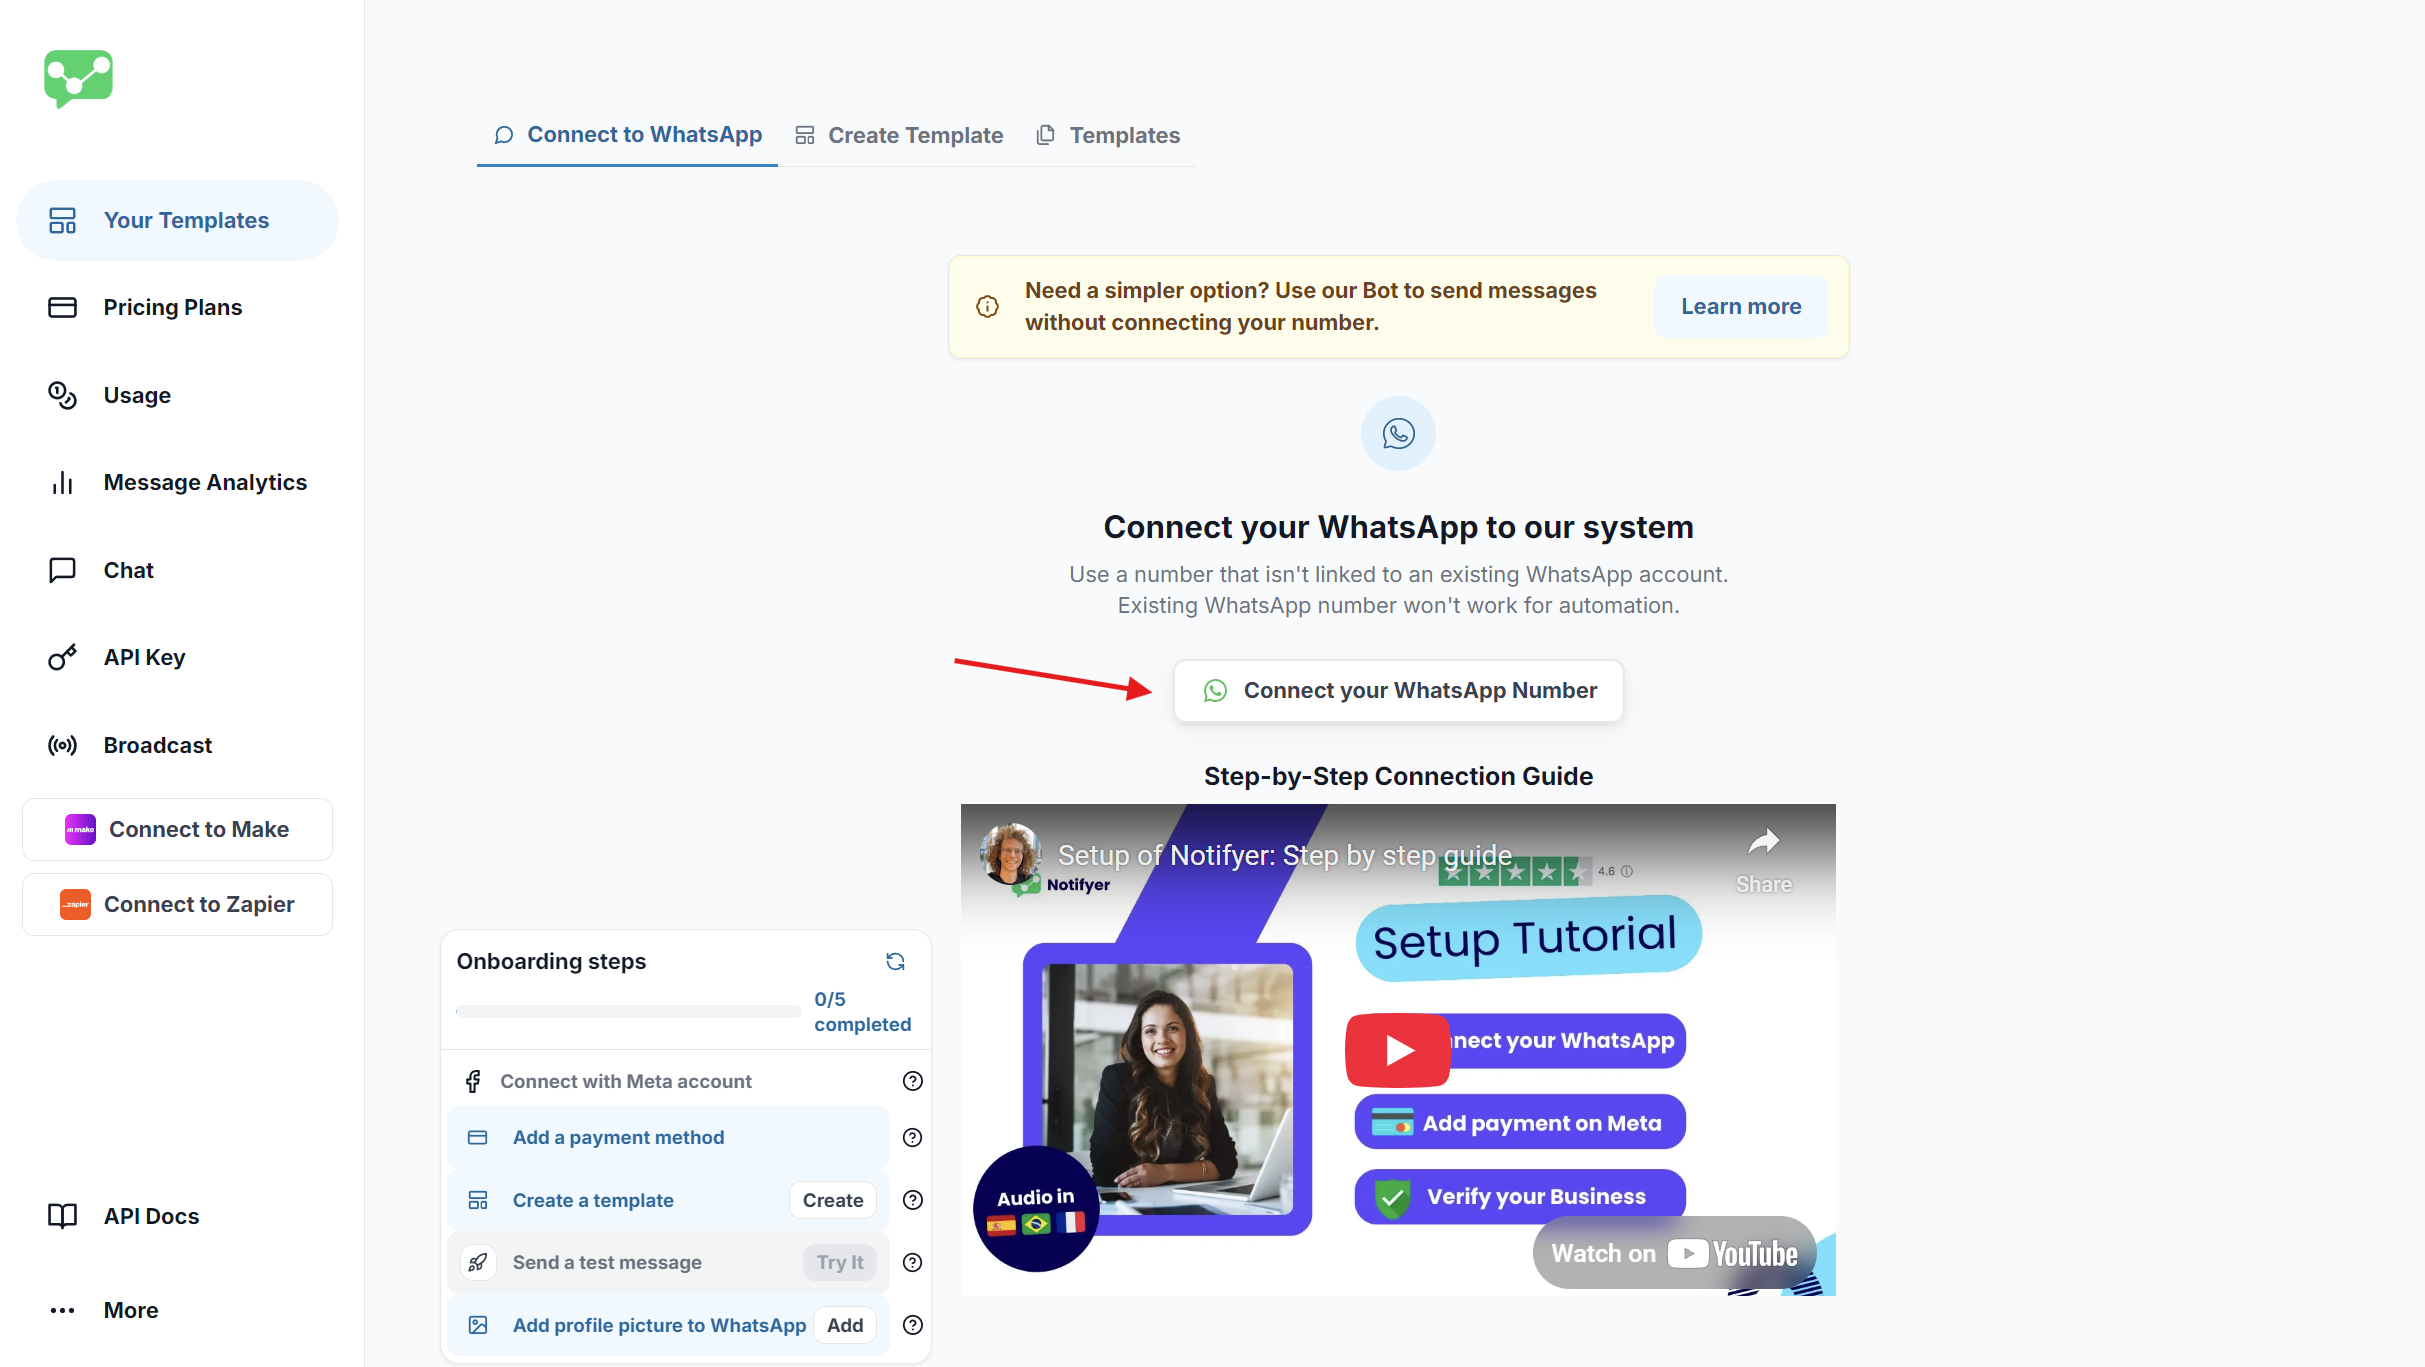
      1. Log in to your Notifyer System dashboard
      2. Navigate to **Your Templates** section
      3. Make sure you're on the **Connect to WhatsApp** tab
      4. Click the **Connect your WhatsApp Number** button in the center of the page

      <Frame caption="Automate your WhatsApp messaging scenarios with Make and Notifier">
        <img src="https://mintcdn.com/whatsable/denF9KomrZc8Vz_c/images/notifyer_emb1.png?fit=max&auto=format&n=denF9KomrZc8Vz_c&q=85&s=d39ccda5675b8b79659de55a1ef4ef33" className="rounded-xl" width="2425" height="1367" data-path="images/notifyer_emb1.png" />
      </Frame>
    </Accordion>

    <Tip>
      You can track your progress through the onboarding process using the steps indicator in the bottom-left corner of the screen.
    </Tip>
  </Step>

  <Step title="Connect with Facebook">
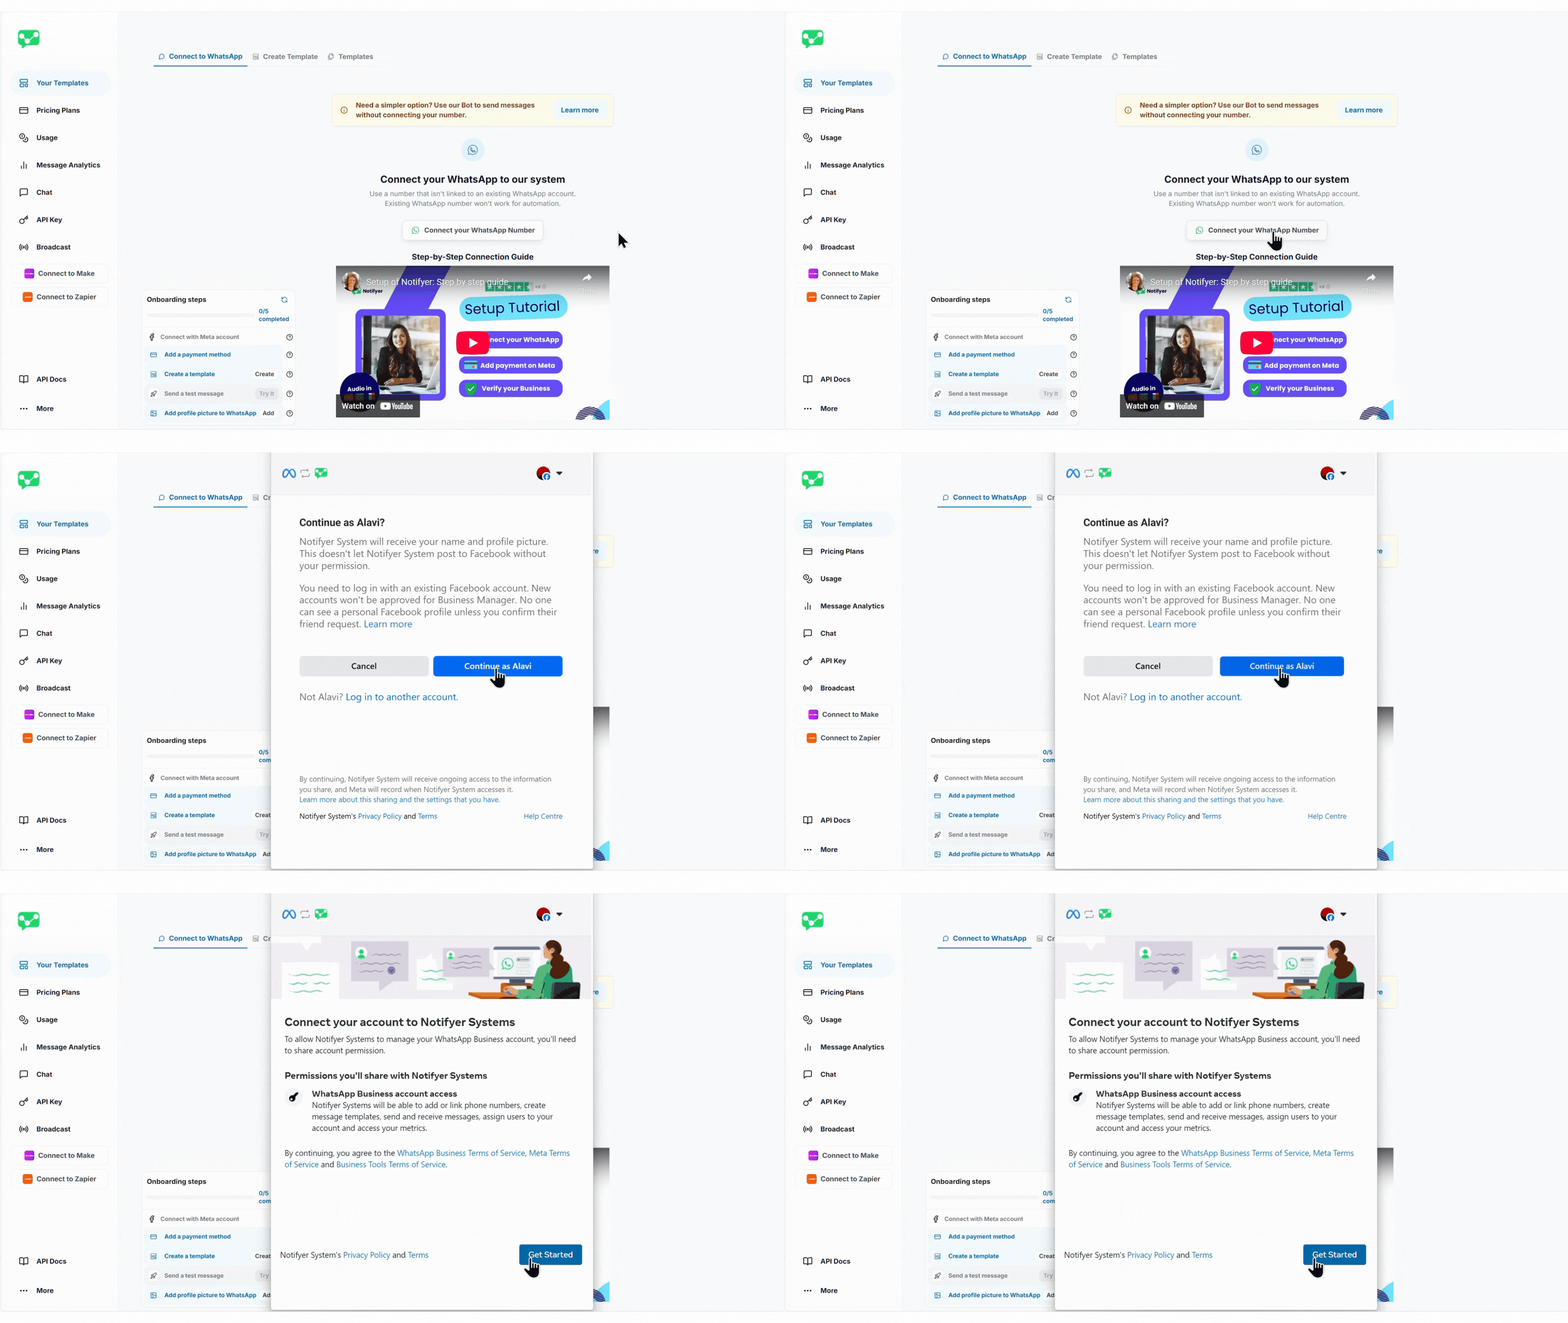
    1. Log in with your Facebook account when prompted
    2. If already logged in, click **Continue as \[your Facebook username]**
    3. Review the permissions Notifyer System is requesting
    4. Click **Get Started** to begin the configuration process

    <Frame caption="Connecting with Facebook">
      <img src="https://mintcdn.com/whatsable/denF9KomrZc8Vz_c/images/notifyer_emb2.gif?s=5dad3d6f982cf1cc800387d59138da68" alt="Connecting with Facebook" width="1920" height="1080" data-path="images/notifyer_emb2.gif" />
    </Frame>
  </Step>

  <Step title="Complete the 6-Step Configuration">
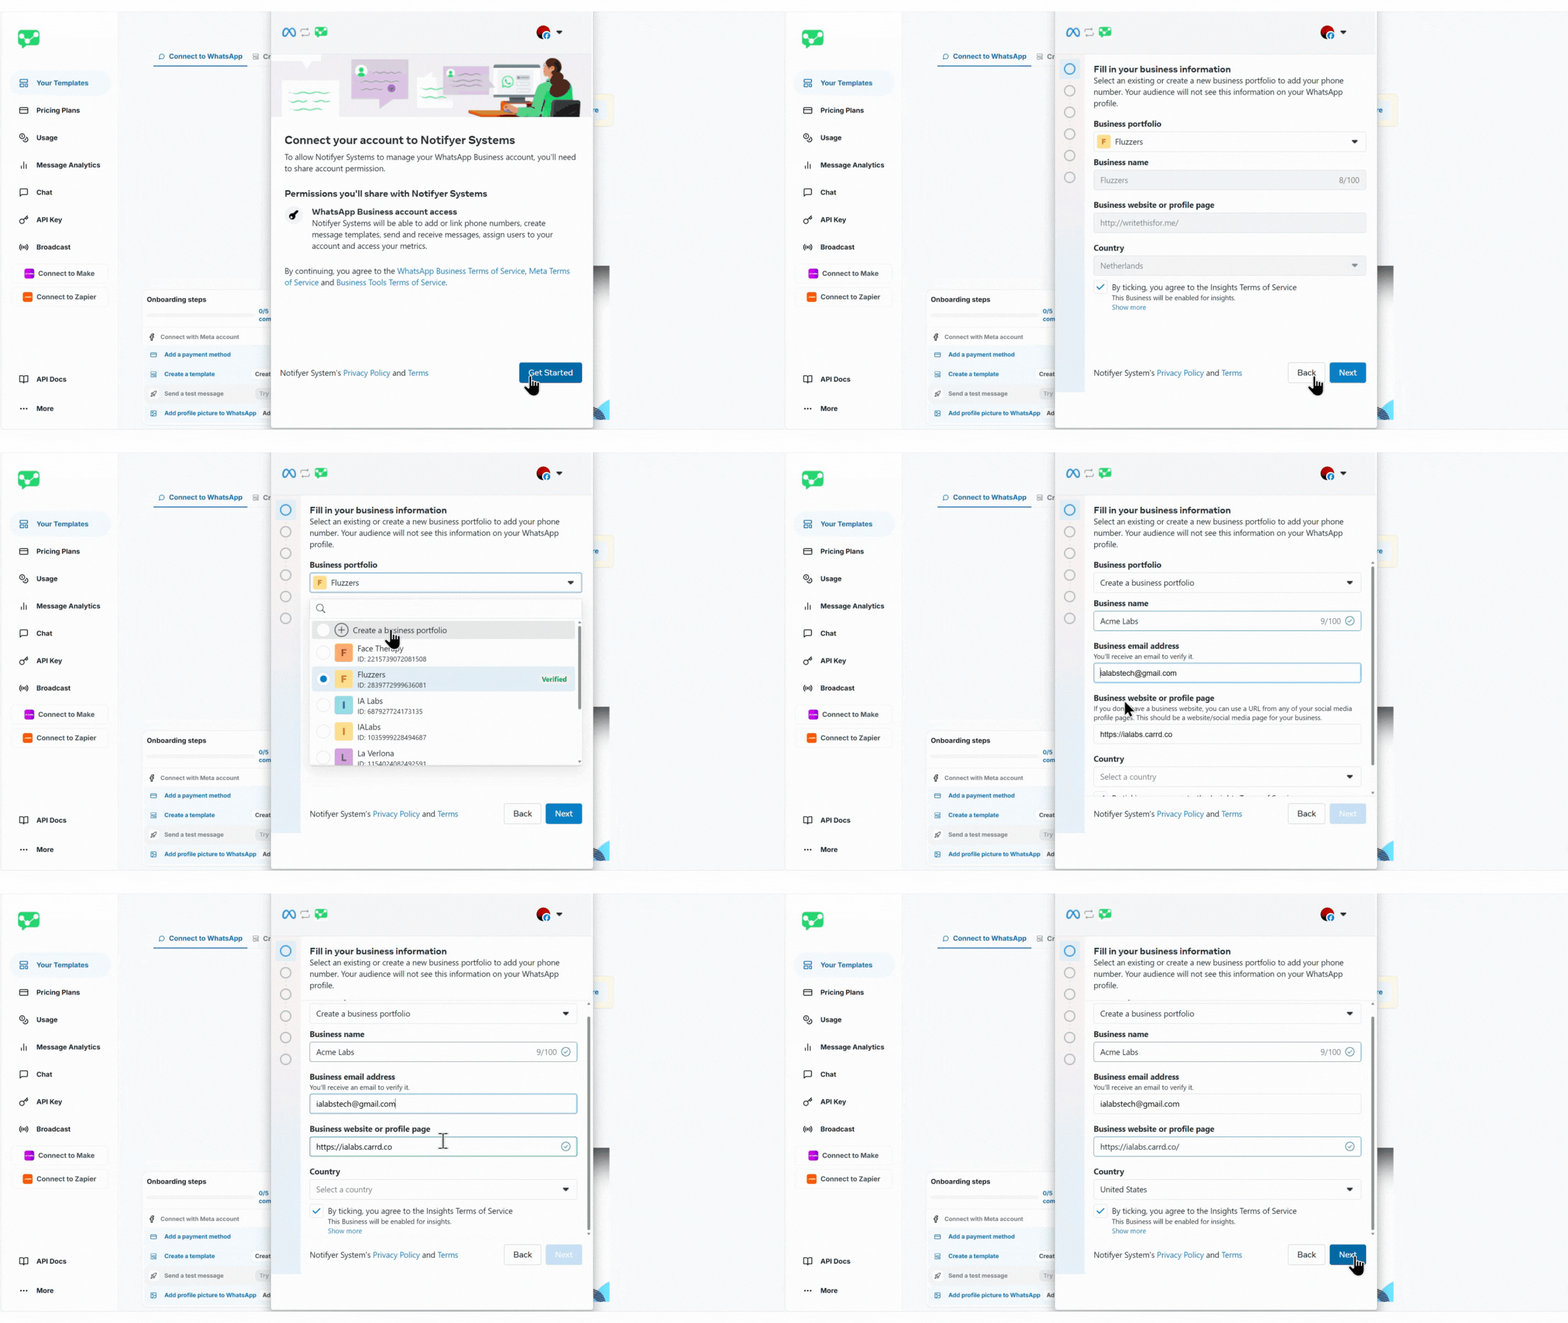
    <Accordion title="Step 1: Business Information" icon="building">
      <ResponseField name="Business Portfolio" type="dropdown" required>
        Select an existing business portfolio or create a new one
      </ResponseField>

      <Accordion title="Create a business portfolio" icon="circle-check">
        If you choose to create a new business portfolio, fill out the required fields:

        <ResponseField name="Business Name" type="string" required>
          Your official business name (must be unique among your portfolios)
        </ResponseField>

        <ResponseField name="Business Email Address" type="string" required>
          A valid email that can receive verification messages
        </ResponseField>

        <ResponseField name="Business Website or Profile" type="string" required>
          Your business website URL or social media profile
        </ResponseField>

        <ResponseField name="Country" type="string" required>
          Country where your business is located
        </ResponseField>

        <Frame caption="Entering required information in Business Information section">
          <img src="https://mintcdn.com/whatsable/denF9KomrZc8Vz_c/images/notifyer_emb3.gif?s=d5fde523853c6a3891fa44c8a1ded016" alt="Entering required information in Business Information section" width="1536" height="864" data-path="images/notifyer_emb3.gif" />
        </Frame>
      </Accordion>

      <Accordion title="Existing Portfolios" icon="circle-check">
        Choose a business portfolio you've already configured in Meta Business Suite

        <Info>
          See how to [create a business portfolio in Meta Business Suite and Business Manager.](https://www.facebook.com/business/help/1710077379203657)

          If you select an existing portfolio, your business name, website, and country will be automatically populated from your Meta Business configuration.
        </Info>
      </Accordion>
    </Accordion>

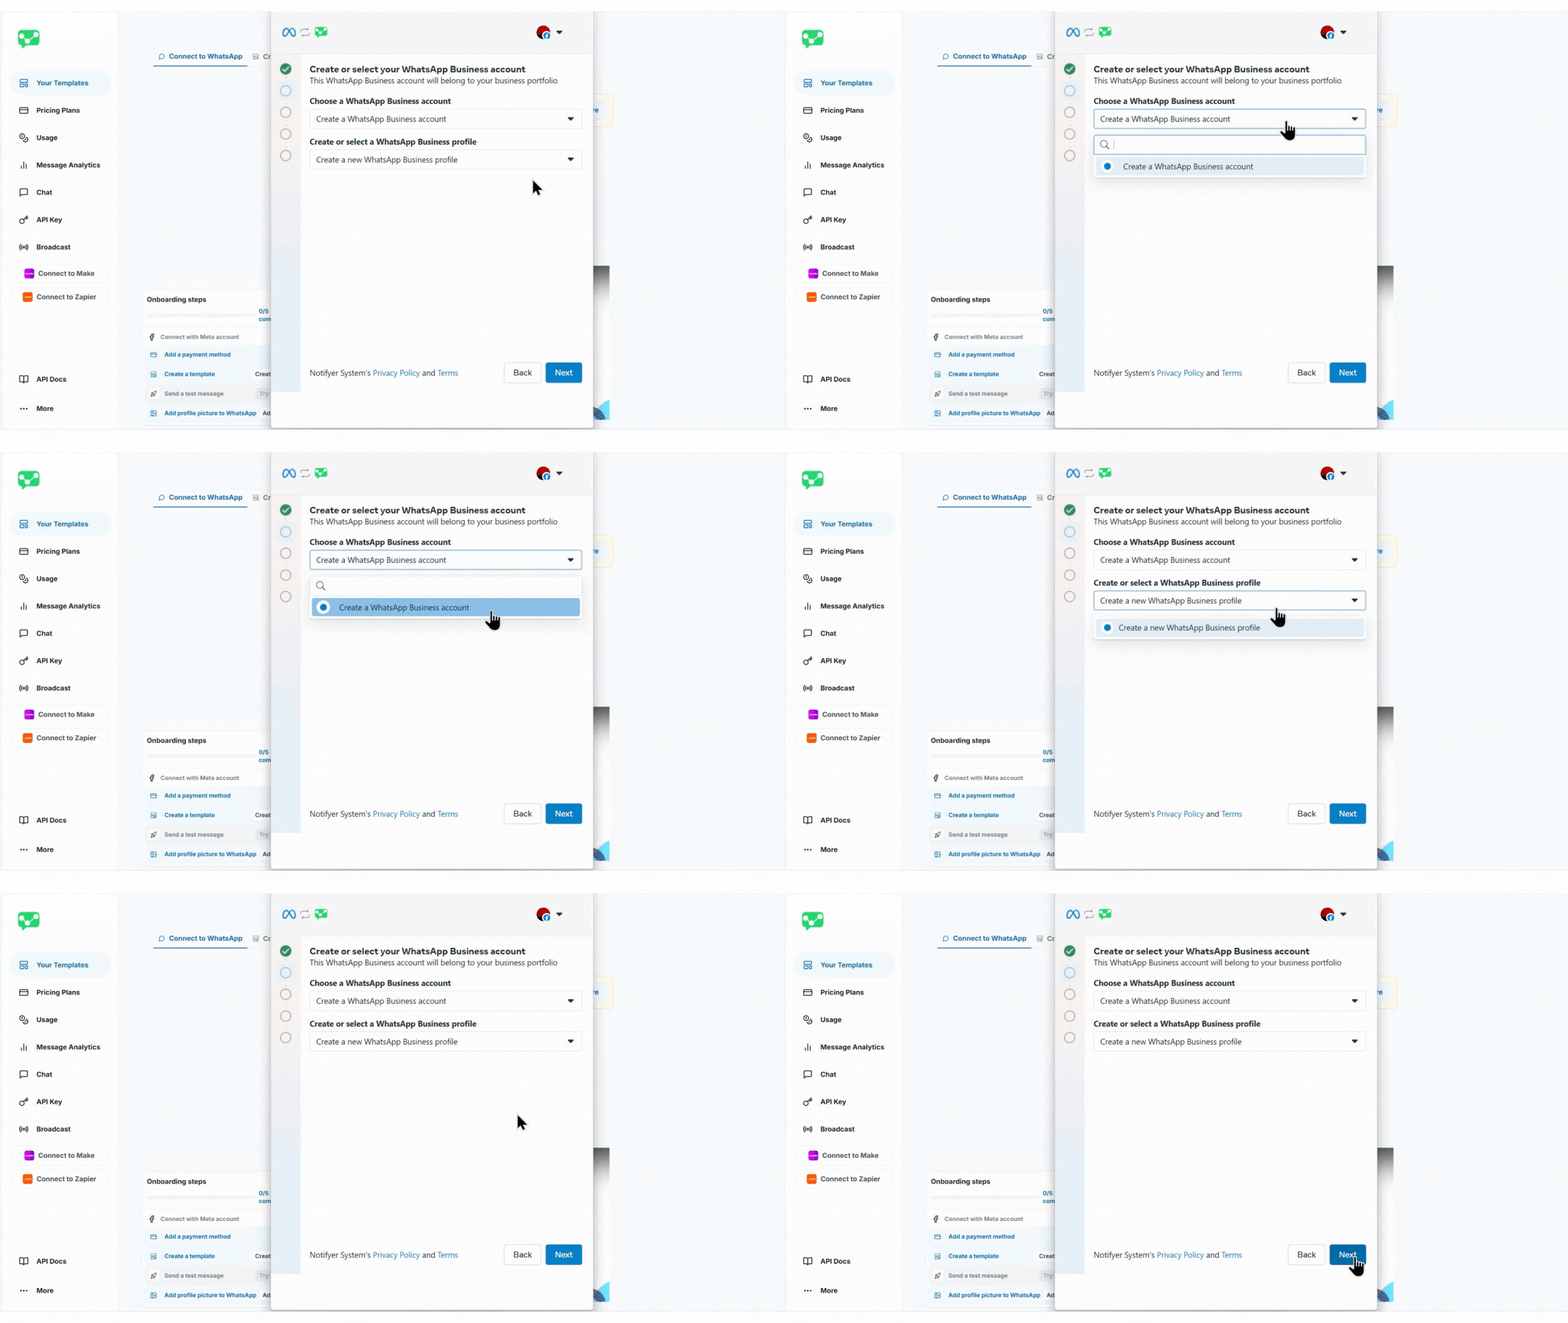
    <Accordion title="Step 2: Select WhatsApp Business Account" icon="message">
      <ResponseField name="WhatsApp Business Account" type="radio" required>
        Select whether to create a new account or use an existing one
      </ResponseField>

      <Expandable title="Account Options">
        <ResponseField name="Create new account" type="option">
          **Recommended** for first-time users (default option)
        </ResponseField>

        <ResponseField name="Select existing account" type="option">
          Only available if you have existing WhatsApp Business accounts
        </ResponseField>
      </Expandable>

      <ResponseField name="WhatsApp Business Profile" type="radio" required>
        Select whether to create a new profile or use an existing one
      </ResponseField>

      <Expandable title="Profile Options">
        <ResponseField name="Create new profile" type="option">
          **Recommended** for first-time users (default option)
        </ResponseField>

        <ResponseField name="Select existing profile" type="option">
          Only available if you connect an existing WhatsApp Business profile
        </ResponseField>
      </Expandable>

      <br />

      <Frame caption="Selecting options for WhatsApp Business Account and Profile">
        <img src="https://mintcdn.com/whatsable/denF9KomrZc8Vz_c/images/notifyer_emb4.gif?s=9eca4dc31921aed19168afc62db4544d" alt="Selecting options for WhatsApp Business Account and Profile" width="1536" height="864" data-path="images/notifyer_emb4.gif" />
      </Frame>
    </Accordion>

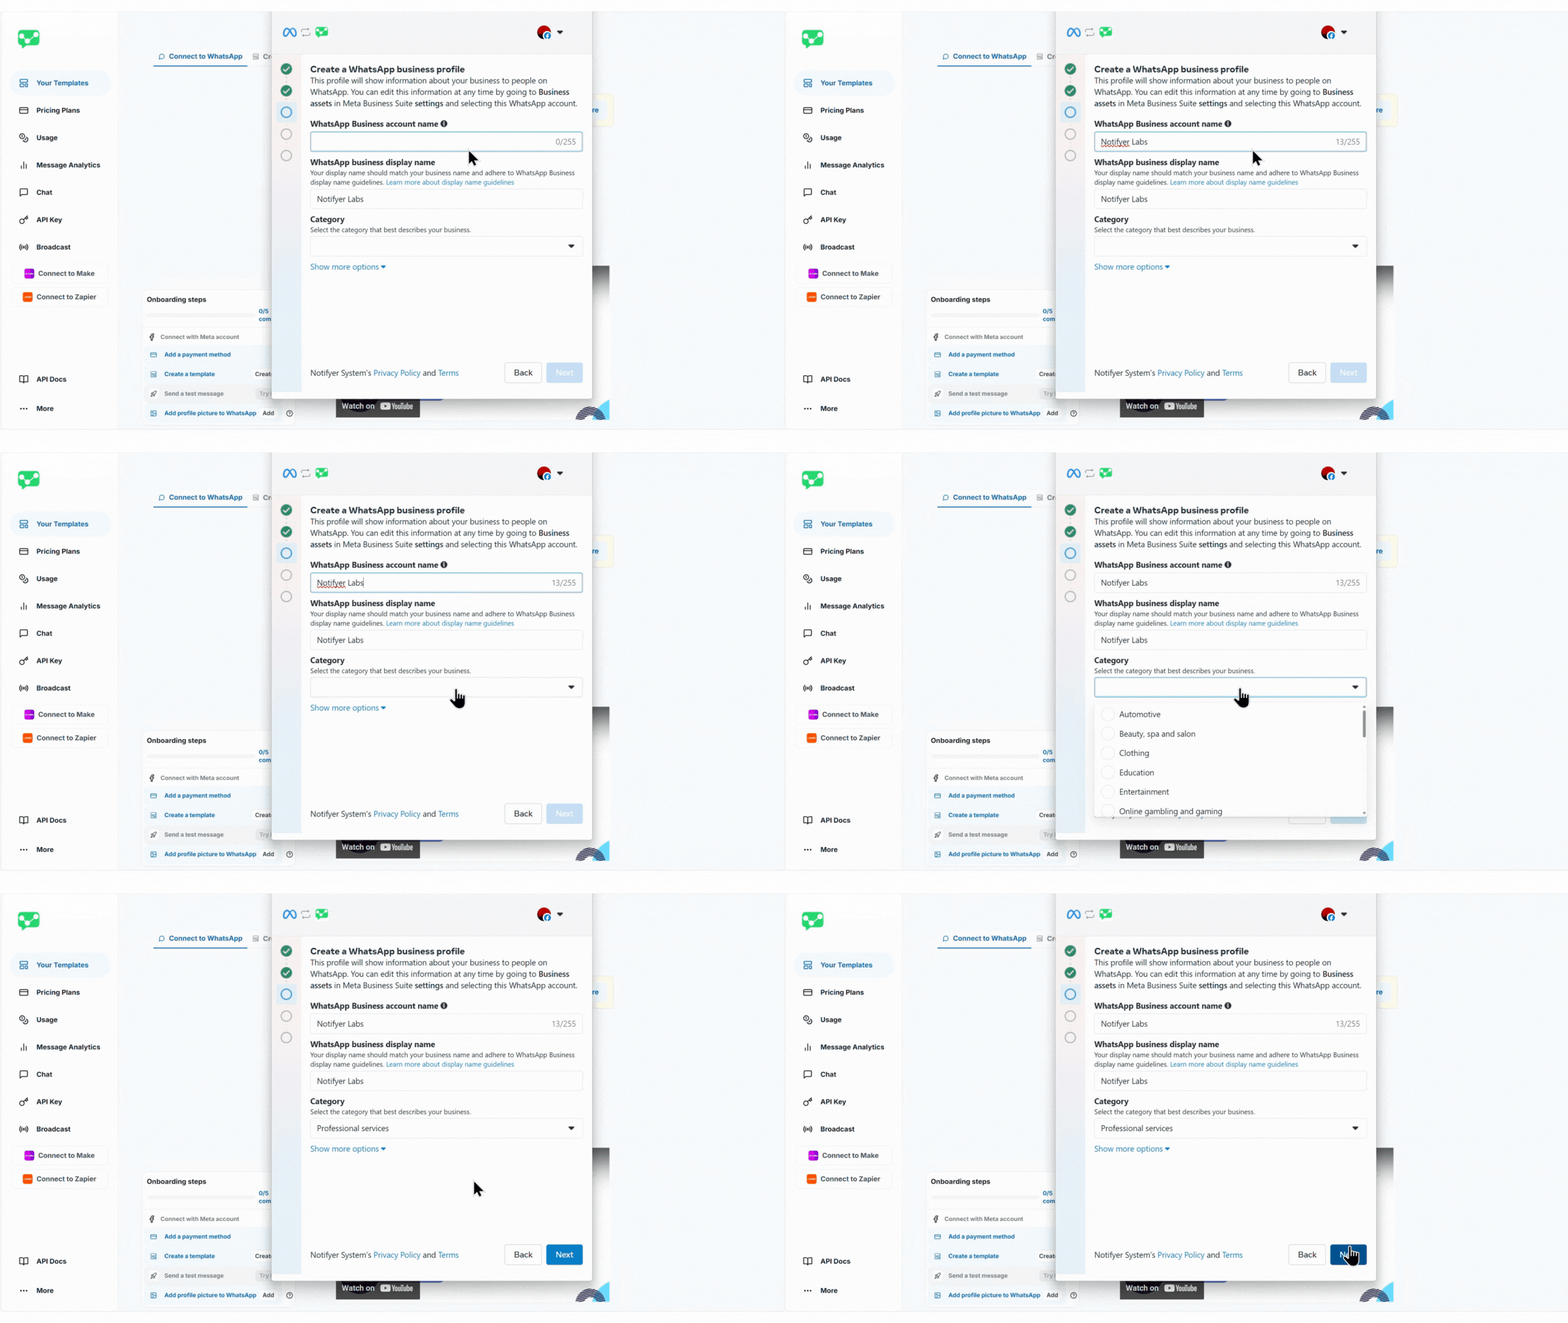
    <Accordion title="Step 3: Business Profile Setup" icon="id-card">
      <ResponseField name="WhatsApp Business Account Name" type="string" required>
        The internal name of your account (used for management purposes)
      </ResponseField>

      <ResponseField name="WhatsApp Business Display Name" type="string" required>
        The name your customers will see when receiving messages from your business

        <Warning>
          This is the name your customers will see when receiving messages from your business. Choose carefully as it impacts brand recognition.
        </Warning>
      </ResponseField>

      <ResponseField name="Category" type="dropdown" required>
        Business category that best represents your industry (will be displayed on your profile)
      </ResponseField>

      <Frame caption="Entering required information in Create a WhatsApp business profile section">
        <img src="https://mintcdn.com/whatsable/denF9KomrZc8Vz_c/images/notifyer_emb5.gif?s=1d590f01295e8c5db00bd9382e642ceb" alt="Entering required information in Create a WhatsApp business profile section" width="1536" height="864" data-path="images/notifyer_emb5.gif" />
      </Frame>
    </Accordion>

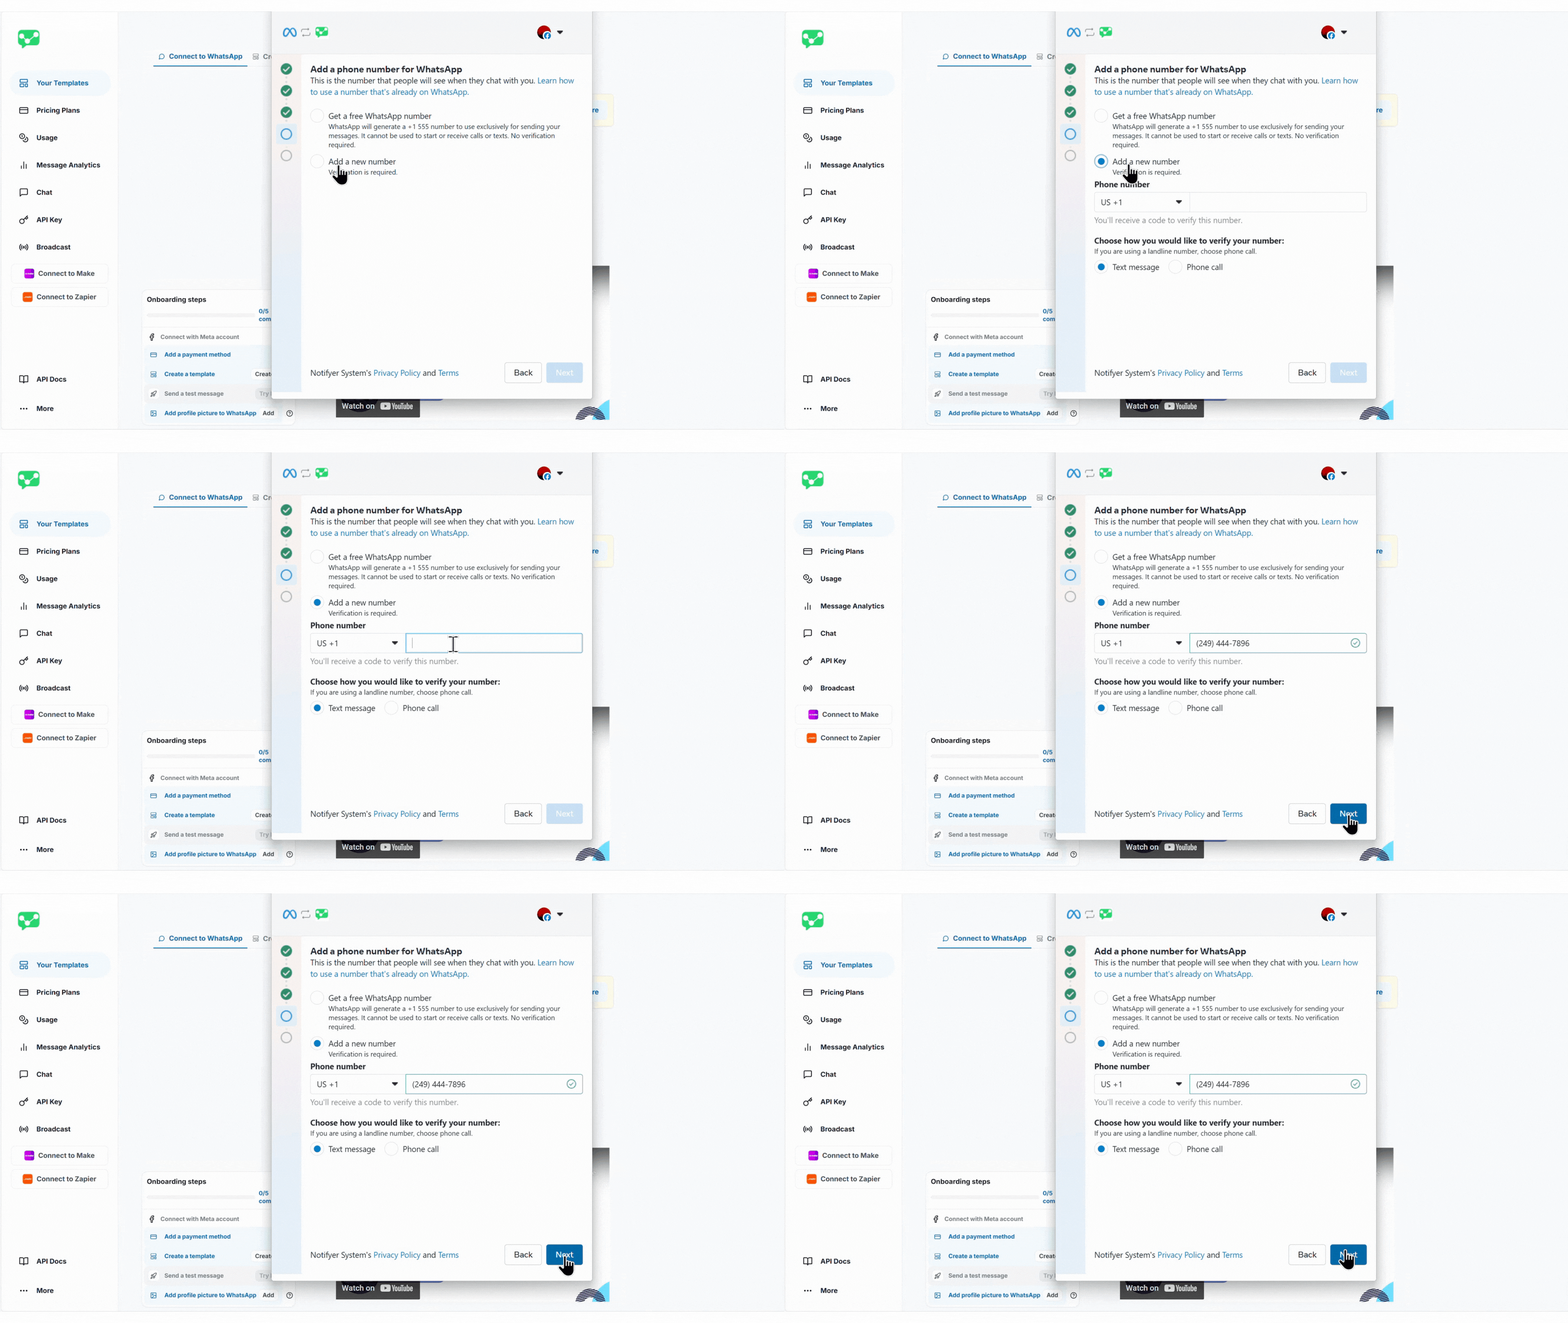
    <Accordion title="Step 4: Phone Number Configuration" icon="phone">
      <ResponseField name="Phone Number Method" type="radio" required>
        Choose how to add your phone number
      </ResponseField>

      <Expandable title="Phone Number Options">
        <ResponseField name="Add a new number (Recommended)" type="option">
          Use your own business phone number
        </ResponseField>

        <ResponseField name="Free WhatsApp number (Not Recommended)" type="option">
          WhatsApp will generate a +1 555 number (limited functionality)
        </ResponseField>
      </Expandable>

      <ResponseField name="Verification Method" type="radio" required>
        Choose how to receive your verification code
      </ResponseField>

      <Expandable title="Verification Options">
        <ResponseField name="Text message" type="option">
          Receive verification code via SMS
        </ResponseField>

        <ResponseField name="Phone call" type="option">
          Receive verification code via automated call
        </ResponseField>
      </Expandable>

      <br />

      <Frame caption="Entering required informstion in Create a WhatsApp business profile section">
        <img src="https://mintcdn.com/whatsable/denF9KomrZc8Vz_c/images/notifyer_emb6.gif?s=addfe936288ee23ac61ee4e280c7784d" alt="Entering required informstion in Create a WhatsApp business profile section" width="1920" height="1080" data-path="images/notifyer_emb6.gif" />
      </Frame>
    </Accordion>

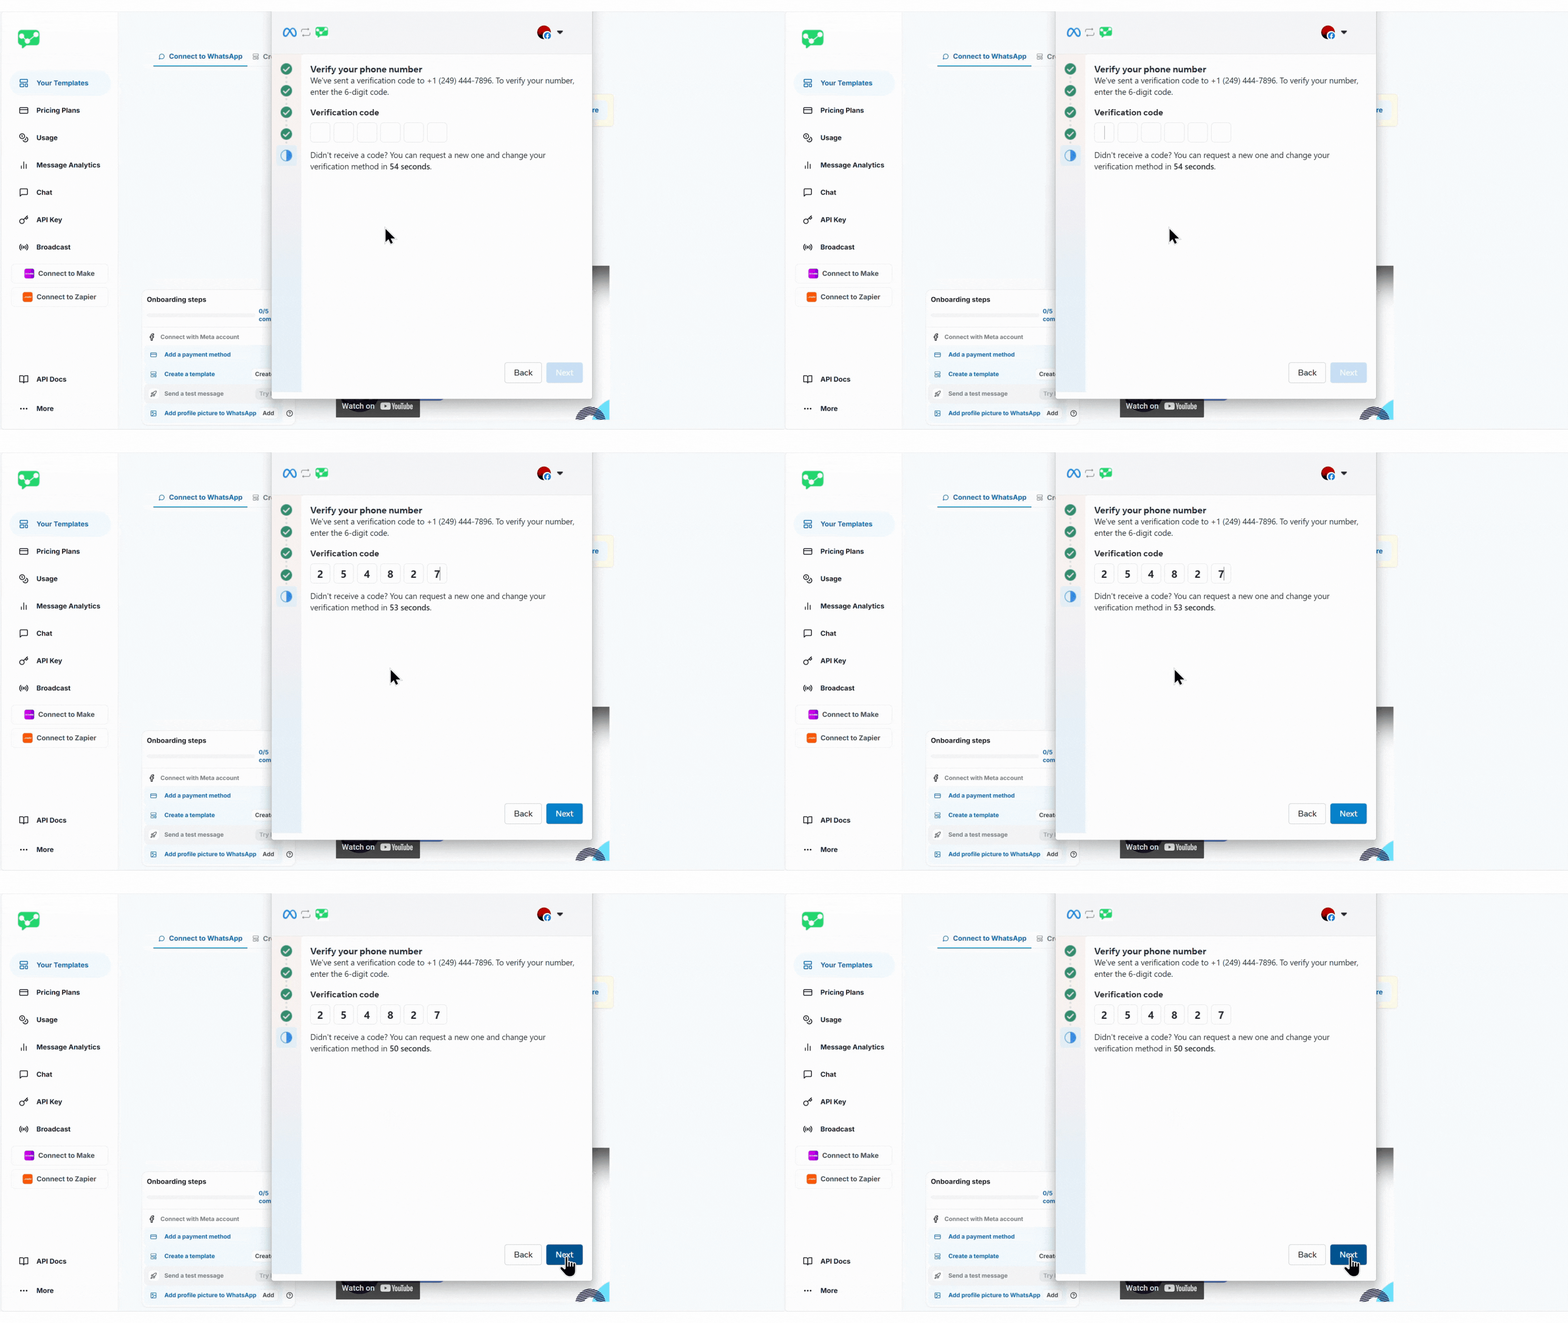
    <Accordion title="Step 5: Number Verification" icon="shield-check">
      Enter the verification code received via your selected method

      <Frame caption="Entering required informstion in Create a WhatsApp business profile section">
        <img src="https://mintcdn.com/whatsable/denF9KomrZc8Vz_c/images/notifyer_emb7.gif?s=5e4fe8c57cf1c46f55d21dcc317d84d2" alt="Entering required informstion in Create a WhatsApp business profile section" width="1920" height="1080" data-path="images/notifyer_emb7.gif" />
      </Frame>
    </Accordion>

    <Accordion title="Step 6: Payment Method Setup" icon="credit-card">
      1. After verification, you'll see a "You're now ready to chat with people on WhatsApp" screen
      2. Click the **Add Payment Method** button
      3. You'll be redirected to the Facebook Business "Billing & Payments" page
      4. Select "Payment Methods" from the left menu
      5. Ensure you're on the "WhatsApp Business accounts" tab
      6. Select your WhatsApp account from the dropdown (verify WhatsApp account ID)
      7. Click "Add Payment Method" and provide the required information
      8. Set your payment method as the default option
    </Accordion>
  </Step>

  <Step title="Complete Business Verification">
    <Warning>
      This step is critical for ensuring you can send messages without restrictions. Unverified businesses may experience limited functionality.
    </Warning>

    1. Navigate to Settings in your Facebook Business Manager
    2. Select "WhatsApp accounts" under the "Accounts" section
    3. Scroll down to the "Business verification" section
    4. Click "Start verification" to access the Security Center
    5. Complete the business verification process by providing the requested business information and documentation
  </Step>
</Steps>

## Account Dashboard Overview

Once your WhatsApp Business Account is connected, you'll have access to the following tabs in the "Your Templates" section:

<CardGroup cols={3}>
  <Card title="Sign Up" icon="user-plus">
    Connect your WhatsApp Business Account using the "Sign up with Facebook" option
  </Card>

  <Card title="Create Template" icon="pen-to-square">
    Design message templates and submit them to Meta for approval
  </Card>

  <Card title="Templates" icon="clipboard-list">
    View, manage, and monitor the approval status of your message templates
  </Card>
</CardGroup>

## Integration Options

After successfully embedding your WhatsApp Business Account, you can integrate Notifyer System with your preferred automation platform:

<AccordionGroup>
  <Accordion title="Make Integration" icon="lines-leaning">
    Connect Notifyer System with Make to create powerful automation workflows.

    [View Make Documentation →](https://docs.whatsable.app/guides/notifyer-system/make-overview)
  </Accordion>

  <Accordion title="Zapier Integration" icon="bolt">
    Integrate with Zapier to connect WhatsApp messaging with thousands of applications.

    [View Zapier Documentation →](https://docs.whatsable.app/guides/notifyer-system/zapier-overview)
  </Accordion>

  <Accordion title="n8n Integration" icon="diagram-project">
    Use n8n for advanced workflow automation with WhatsApp messaging.

    [View n8n Documentation →](https://docs.whatsable.app/guides/notifyer-system/n8n-overview)
  </Accordion>

  <Accordion title="Direct API Integration" icon="code">
    Implement custom integrations using our comprehensive API.

    [Try API Reference →](https://docs.whatsable.app/api-reference/introduction)
  </Accordion>
</AccordionGroup>

## API Reference

<CardGroup cols={3}>
  <Card title="Get Templates" icon="list" href="https://docs.whatsable.app/guides/notifyer-system/api/get-templates">
    Retrieve all your approved message templates
  </Card>

  <Card title="Send Template Message" icon="paper-plane" href="https://docs.whatsable.app/guides/notifyer-system/api/template-message">
    Send messages using your approved templates
  </Card>

  <Card title="Incoming Message" icon="inbox" href="https://docs.whatsable.app/guides/notifyer-system/api/incoming-message">
    Handle incoming messages from customers
  </Card>
</CardGroup>

<Card title="Try it in the API Reference" icon="arrow-right" href="https://docs.whatsable.app/api-reference/">
  Experiment with the Get Templates API and view responses in real-time
</Card>

## Alternative Option: Notifier

<Info>
  If the embedding process is too complex for your needs, you can use Notifier by WhatsAble instead, which allows you to send automated messages through our WhatsApp bot without going through the full embedding process.
</Info>

<Card title="Learn More About Notifier" icon="lightbulb" href="https://docs.whatsable.app/guides/notifier/zapier">
  Discover a simpler way to send automated WhatsApp messages using Notifier by WhatsAble
</Card>

## Troubleshooting

<Accordion title="Verification Failed" icon="triangle-exclamation">
  If your phone number verification fails:

  1. Ensure the phone number isn't already linked to a WhatsApp account
  2. Wait 24 hours before trying again with the same number
  3. Try a different verification method (SMS vs. call)
  4. Contact support if issues persist
</Accordion>

<Accordion title="Business Verification Issues" icon="building-shield">
  If you encounter problems with business verification:

  1. Ensure all business information is accurate and matches official documents
  2. Provide clear, high-quality images of requested documentation
  3. Allow 1-2 business days for verification review
  4. Submit an appeal if verification is rejected
</Accordion>

## Resources

<CardGroup cols={3}>
  <Card title="Meta Business Suite" icon="facebook" href="https://business.facebook.com">
    Manage your Meta business profiles and portfolios
  </Card>

  <Card title="WhatsApp Business Platform" icon="whatsapp" href="https://business.whatsapp.com/products/business-platform">
    Learn more about the WhatsApp Business Platform
  </Card>

  <Card title="Embedded Signup Guide" icon="link" href="https://developers.facebook.com/docs/whatsapp/embedded-signup">
    Meta's official documentation on embedded signup
  </Card>
</CardGroup>

## Need help?

Our support team is ready to assist you:

<CardGroup cols={3}>
  <Card title="Email support" icon="envelope" href="mailto:team@whatsable.app">
    Contact [team@whatsable.app](mailto:team@whatsable.app)
  </Card>

  <Card title="Schedule a demo" icon="calendar" href="https://tidycal.com/axelmeta/whatsapp-notifications-by-whatsable">
    Book a personalized walkthrough
  </Card>

  <Card title="Live chat" icon="message-dots" href="https://console.notifyer-systems.com/">
    Click the chat button in the bottom right corner of the Notifyer System dashboard
  </Card>
</CardGroup>